18 Melon Growing Hacks That Actually Work (Including One That Feels Like Cheating)
Growing melons in your backyard feels like a little summertime magic—especially when you finally cut into one and it’s bursting with sweetness. But I’ve had my fair share of disappointments too, from flavorless fruits to vines that barely grow. It turns out, a few simple tweaks can make a big difference.
Once I started using a couple of these tricks, my melons got sweeter, bigger, and way more consistent. Things like improving soil warmth, spacing the plants right, and watering smarter really changed the game. If you’ve been struggling like I did, these tips can seriously turn things around.
You don’t need fancy tools or a giant garden—just a few smart habits and a little patience. Let’s dive into the easiest ways to grow mouthwatering melons that’ll have you skipping the grocery store all summer long.
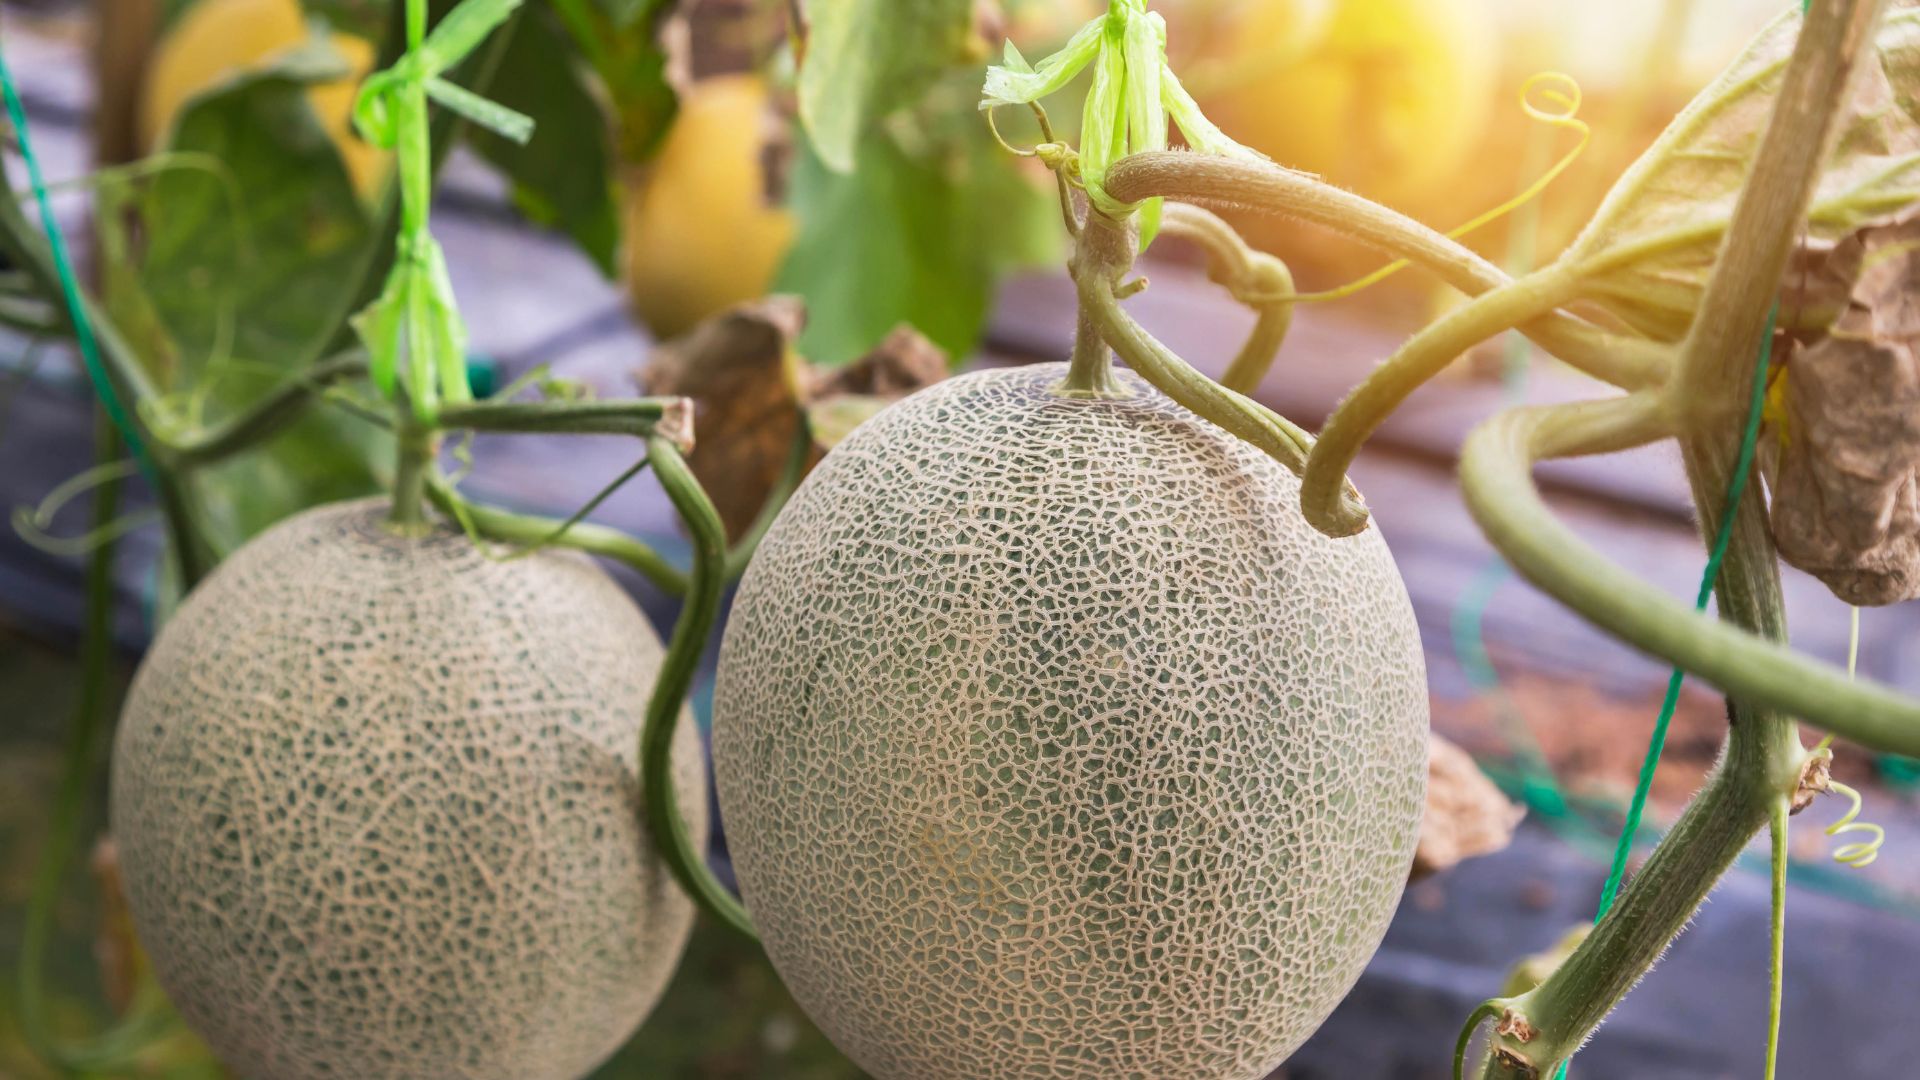
1. Plant In Black Plastic Mulch
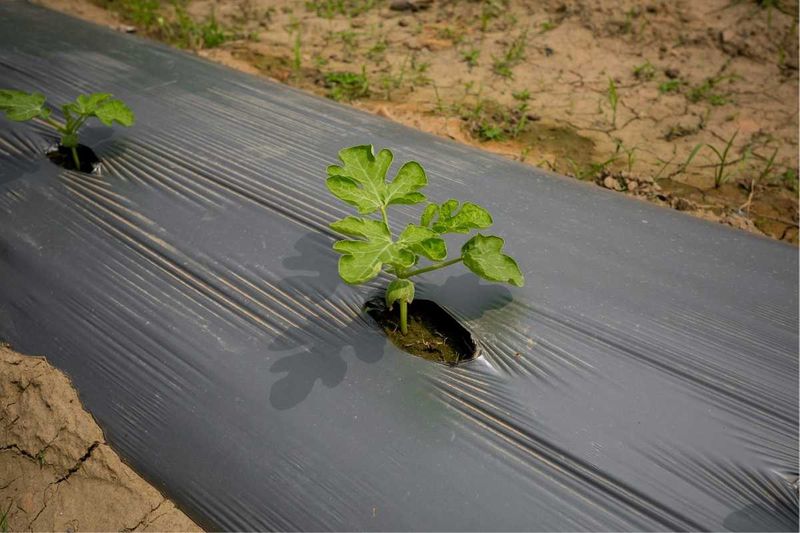
Black plastic mulch creates a powerful growing environment for heat-loving melons. The dark surface absorbs sunlight, warming the soil underneath by several degrees – exactly what melon roots crave for optimal development.
Lay the plastic down before planting, cut holes for your seedlings, and watch them take off. This method not only speeds growth but keeps weeds at bay and prevents fruit from sitting directly on damp soil where rot can develop.
I was skeptical about using plastic in my garden until I tried this technique. My melons matured two weeks earlier than usual, and the harvest nearly doubled compared to my unmulched plants.
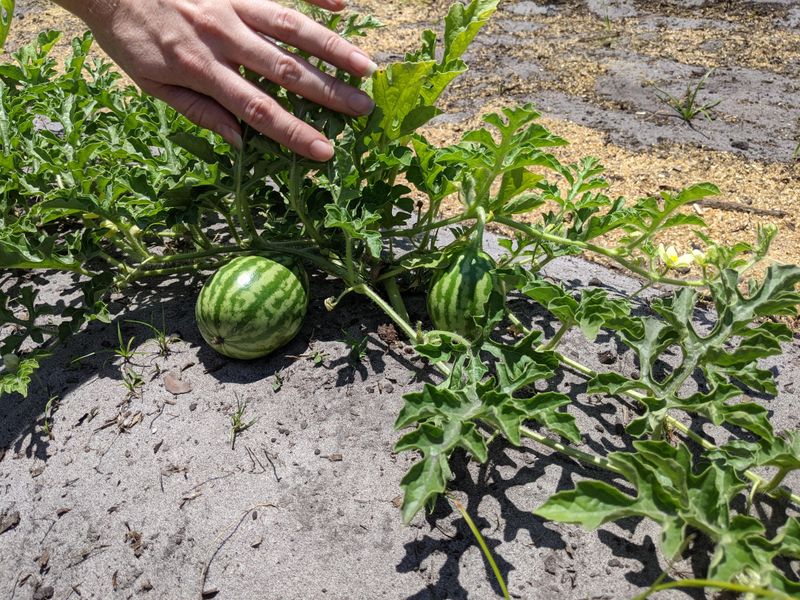
2. Prune To Three Main Vines

Selective pruning transforms sprawling melon plants into focused fruit-producing machines. When your seedlings develop about five leaves, identify the three strongest vines and snip off the others with clean scissors.
These remaining vines will receive all the plant’s energy, resulting in bigger melons rather than numerous small ones. Allow each main vine to produce just 2-3 fruits for maximum size and sweetness.
The first time I tried this approach, I worried I was damaging my plants. That concern vanished when I harvested melons nearly twice the size of previous years, with noticeably sweeter flesh and more pronounced aromas.
3. Female Flower Hand-Pollination
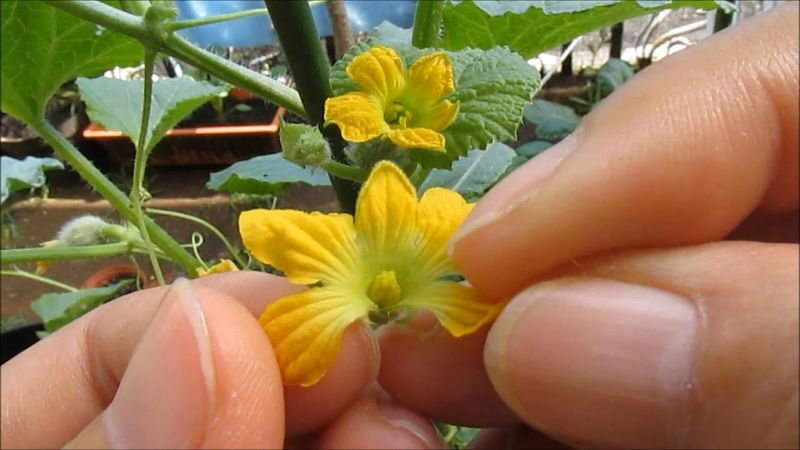
Boosting pollination rates dramatically increases your melon yield. Female flowers (the ones with tiny fruit behind the blossom) often need help connecting with male pollen, especially during rainy periods when bees are less active.
Simply pluck a male flower (no fruit behind it), remove its petals, and gently brush the center against several female flowers. Morning is best when pollen is most viable – I aim for between 6-10 AM.
After adopting this quick morning ritual in my garden, my successful fruit set rate jumped from about 60% to nearly 95%. It takes just minutes but makes a huge difference in your harvest success.
4. Bury Banana Peels Under Plants

Banana peels provide a powerful potassium boost that melons absolutely love. Before planting, dig holes about 8 inches deep and place 2-3 banana peels in each hole, then cover with a few inches of soil before adding your plants.
As the peels decompose, they release potassium that strengthens stems, improves disease resistance, and enhances fruit development. The slow-release nature of this method provides nutrients throughout the growing season.
My garden soil isn’t naturally potassium-rich, and I noticed my melons developed better color and sweetness after implementing this simple kitchen scrap hack. The difference in flavor was particularly noticeable in watermelons.
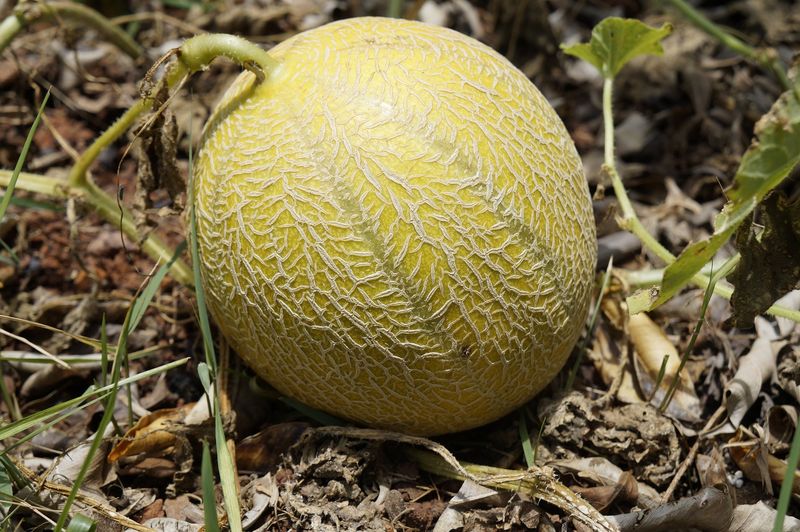
5. Elevate Fruits Off The Ground

Creating mini pedestals for your growing melons prevents rot and pest damage. Once fruits reach tennis ball size, place them on upturned flower pots, foam mesh fruit protectors, or even small squares of wood.
This simple elevation improves air circulation around the developing fruit, dramatically reducing the risk of belly rot and keeping bugs from accessing your precious melons. For larger varieties like watermelons, use sturdier supports that won’t collapse.
After losing several nearly-mature cantaloupes to ground rot last year, I implemented this technique. The results were immediate – not a single melon lost to rot, and the unblemished rinds made for prettier presentation when serving.
6. Water At The Base, Never The Leaves
Targeted watering prevents the fungal diseases that plague many melon crops. Using soaker hoses or careful hand-watering, deliver moisture directly to the soil around plants while keeping foliage completely dry.
Early morning watering gives any accidental splashes time to dry before evening, further reducing disease risk. Aim for deep, infrequent watering rather than frequent light sprinkles – this encourages roots to grow deeper and stronger.
When I switched from overhead sprinklers to soaker hoses, powdery mildew virtually disappeared from my melon patch. My plants remained healthy much longer into the season, allowing fruits to reach full maturity and maximum sweetness.
7. Honey Water Boost Two Weeks Before Harvest
This sweet hack significantly increases sugar content in your melons. Mix two tablespoons of honey with one gallon of water and apply this solution to your plants about 14 days before expected harvest.
The natural sugars and trace minerals are absorbed through the roots and transferred to the developing fruits. Apply this mixture once every three days for the two-week period, stopping all other fertilizers during this time.
My family could immediately tell which watermelons had received this treatment in a blind taste test – the honey-boosted fruits were consistently sweeter with more complex flavor profiles. This method works particularly well for melons grown in cooler climates.
8. Newspaper Beneath Developing Fruits
A layer of newspaper creates an effective barrier between your growing melons and the soil. Slide several sheets under each developing fruit once they reach about softball size.
The paper prevents direct soil contact that leads to rot, deters soil-dwelling insects, and reflects light back up to the fruit for more even ripening. The newspaper gradually breaks down over the season, adding organic matter to your soil.
During a particularly rainy summer, this technique saved my cantaloupe crop. While my neighbor lost many fruits to rot, my newspaper-protected melons stayed clean and healthy despite the excessive moisture. It’s surprisingly effective for such a simple solution.
9. Coffee Grounds For Nitrogen Boost

Used coffee grounds provide an ideal slow-release nitrogen source for hungry melon plants. Sprinkle a quarter-cup of grounds around each plant monthly, gently working them into the top inch of soil without disturbing roots.
The grounds gradually break down, feeding beneficial soil microbes while providing nutrients that support vigorous vine growth. As a bonus, many garden pests dislike the smell and texture of coffee grounds and will avoid treated areas.
After adding grounds to my melon beds, I noticed significantly greener foliage and stronger vines. My plants produced more female flowers than in previous years, which translated directly to increased fruit production.
10. Cardboard Collar Cutworm Protection
Young melon seedlings often fall victim to cutworms that chew through stems at soil level. Create protective collars from toilet paper tubes or small strips of cardboard formed into circles around each plant.
Push these collars about an inch into the soil, leaving 2-3 inches above ground. This physical barrier prevents cutworms from reaching your tender plants during their vulnerable early weeks, while eventually biodegrading into the soil.
After losing half my seedlings one spring, I implemented this simple protection method. The following season, I didn’t lose a single plant to cutworms, and the collars naturally broke down by mid-season when plants were strong enough to resist damage.
11. The “Thumping Test” For Perfect Ripeness
Mastering the thumping technique helps you harvest melons at peak sweetness. Tap the melon with your knuckles – underripe fruits produce a higher-pitched sound, while perfectly ripe ones create a deeper, hollow-sounding thump.
For watermelons, look for the spot touching the ground to turn creamy yellow, not white or pale green. Cantaloupe and honeydew should develop a subtle, sweet aroma and slight give at the stem end when ripe.
After years of cutting into disappointingly underripe melons, this method transformed my harvest timing. I now pick melons at their absolute flavor peak instead of guessing based on calendar dates or appearance alone.
12. Milk Spray For Powdery Mildew Prevention
A simple milk solution acts as a powerful preventative against powdery mildew, a common melon plant disease. Mix one part milk with nine parts water and spray this solution on plants weekly during the growing season.
The proteins in milk create an environment hostile to fungal spores when exposed to sunlight. Apply in morning so leaves dry completely before evening, focusing on covering both top and bottom leaf surfaces.
This organic solution replaced chemical fungicides in my garden three years ago. My melon plants now remain disease-free through the entire season, even during humid periods when powdery mildew typically runs rampant.
13. Companion Plant With Nasturtiums
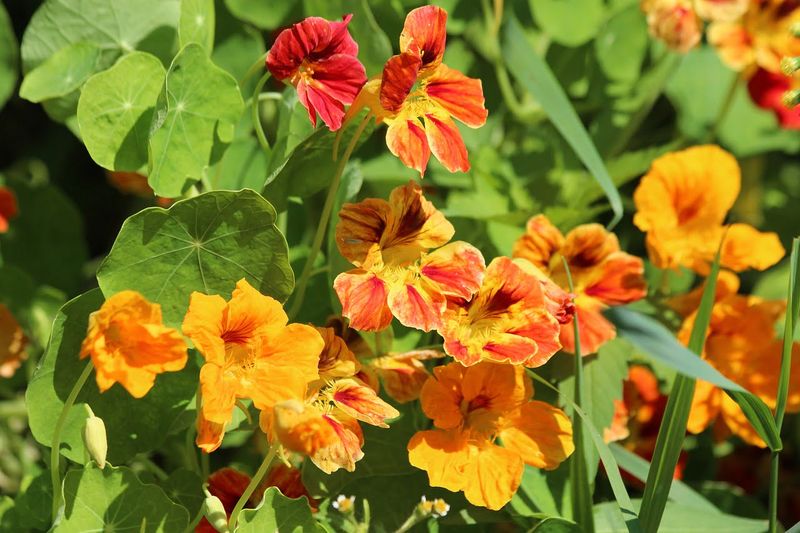
Nasturtiums create the perfect partnership with melon plants in your garden. These bright flowers attract pollinators while simultaneously luring aphids away from your valuable melon vines – essentially serving as sacrificial plants.
Plant nasturtiums every few feet around your melon patch, creating a living border that provides both protection and beauty. Their shallow root systems don’t compete with the deeper melon roots for nutrients or water.
Adding nasturtiums transformed my gardening experience. Beyond the practical pest management benefits, the vibrant flowers brought beneficial insects that improved pollination rates. My melon yields increased by about 30% the very first season.
14. Plastic Bottle Cloche For Early Planting
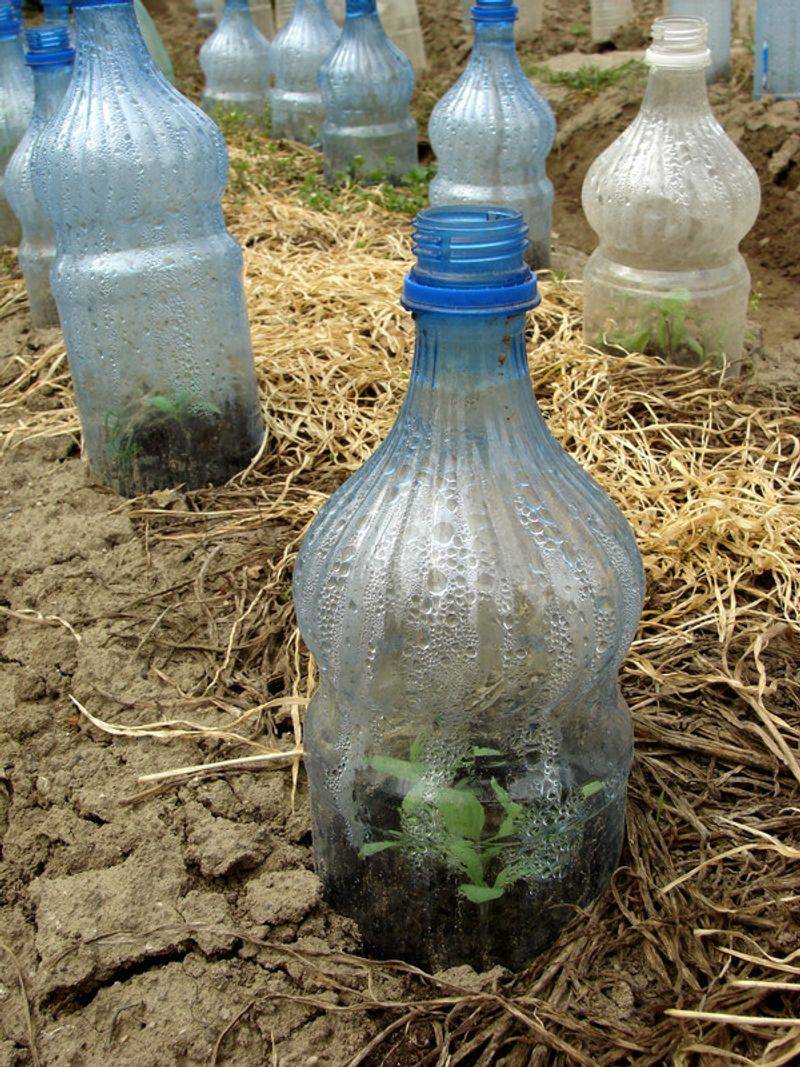
Transform plastic bottles into mini-greenhouses that allow for earlier planting. Cut the bottom off clean 2-liter bottles and place them over young seedlings, pressing slightly into the soil to secure them.
These makeshift cloches trap heat while protecting tender plants from cold nights, wind, and pests during the critical early growth stage. Remove caps during warm days to prevent overheating, then replace them at night for maximum protection.
Using this technique, I successfully planted melons three weeks earlier than normally possible in my climate. This head start meant my plants were already flowering by the time I would typically just be putting seedlings in the ground.
15. Epsom Salt Solution For Magnesium Boost
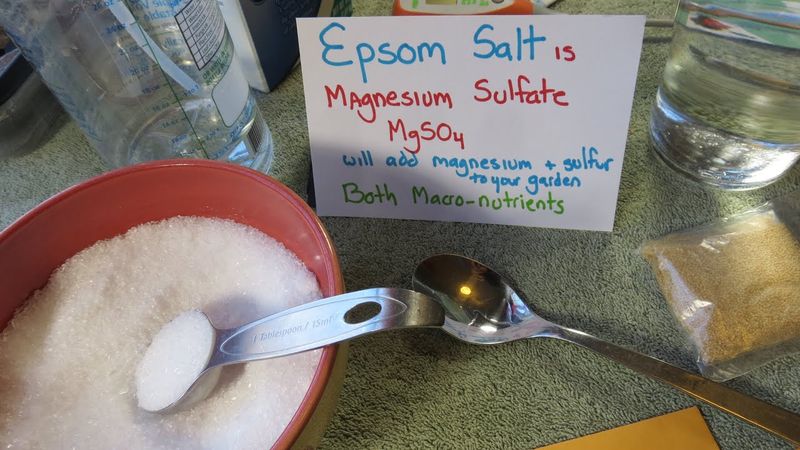
Epsom salt delivers a crucial magnesium supplement that enhances melon sweetness and size. Dissolve one tablespoon of Epsom salt in a gallon of water and apply this solution to your plants monthly throughout the growing season.
Magnesium plays a key role in chlorophyll production and sugar development in fruits. You can also sprinkle dry Epsom salt (about a teaspoon) around each plant before watering for a slower-release effect.
The difference became obvious when I started using this solution on half my melon patch as an experiment. The treated plants produced fruits with noticeably brighter flesh colors and consistently higher sugar content, particularly in honeydew varieties.
16. Vinegar-Sugar Trap For Fruit Flies
Protect ripening melons from destructive fruit flies with this simple trap. Mix equal parts apple cider vinegar and sugar in a small container, add a drop of dish soap, then place several of these traps around your melon patch.
The sweet-sour scent attracts fruit flies, while the soap breaks surface tension, causing them to sink rather than land and escape. Replace the mixture weekly or after heavy rain for continuous protection throughout the harvest season.
After watching fruit flies damage my nearly-ripe cantaloupes one summer, I deployed these traps the following year. The reduction in pest pressure was dramatic – the traps filled with flies while my melons remained untouched.
17. Vertical Growing With Pantyhose Hammocks
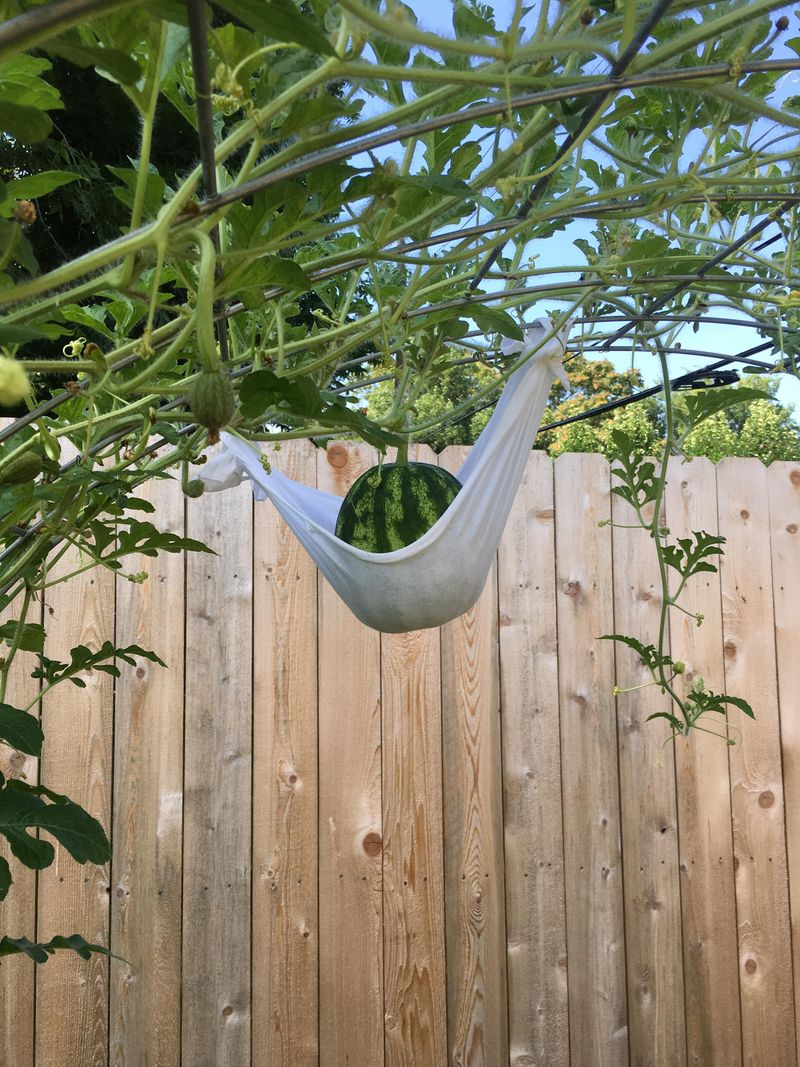
Growing melons vertically saves valuable garden space while improving air circulation. Train vines up sturdy trellises, then create supportive hammocks for developing fruits using old pantyhose or stretchy fabric strips.
Tie the fabric to the trellis, forming slings that cradle each melon as it grows, preventing stem breakage from increasing weight. The elastic nature of pantyhose allows fruits to expand naturally while providing reliable support.
My urban garden space tripled its melon production after implementing vertical growing. Beyond the benefits, I found the elevated fruits developed more uniform shapes and colors, with virtually no pest damage compared to ground-grown melons.
18. Store-Bought Seedling Surgery
Here’s the hack that feels like cheating: Purchase healthy seedlings from garden centers, then perform “seedling surgery” before planting.
Gently remove seedlings from their containers and carefully tease apart the root ball, spreading roots horizontally. Dig a wide, shallow hole rather than a deep one, arranging roots outward like spokes of a wheel.
This radical root restructuring encourages plants to establish broader, more efficient root systems instead of continuing the circular growth pattern from their containers.
My melons developed noticeably faster after I started using this technique – reaching maturity nearly two weeks earlier than conventionally planted seedlings. The restructured root systems accessed nutrients more effectively, producing larger fruits with enhanced flavor.