Oregon Guide To Spring Transplanting After Winter Sowing
There’s a certain pride that comes with starting seeds through winter and watching them push through cold, damp conditions. By the time spring rolls around in Oregon, those seedlings are ready for their next step, but timing that move can feel a bit uncertain.
Transplant too early and they struggle with sudden changes. Wait too long and they start crowding each other out.
Many gardeners hit this moment every year, wondering when to make the shift from protected containers to open garden beds.
The weather doesn’t always give clear signals, and conditions can change quickly across different parts of the state.
A careful transition can help seedlings adjust better and continue growing without unnecessary setbacks, leading to sturdier plants that handle outdoor conditions with more confidence.
1. Harden Off Seedlings Gradually Outdoors
Most gardeners do not realize that moving seedlings straight from a warm indoor space to the open garden is one of the fastest ways to stress a young plant. Hardening off is the process of slowly introducing your seedlings to outdoor conditions, and in Oregon, it is absolutely essential.
The Pacific Northwest brings unpredictable spring weather, with cool mornings, gusty winds, and occasional rain, all of which can overwhelm a plant that has never experienced them.
Start by placing your seedlings outside in a sheltered spot for just two to three hours on the first day. A covered porch or the shaded side of a fence works perfectly.
Gradually increase the time outdoors over the next week or two, slowly introducing more sunlight and cooler air. By the end of this process, your plants should be able to handle a full day outside without wilting or showing stress.
Oregon winters can leave seedlings soft and fragile, especially if they sprouted in a warm garage or greenhouse. Skipping the hardening process often leads to leaf scorch, wilting, and stunted growth after transplanting.
Taking it slow pays off in a big way. Plants that are properly hardened off adapt faster, grow stronger roots, and produce better harvests throughout the season.
Think of it as building endurance for your garden, one hour at a time.
2. Allow 7 To 10 Days For Adjustment
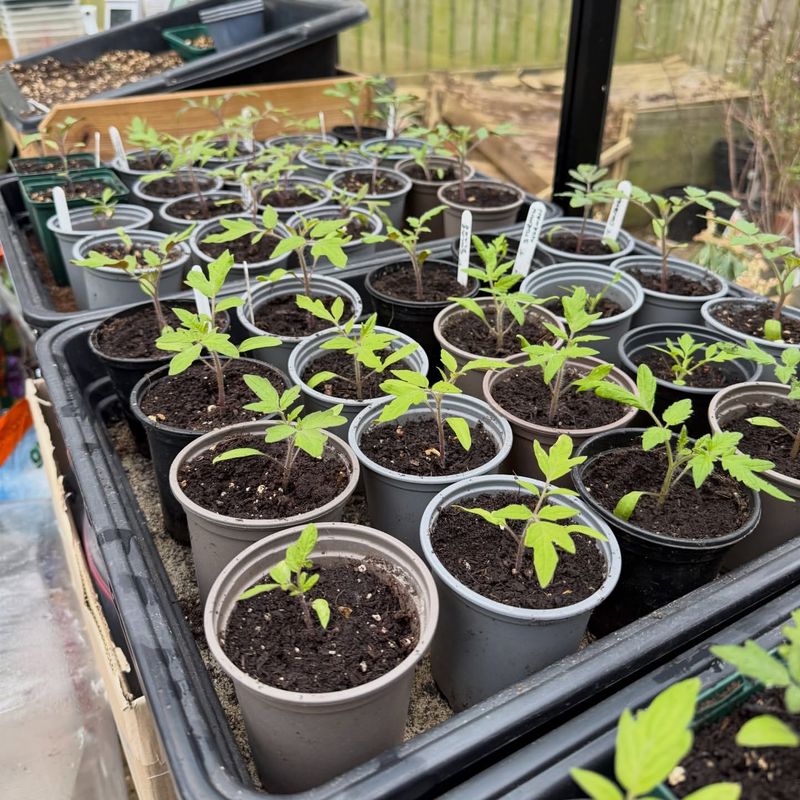
Patience is genuinely a gardener’s best tool, especially during spring in Oregon. Once you begin the hardening off process, committing to a full seven to ten days gives your seedlings the adjustment window they truly need.
Rushing this step, even by just a couple of days, can leave plants vulnerable to cold snaps or wind damage that set back their growth significantly.
During this period, watch your seedlings closely for signs of stress. Yellowing leaves, drooping stems, or brown edges are signals that the transition is happening too fast.
If you notice any of these signs, pull back and give them more time in a sheltered spot before pushing them further. Oregon’s spring weather can shift quickly, so always check the forecast before leaving seedlings out overnight.
A helpful tip for Willamette Valley gardeners is to use this adjustment window alongside Oregon’s natural weather rhythms. Cool, cloudy days are actually perfect for outdoor exposure because they reduce the risk of sunscald on tender leaves.
On warmer, sunny days, start with morning light and move plants to shade in the afternoon. By day ten, most seedlings will stand firm, look healthy, and be ready for their permanent spot in the garden.
That ten-day investment pays dividends all season long.
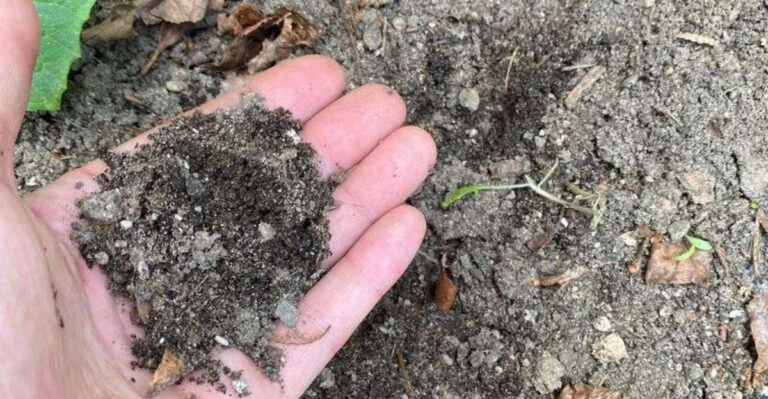
3. Wait For Workable, Not Waterlogged Soil
Oregon springs are famously wet, and that moisture is both a blessing and a challenge for gardeners. One of the most common mistakes made after winter sowing is transplanting too early into soil that is still saturated from winter rains.
Waterlogged soil compacts easily when you walk on it or dig in it, and it suffocates young roots by blocking the oxygen they need to grow.
A simple squeeze test tells you everything. Grab a handful of soil and squeeze it firmly.
If water drips out or the clump stays in a tight, slick ball, the soil is too wet to work. If it crumbles apart easily after you open your hand, it is ready.
In many parts of Oregon, especially the Willamette Valley and coastal areas, gardeners often need to wait until late March or even April before soil reaches a workable state.
Raised beds are a smart solution for Oregon gardeners who struggle with heavy clay soils that drain slowly. They warm up faster and dry out more quickly than in-ground beds, which means you can start transplanting sooner.
Adding a layer of straw or mulch over the soil surface during winter also helps shed excess moisture and keeps the soil structure loose. Waiting for the right soil conditions is not wasted time, it is preparation that directly protects your transplants.
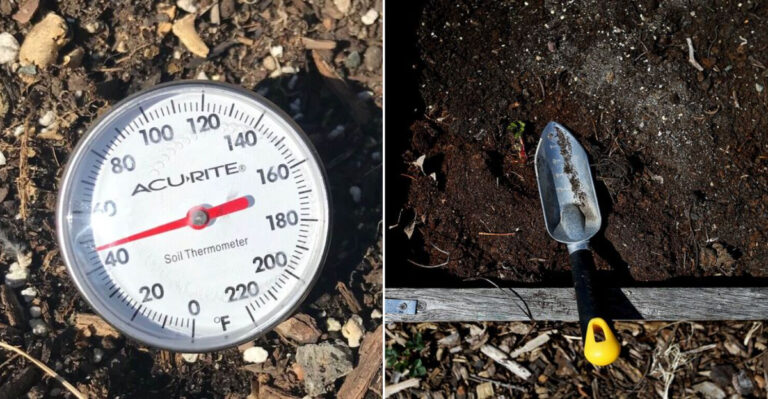
4. Follow Soil Temperature, Not Just Dates
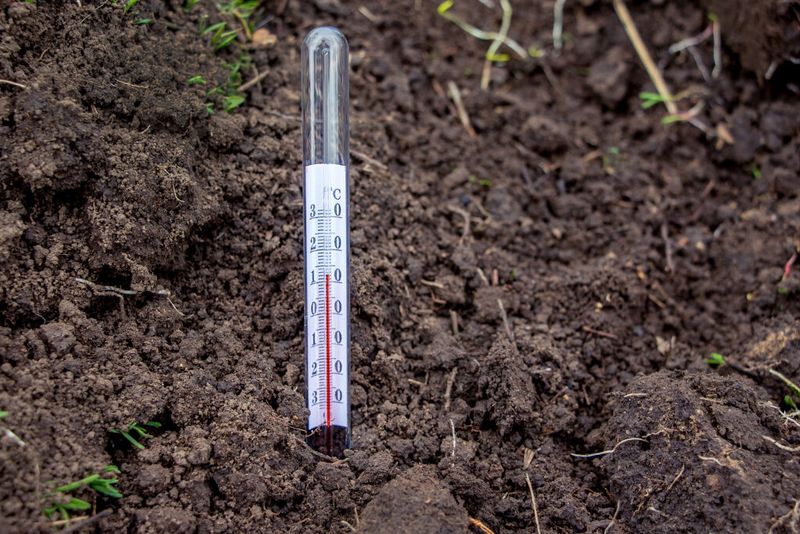
Calendar dates are a starting point, not a guarantee. Many Oregon gardeners have learned the hard way that planting by the calendar alone, without checking actual soil temperature, can leave transplants struggling in cold, slow-draining ground.
Soil temperature directly controls how fast roots grow, how well nutrients are absorbed, and whether beneficial soil organisms are active enough to support new plants.
Most warm-season vegetables like tomatoes, peppers, and squash need soil that is consistently at least 60 degrees Fahrenheit to thrive. Cool-season crops like lettuce, kale, and broccoli can handle soil temperatures as low as 40 degrees.
A basic soil thermometer, available at most garden centers across Oregon, takes the guesswork out of transplanting timing entirely. Check the temperature at a depth of two to three inches in the morning for the most accurate reading.
In Oregon, soil temperatures in the Willamette Valley typically reach 50 degrees around mid-March, but higher elevation areas or north-facing garden beds may take several more weeks to warm up. South-facing beds and raised beds warm up earlier, making them ideal spots for your first transplants of the season.
Tracking soil temperature rather than just watching the calendar gives you a real advantage, especially in a state where spring weather shifts as often as it does in Oregon.
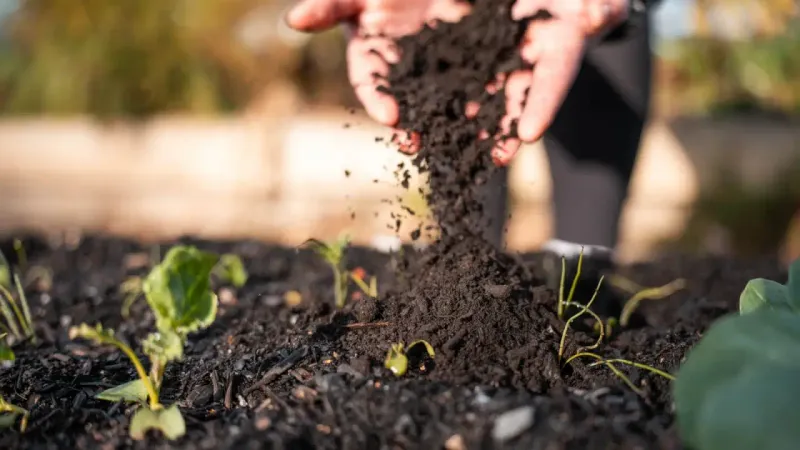
5. Add Organic Matter Before Planting
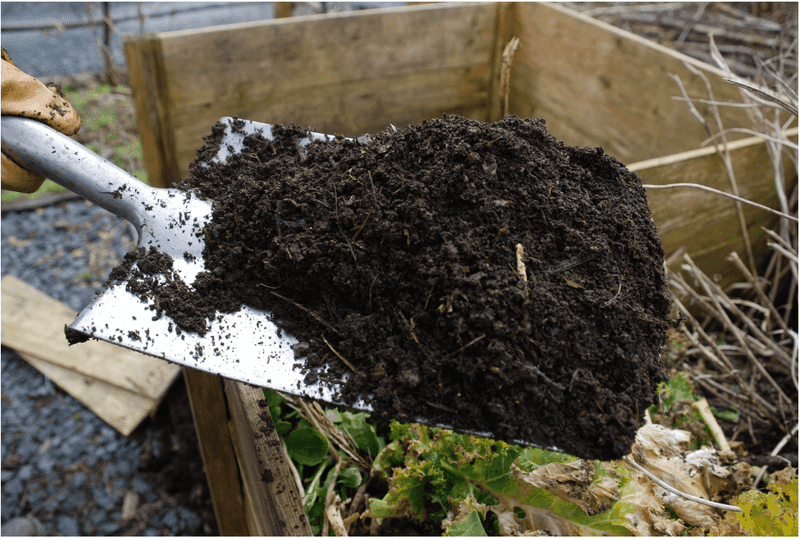
Rich, living soil is the foundation of every successful garden, and in Oregon, building that foundation before transplanting makes a noticeable difference. Adding organic matter, like compost, aged manure, or worm castings, improves drainage in heavy clay soils, helps sandy soils hold moisture, and feeds the beneficial microbes that make nutrients available to plant roots.
Work a two-to-three-inch layer of finished compost into the top eight to ten inches of your garden bed before transplanting. This single step improves soil structure, boosts nutrient levels, and creates the loose, airy texture that roots love.
Oregon State University Extension recommends compost as one of the most effective and affordable soil amendments available to home gardeners anywhere in the state.
If you have been composting your kitchen scraps or yard waste over the winter, spring is the perfect time to put that material to work. If your compost is not fully broken down, it is best to let it finish decomposing before mixing it into planting beds.
Local garden centers across Oregon also carry bagged compost and soil amendments if you need a quick option. Well-amended soil holds water more evenly, reduces the need for fertilizer, and gives transplants a genuinely warm and nourishing welcome.
A little prep work before planting goes a long, long way.
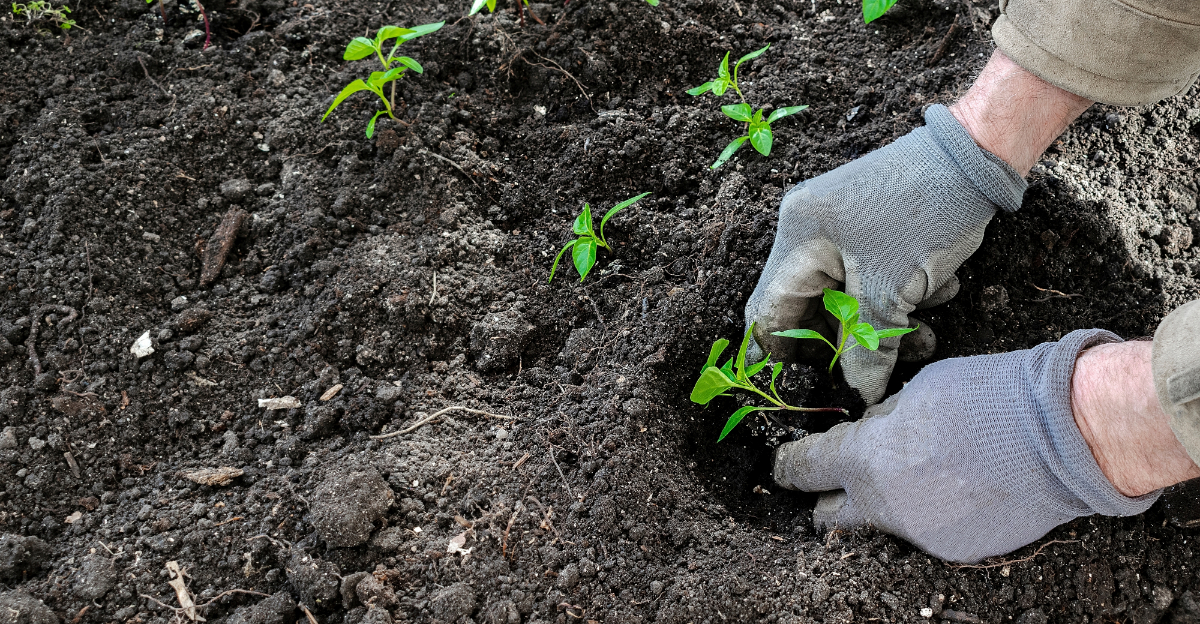
6. Transplant At The Same Soil Depth

Planting depth might seem like a small detail, but it has a big impact on how well your transplants establish themselves. Most seedlings should go into the ground at exactly the same depth they were growing in their containers.
Burying the stem too deep can cause rot in wet Oregon soils, while planting too shallow exposes roots to drying out and temperature swings.
Tomatoes are one of the few exceptions to this rule. They can actually be planted deeper than their original container level because they develop roots along their buried stems.
For nearly every other vegetable and flower, however, matching the original soil depth is the safest and most effective approach. Before placing each seedling, dig a hole slightly wider than the root ball to give roots room to spread without being cramped or bent.
After placing the transplant, firm the soil gently around the base to remove air pockets, then water thoroughly. In Oregon’s spring climate, where cool temperatures and moisture are plentiful, air pockets around roots can actually encourage fungal issues, so good soil contact matters.
Label your transplants as you go so you can track which varieties are performing best in your specific Oregon microclimate. Consistent planting depth across your entire garden leads to more even growth, better water distribution, and healthier plants overall from the very first week in the ground.
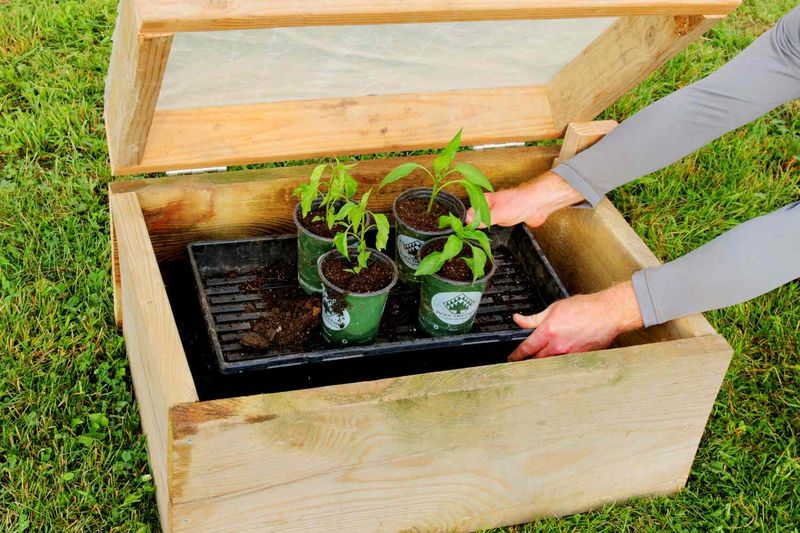
7. Use Protection Like Cold Frames Early On
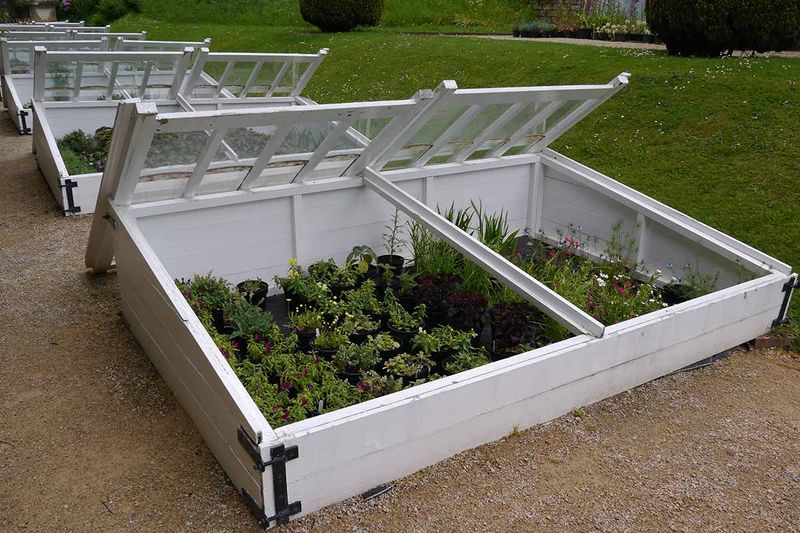
Even after you have hardened off your seedlings and checked all the right conditions, Oregon’s early spring weather can still throw a surprise frost your way. Cold frames are one of the most reliable tools a gardener can use to bridge the gap between late winter and the fully frost-free days of late spring.
They work by trapping heat from the sun during the day and holding it around plants at night.
A basic cold frame is simply a box with a clear lid, usually made from an old window or polycarbonate panel. You can build one yourself for very little money using scrap lumber and a recycled window sash.
Place it directly over your transplants and open the lid on warm, sunny days to prevent overheating. On nights when temperatures drop below 35 degrees Fahrenheit, keep the lid closed to protect against frost damage.
Row covers and cloches are other affordable options that work just as well for smaller plantings. Garden centers throughout Oregon carry these supplies every spring, and many gardeners swear by them for extending the growing season on both ends.
Using cold frame protection during the first two to three weeks after transplanting gives your seedlings a sheltered environment to finish adjusting. Once nighttime temperatures stay consistently above 40 degrees, you can remove the protection and let your garden grow freely in the Oregon spring air.