What Oregon Gardeners Should Do To Hydrangeas In June After Buds Appear
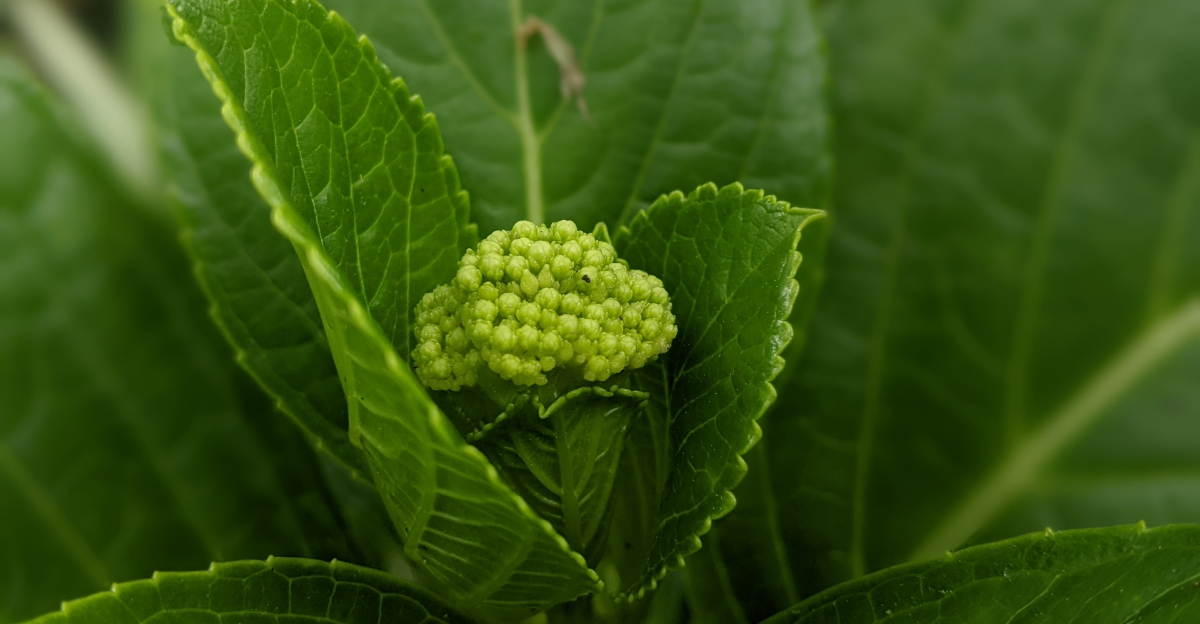
Hydrangea buds can make June feel exciting, but they also raise the stakes. One wrong move now can mean fewer flowers right when the plant is getting ready to show off.
Oregon weather adds its own twist, with warm afternoons, cool nights, and soil that can shift quickly after rain fades.
This is the moment to stop treating hydrangeas like sleepy spring shrubs and start paying closer attention.
Buds are a sign that the plant is using real energy. Water, light, mulch, and pruning choices all matter more than they did a few weeks ago.
The goal is to support the blooms without interrupting them. Handle hydrangeas wisely in June, and those small buds can turn into the big, lush flowers that make the whole garden feel worth the wait.
1. Stop Pruning Once Buds Are Easy To See

Most gardeners know that timing matters when it comes to pruning, but once those buds become clearly visible, it is time to put the shears away for good.
Cutting stems now means cutting off the very blooms you have been waiting for all spring. Even trimming just a few inches can remove bud clusters that were weeks in the making.
Many hydrangea varieties in this state form their buds on old wood, which means the growth from last year is what carries the flowers.
If you prune after buds appear, you are not just delaying blooms, you are removing them entirely for the season.
That is a frustrating mistake that is very easy to avoid once you understand the timing.
A good habit is to do any shaping or light pruning in late summer right after blooms fade, or in very early spring before new growth starts. June is not the time for cutting.
Walk through your garden and simply observe instead. Look at how the buds are positioned and how many stems are loaded with potential flowers.
If you spot a stem that looks truly dead or broken, you can carefully remove just that one. Otherwise, resist the urge to tidy things up too aggressively.
Patience pays off big when hydrangeas are involved. Let the plant do its thing and save the pruning tools for a better time of year.
2. Know Whether Your Hydrangea Blooms On Old Or New Wood

Not all hydrangeas behave the same way, and understanding how your specific plant blooms can save you a lot of confusion. Some varieties bloom on old wood, which is the stems that grew the previous year.
Others bloom on new wood, meaning the stems that grew this current season. A few newer varieties can do both.
Bigleaf hydrangeas, also called mopheads and lacecaps, are the most common type grown here and they almost always bloom on old wood.
That means any cold snaps, late frosts, or heavy pruning during the wrong time can wipe out your blooms before they even get started.
Smooth hydrangeas and panicle types bloom on new wood, so they are more forgiving if something goes wrong early in the season.
Checking a plant tag or doing a quick search for your specific variety name can tell you exactly what you are working with. Once you know, everything else becomes easier.
You will know when to prune, when to protect, and what to expect each June.
Gardeners in cooler, higher elevation parts of our state sometimes struggle more with old wood bloomers because late frosts can damage those precious buds.
Knowing your variety helps you plan ahead and take the right steps at the right time. A little research now saves a lot of heartbreak later in the season.
3. Remove Only Damaged Or Weak Stems

Even though big pruning is off the table once buds appear, there is still one thing worth doing.
Scanning your plant for stems that are clearly damaged, broken, or too weak to support growth is a smart use of your time in June.
Removing these problem stems helps the plant focus its energy on the healthy ones that are already budding up nicely.
A damaged stem is usually easy to spot. It may look brown or gray all the way through when you gently scratch the surface with your fingernail.
A healthy stem will show green underneath. Weak stems are thin, spindly, and often growing inward or crossing other branches in awkward ways.
These rarely produce good blooms anyway.
When you remove a problem stem, cut it cleanly at the base using sharp, clean pruners. A clean cut heals faster and reduces the chance of disease entering the wound.
Avoid tearing or breaking stems by hand, since ragged cuts are harder for the plant to recover from.
This kind of light cleanup is different from full pruning. Think of it as housekeeping rather than shaping. You are just clearing out what is not working so the rest of the plant can thrive.
Most healthy hydrangeas in this state will have only one or two stems that need this treatment in June. Keep the work minimal and targeted for the best results.
4. Keep Soil Evenly Moist As Buds Develop

Few things matter more to a budding hydrangea than consistent moisture in the soil. Once those buds start forming and growing, the plant is working hard and pulling a lot of water up through its roots.
If the soil dries out unevenly, the plant gets stressed and may drop buds or produce smaller, weaker flowers.
Even moisture does not mean soggy soil. Hydrangeas do not like sitting in water, and poorly drained beds can lead to root problems over time.
The goal is soil that feels like a wrung-out sponge, damp throughout but never waterlogged. Checking the soil about two inches down is a reliable way to know if watering is needed.
Our state’s June weather can be tricky. Some years bring steady rain through the month, while others turn dry and warm faster than expected.
Do not rely on rainfall alone to keep your hydrangeas happy. Pay attention to how quickly the soil dries out in your specific garden spot, since sun exposure and soil type both affect moisture levels.
Container-grown hydrangeas need even more attention since pots dry out much faster than in-ground beds. Check them every day during warm spells.
Setting up a simple drip irrigation system or soaker hose around your hydrangeas can make consistent moisture much easier to manage without constant hand watering. Your buds will thank you for the steady supply.
5. Water Deeply During Dry June Stretches

When a dry stretch hits in June, shallow watering is not enough to protect developing buds. Light watering only wets the top layer of soil, which encourages roots to stay near the surface.
Surface roots are much more vulnerable to heat and drought than deep roots that reach further down into cooler, stable soil.
Deep watering means letting water soak slowly into the ground around the root zone. A slow trickle from a hose left near the base of the plant for 20 to 30 minutes is far more effective than a quick sprinkle from above.
The goal is to wet the soil at least six to eight inches deep, which is where most of the active roots are feeding.
Watering in the morning is the best timing. Morning watering gives leaves time to dry before evening, which helps prevent fungal issues that hydrangeas can sometimes struggle with.
Wet foliage sitting overnight creates conditions that fungi love, and June in this state can be humid enough to make that a real concern.
Avoid overhead sprinklers if you can. Water landing directly on buds and flowers can cause spotting and may weaken delicate new growth. Directing water at the base of the plant is always the smarter approach.
During a dry June week, watering every two to three days with deep soaks will keep your hydrangeas strong and blooming on schedule without unnecessary stress.
6. Refresh Mulch To Keep Roots Cool

Mulch is one of the most underrated tools in any gardener’s kit, especially during June when soil temperatures start climbing. A fresh layer of mulch around your hydrangeas does several important things at once.
It holds in moisture, keeps roots cooler on warm days, and slowly breaks down to feed the soil over time.
If you already have mulch from earlier in the season, June is a great time to check its depth and refresh it if needed. Mulch breaks down and compacts over time, losing its effectiveness.
Aim for a layer about two to three inches deep around the base of the plant. Keep it pulled back a few inches from the main stem to prevent moisture from collecting right against the wood, which can cause rot.
Wood chips, shredded bark, and compost are all solid choices for hydrangeas. Avoid thick rubber mulches or anything that blocks air from reaching the soil.
Organic mulches are best because they improve soil health as they break down, which benefits roots in the long run.
On hot June afternoons, bare soil around hydrangeas can heat up quickly and stress roots just when the plant needs stability most. A proper mulch layer acts like a blanket that keeps things steady below the surface.
Spending 20 minutes refreshing your mulch now can protect your plant through the warmest weeks of the summer ahead.
7. Avoid Heavy Nitrogen Once Buds Are Forming

Fertilizing at the wrong time with the wrong product is one of the most common mistakes gardeners make in June.
Once buds are clearly forming on your hydrangeas, high-nitrogen fertilizers can actually work against you.
Nitrogen pushes leafy, green growth, which sounds good in theory but can come at the expense of flowers.
When a plant gets a big nitrogen boost right before it is about to bloom, it often redirects energy into making more leaves and stems instead of developing those buds fully.
You end up with a lush, green plant that produces fewer or smaller blooms. That is the opposite of what most gardeners are hoping for in summer.
If you want to feed your hydrangeas in June, look for a fertilizer with a lower first number on the label. The three numbers on fertilizer bags represent nitrogen, phosphorus, and potassium.
A product higher in phosphorus supports root strength and flower development, which is exactly what you want right now.
Slow-release granular fertilizers applied in early spring are often the best approach overall. They feed gradually and do not cause the sudden growth surges that liquid nitrogen products can trigger.
If you missed the spring window, hold off on feeding until after blooms appear and then use a balanced product sparingly. Less is often more when it comes to fertilizing hydrangeas once buds are on the way.
8. Check For Slugs Around Soft New Growth

Slugs are a real problem in this part of the country, and June is prime time for them. The cool, moist conditions that make our state such a great place to garden also happen to be exactly what slugs love.
They are most active at night and on cloudy days, quietly chewing through soft new growth and young buds before you even notice they are there.
Look for the telltale signs during your regular garden walks. Ragged holes in leaves, shiny slime trails on stems or soil, and chewed bud tips are all signs that slugs have been visiting.
Check under leaves and around the base of the plant where slugs like to hide during the day. They often tuck themselves into mulch or under debris near the soil line.
There are several ways to manage slugs without harsh chemicals. Copper tape placed around pots creates a barrier that slugs avoid.
Iron phosphate-based slug baits are effective and considered safe around pets and wildlife. Diatomaceous earth sprinkled around the base of plants can also deter them, though it needs reapplying after rain.
Hand-picking slugs at night with a flashlight is surprisingly effective if you have a small garden. Drop them into soapy water to remove them from the area.
Staying consistent with checks every few days keeps populations from exploding and gives your soft new hydrangea growth the best chance to develop undisturbed.
9. Wait To Deadhead Until Flowers Actually Fade

Deadheading feels satisfying, and it is a good habit for many flowering plants. But with hydrangeas in June, patience is the smarter move.
Once buds appear and begin opening into flowers, resist the urge to start cutting off anything that looks even slightly past its peak. Flowers that look a little tired may still be supporting the plant in important ways.
Hydrangea blooms go through several stages. What looks like a fading flower in early to mid June might just be transitioning from one color phase to the next.
Many varieties shift from white to pink or from bright blue to a softer dusty hue as the season progresses. These color changes are normal and often quite beautiful in their own right.
Cutting blooms too early can also remove developing side buds on the same stem. Some hydrangea varieties set additional flower clusters lower on a stem, and clipping the top too soon removes the signal the plant uses to push those secondary buds forward.
Wait until a bloom is clearly brown, papery, and fully spent before removing it. Even then, cut just above a healthy leaf node rather than removing the whole stem.
In this state, the best time to do real deadheading is late summer after the main bloom season winds down.
For now, in June, let the flowers open fully and enjoy every stage of the show your hydrangeas are putting on for you.