Why Tomato Leaves Turn Yellow In Minnesota And How To Help Them
Minnesota has a way of humbling even experienced gardeners. The season is short, the soil runs cold well into spring, and just when your tomatoes finally hit their stride, something goes wrong with the leaves.
Maybe they curl. Maybe they spot. Maybe they slowly fade from deep green to a color that makes your stomach drop. Most gardeners blame themselves first.
That is usually the wrong instinct. Yellowing tomato leaves are a message, not a failure, and the plant is sending it for a specific reason.
Nutrient deficiency, drainage problems, fungal pressure, pH that is quietly off by just enough to cause chaos, each one leaves a different fingerprint on the foliage.
The fix almost always exists. But you have to read the signs correctly before you reach for anything.
This breakdown walks you through every major cause of leaf trouble in Minnesota gardens and tells you exactly what to do next.
Nitrogen Deficiency Drains Green Color From Older Leaves First

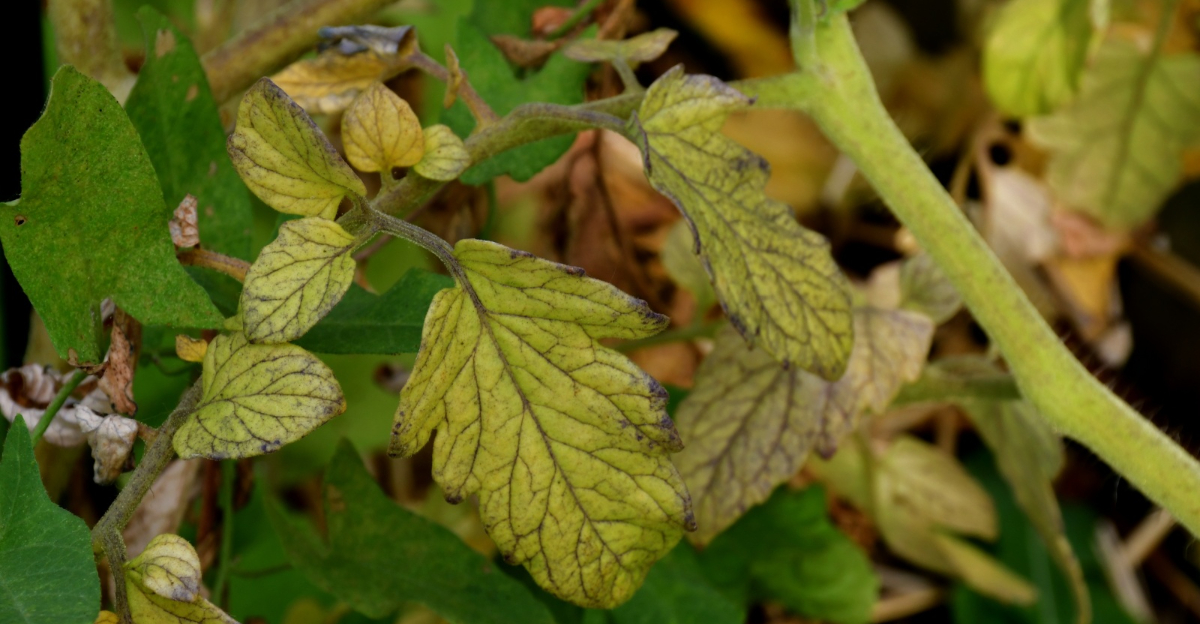
Something sneaky happens when tomato plants run low on nitrogen. The older leaves at the bottom of the plant start fading from rich green to a dull, washed-out yellow.
Nitrogen is the fuel behind that deep green color gardeners love. Without enough of it, the plant pulls what little it has from older growth to feed new growth at the top.
You might first notice the lower leaves looking almost lime-colored. Meanwhile, the upper leaves still appear healthy, which can fool you into thinking everything is fine.
Minnesota soils, especially sandy ones in the northern parts, tend to drain nitrogen quickly. Heavy spring rains can also wash it away before roots ever get a chance to absorb it.
Checking your soil before planting is one of the smartest moves you can make. A basic soil test from your local extension office costs almost nothing and tells you exactly what is missing.
Once you spot the yellowing pattern moving upward from older leaves, act fast. A liquid nitrogen fertilizer applied at the base of the plant can start showing results within a week.
Granular options work more slowly but feed the plant steadily over time. Compost mixed into the soil also helps build nitrogen levels naturally over time.
Organic matter breaks down slowly and feeds your tomato plants steadily through the whole growing season. Catching nitrogen deficiency early keeps your tomato leaves healthy and productive all summer long.
Overwatering Suffocates Roots And Prevents Nutrient Uptake

Soggy roots cannot breathe, and tomato plants need oxygen just as much as they need water. When the soil stays waterlogged for too long, roots begin to suffocate slowly.
Overwatering is one of the most common mistakes home gardeners make, especially after a rainy Minnesota week. The instinct to water daily can actually work against your plants in a big way.
When roots struggle to breathe, they also lose their ability to pull in nutrients. Your plant might sit in perfectly fertilized soil and still show signs of deficiency because the roots simply cannot function.
Wilting is a tricky symptom because both underwatering and overwatering can cause it. The key difference is that overwatered plants often have yellowing leaves alongside the wilting, and the soil feels cold and heavy.
Minnesota summers bring unpredictable rainfall, which makes it easy to accidentally overwater on top of what nature already provides. Checking soil moisture before reaching for the hose is a habit worth building.
Stick your finger two inches into the soil near the plant base. If it feels moist down there, skip watering for another day and check again tomorrow.
Raised beds and containers with good drainage help prevent waterlogging in wetter seasons. Adding perlite or coarse sand to heavy clay soils also improves drainage significantly.
Healthy roots mean healthy leaves, and healthy leaves mean a better tomato harvest at the end of the season.
Early Blight Fungus Thrives In Minnesota’s Humid Summer Conditions

Brown spots with yellow rings around them are the calling card of early blight, a fungal disease that loves warm and humid air. Minnesota summers hand this fungus exactly what it craves.
Early blight spreads through water splashing onto leaves from infected soil. Once one leaf shows symptoms, the fungus can move through a plant shockingly fast.
The spots usually appear on lower and older leaves first, then creep upward as the season progresses. Each spot has a distinctive target-like pattern with rings inside the brown area.
Gardeners who water from overhead give this fungus a free ride across the entire plant. Switching to drip irrigation or soaker hoses reduces the splashing that spreads spores from leaf to leaf.
Spacing plants properly also makes a real difference. When tomato plants crowd each other, air circulation drops and humidity between leaves skyrockets, creating a perfect breeding ground for fungal problems.
Copper-based fungicide sprays can help slow early blight once it appears. Apply them early in the morning so leaves dry out completely before nightfall.
Rotating your tomato crop to a different garden bed each year is one of the best preventive strategies. Blight spores can survive in soil over winter and attack new plants the following spring.
Staying ahead of early blight means less leaf loss and more energy directed toward growing the juicy tomatoes you planted for in the first place.
Cool Spring Temperatures Slow Nutrient Absorption In Young Plants

Minnesota springs are gorgeous but unforgiving to warm-season crops like tomatoes. When soil temperatures drop below 55 degrees Fahrenheit, root activity slows down dramatically.
Cold soil stiffens the cell membranes in roots, making it harder for nutrients to pass through. Even if your soil has plenty of phosphorus and nitrogen, cool temps can lock them away from the plant.
One telltale sign of cold-soil stress is a purplish tint on the undersides of younger leaves. This happens because phosphorus absorption shuts down when roots get too chilled.
Many Minnesota gardeners transplant seedlings outdoors too early, eager to get the season started. A couple of cold nights right after transplanting can set young plants back by weeks.
Waiting until nighttime temperatures stay consistently above 50 degrees is the smarter approach. Soil thermometers are inexpensive tools that take all the guesswork out of timing your transplant.
Black plastic mulch laid over the bed before planting absorbs sunlight and warms the soil faster. Some gardeners use it for two weeks before transplanting just to get a head start on heat.
Wall-o-Water plant protectors create a warm microclimate around individual seedlings during those unpredictable early weeks. They trap heat during the day and release it slowly through cool nights.
Give your young plants warm soil and stable nights, and they will reward you with strong, productive growth all the way through harvest.
Feed Plants With A Balanced Nitrogen-Rich Fertilizer Throughout The Season

Tomatoes are heavy feeders, and they will not be shy about showing you when they need more food. A regular fertilizing schedule keeps leaves green, stems strong, and fruit production on track.
A balanced fertilizer with a higher nitrogen number in the first part of the growing season supports strong leaf and stem development. Look for formulas like 10-5-5 or similar ratios on the packaging label.
Feeding every two weeks gives plants a steady supply without overwhelming the roots all at once. Slow and consistent is always better than one giant dose that the soil cannot hold.
Granular fertilizers worked into the soil around the plant base release nutrients gradually with each watering. Liquid fertilizers act faster and are great when you need a quick boost for struggling plants.
Always water your tomatoes before applying fertilizer to avoid burning dry roots. Dry roots exposed to concentrated nutrients can get damaged, which makes the problem worse instead of better.
Once plants start flowering, shift to a fertilizer lower in nitrogen and higher in phosphorus and potassium. Too much nitrogen late in the season pushes leafy growth at the expense of fruit development.
Organic options like fish emulsion or worm castings feed plants gently and also improve soil health over time.
They are excellent choices for gardeners who prefer to avoid synthetic products in their growing space. Consistent feeding is one of the simplest ways to keep tomato leaves thriving all season long.
Adjust Watering To Keep Soil Moist But Not Overly Saturated

Finding the right watering balance for tomatoes feels like walking a tightrope at first. Too little and leaves curl and wilt, too much and roots suffocate in soggy ground.
The goal is consistently moist soil, about the texture of a wrung-out sponge. That sweet spot keeps roots hydrated and nutrient channels open without cutting off oxygen flow underground.
Tomatoes generally need about one to two inches of water per week, depending on heat and rainfall. During hot Minnesota July weeks, that number can climb higher as the sun pulls moisture from the soil fast.
Morning watering is the best habit to build because it gives foliage time to dry before evening. Wet leaves sitting through cool nights are an open invitation for fungal problems to take hold.
Drip irrigation systems deliver water directly to the root zone without wetting leaves at all. They also conserve water by reducing evaporation, which is a bonus during drier stretches in the season.
A rain gauge placed near your garden takes the mystery out of how much water your plants actually received. On weeks when nature does the job, you can skip a watering cycle without any guilt.
Consistency matters more than perfection when it comes to tomato watering. Plants that get irregular watering, alternating between bone dry and soaking wet, often develop problems like blossom end rot on the fruit.
Steady watering habits lead directly to steady leaf health and a more productive garden overall.
Remove Affected Leaves Immediately And Avoid Overhead Watering

Spotting a sick leaf on your tomato plant should trigger one immediate reaction: remove it now. Leaving diseased foliage on the plant is like keeping a sick person in a crowded room and hoping no one else gets ill.
Diseased leaves spread spores and bacteria to neighboring healthy tissue every time the wind blows or water splashes. Pulling them off early breaks the cycle before it spirals out of control.
Always use clean pruning shears or scissors when removing affected leaves. Dirty tools can transfer pathogens from one plant to another, spreading the problem you are trying to contain.
Dispose of removed leaves in the trash rather than the compost pile. Compost piles do not always get hot enough to destroy fungal spores, so infected material can come back to haunt next year’s garden.
Overhead watering, meaning sprinklers or hoses aimed at the tops of plants, is one of the fastest ways to spread leaf disease. Water droplets carry spores from sick leaves to healthy ones in seconds.
Switching to ground-level watering is a simple change that pays off enormously over a full growing season. Soaker hoses and drip lines keep moisture exactly where it belongs: at the roots.
After handling diseased plants, wash your hands and tools thoroughly before touching healthy ones. Cross-contamination is a real risk that many gardeners underestimate until they see the damage spreading fast.
A clean garden is a productive garden, and small daily habits make the biggest long-term difference.
Mulch Around The Base To Regulate Soil Temperature And Moisture

A good layer of mulch around your tomato plants is one of those simple tricks that quietly solves multiple problems at once. Straw, wood chips, or shredded leaves laid two to three inches deep work like a protective blanket for the soil.
In Minnesota, where spring soil stays cold long into the season, mulch traps warmth that roots desperately need. It also slows down the wild temperature swings that stress plants during cool nights and hot afternoons.
Moisture retention is another major benefit that mulch brings to the table. Bare soil loses water to evaporation quickly on warm sunny days, but a mulched bed holds moisture far longer between watering sessions.
Consistent soil moisture directly supports healthy leaf function and nutrient absorption. When roots stay evenly hydrated, they pull in minerals more efficiently and send that goodness up through the stem to the leaves.
Mulch also acts as a physical barrier between the soil and the lower leaves of the plant. This barrier stops soil-borne fungal spores from splashing up onto foliage during rain or watering, cutting disease risk noticeably.
Straw is a popular mulch choice for vegetable gardens because it is lightweight, affordable, and breaks down into organic matter over time. Avoid using hay, though, since it often contains weed seeds that will sprout right in your garden bed.
Applying mulch is one of the best investments of time you can make for your tomato plants. Strong roots, steady moisture, and protected leaves all work together to give your garden its best possible season.