How To Spot Boxwood Blight In Kentucky And Stop It Before It Spreads
You crouch down beside your hedge and press your palm into the mulch. It feels warm and damp, and the smell hits you first.
Something fungal, sharp, completely wrong. Then you see the stems covered in pale brown rings crawling upward, leaves peeling off like wet paper.
Your entire boxwood hedge, the one you shaped over six Kentucky summers, is fading fast from the inside out. Boxwood blight doesn’t knock before it enters.
It slips through a water droplet, hitchhikes on your pruning shears, and hides under healthy-looking leaves until the signs are impossible to ignore. Ever watched something you built for years quietly slip away in a single wet week?
Kentucky gardeners lose gorgeous shrubs every season because they caught the warning signs one moment too late. This disease moves quickly, and your window to act is narrow.
Know exactly what you’re looking for, because what comes next will change how you see every shrub you own.
1. Look For Brown Leaf Spots With Dark Borders

Something looks off about your boxwood, and the leaves are telling the story. Brown spots with dark, defined borders are one of the earliest and most reliable signs of boxwood blight.
These spots usually start small, almost like tiny freckles scattered across the leaf surface. The spots grow fast under warm, wet conditions.
Within days, a single infected leaf can look like it was scorched from the inside out. The dark border is the key detail that separates blight from ordinary leaf scorch or drought stress.
Healthy boxwoods have smooth, solid green leaves with no discoloration. If you spot tan or straw-colored centers ringed by dark edges, that is your red flag.
Take a close look at both sides of the leaf, because the fungal spores often appear as white fuzz on the underside. Do not brush it off as a watering problem.
Blight moves quickly, and those early spots are your window to act. Grab a magnifying glass if you need to, because catching this sign first gives you the best chance of protecting the entire shrub before the infection spreads further into your garden.
2. Watch For Rapid Leaf Drop Spreading Through The Shrub

One morning your boxwood looks thin, and by the weekend it looks nearly bare. Rapid leaf drop is one of the most alarming signs of boxwood blight, and it happens faster than most gardeners expect.
Unlike normal seasonal shedding, blight-related leaf loss is sudden and sectional. You might notice clusters of leaves falling from one section first.
Then the drop spreads outward like a wave moving through the plant. This pattern is different from pest pressure or drought, which tend to cause more scattered, gradual thinning across the shrub.
Scoop up a handful of the fallen leaves and look closely at them. Brown spots with dark borders on dropped leaves confirm that blight is the cause.
Healthy plants do not shed this many leaves this quickly without a serious reason behind it. The speed of the drop is your urgency signal.
A shrub that loses a third of its leaves in under two weeks needs prompt attention. Do not wait to see if the plant bounces back on its own, because blight continues to progress without intervention.
Removing fallen leaves from the ground immediately helps stop the spores from spreading to nearby boxwoods and other susceptible plants in your yard.
3. Check Stems For Black Or Dark Brown Streaks

Peel back the bark on a suspect stem and you might get a surprise. Dark brown or black streaking inside the stem tissue is a telltale sign that boxwood blight has moved beyond the leaves.
This internal discoloration means the fungus has traveled into the vascular system of the plant.
Run your fingernail lightly along a young stem near an infected area. Healthy stems are firm and green just beneath the surface.
Infected stems show dark staining that looks almost like the wood was bruised from the inside.
This symptom is especially important because it tells you how far the disease has progressed. Surface spots on leaves are early-stage.
Stem streaking means the infection is deeper and more established. At this point, pruning alone may not be enough to stop the spread.
Use a clean, sharp knife to make a small cut on a stem you suspect. Look at the cross-section under good light.
Dark rings or streaks in the tissue confirm active blight infection. Always sanitize your cutting tool immediately after, because the fungal spores transfer easily from blade to plant.
This step protects the rest of your garden from catching the same disease through your own tools.
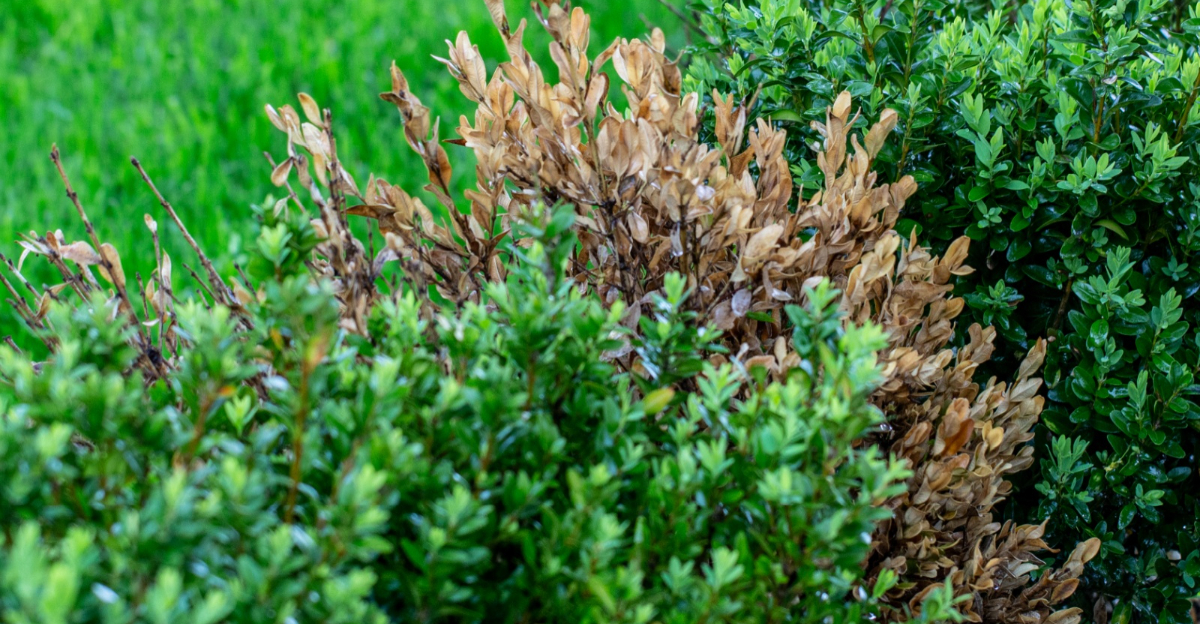
4. Look For Branch Dieback And A Bare Sparse Canopy

A boxwood with a patchy, hollow-looking canopy is sending a distress signal. Branch dieback happens when the fungus cuts off nutrients and water to entire sections of the shrub.
You will notice branches that look gray, brittle, and completely leafless while the surrounding growth still appears green.
Snap one of the affected-looking branches between your fingers. A healthy branch bends before it breaks.
A branch affected by blight snaps cleanly and shows no green tissue inside, just dry, dark, lifeless wood.
The canopy of a blight-infected boxwood often looks moth-eaten or hollow in patches. Some sections may still hold green leaves while others are completely stripped.
This uneven pattern is different from the uniform thinning caused by drought or root problems.
Dieback is a sign that the disease has been active for a while. The longer it goes untreated, the more branches become affected.
Prune out affected branches as soon as you identify them, cutting back into healthy green tissue at least an inch below the troubled zone. Bag all removed material immediately and do not compost it.
Allowing affected wood to remain on the plant lets the fungus persist and spread to nearby growth.
If dieback covers more than half the shrub, full removal may be the more practical path to protecting the rest of your garden.
5. Sanitize All Tools, Clothing, And Hands

Unclean pruning shears can carry and transfer blight spores from plant to plant. Boxwood blight spreads through contaminated tools, dirty gloves, and even the soles of your shoes.
Kentucky gardeners are especially familiar with how fast a single overlooked tool can undo an entire season of careful work.
Sanitizing everything that touches an infected plant is not optional, it is the rule that keeps the disease from jumping to healthy shrubs.
Mix a solution of one part bleach to nine parts water in a small bucket. Dip your pruning tools into the solution between each cut and between each plant.
This simple step breaks the chain of transmission before it starts. Your clothing matters too. The fungal spores are microscopic and cling to fabric easily.
Wear dedicated garden clothes when working around infected boxwoods, and wash them in hot water as soon as you come inside. Do not wear the same shirt from an infected area into a clean part of your garden.
Wash your hands thoroughly after handling any infected material, even if you wore gloves. Spores can transfer through tiny glove tears or when you remove them carelessly.
Keeping a spray bottle of rubbing alcohol near your work area makes quick sanitizing easy. In Kentucky’s humid growing season, spores spread faster than most people expect, so every sanitizing step you take matters more than it might seem.
Clean, sanitized hands and tools are your most powerful defense against letting boxwood blight travel through your entire landscape without you even realizing it.
6. Remove And Bag All Infected Material

Every infected leaf left on the ground is an ongoing risk to nearby plants. Removing and bagging all infected material is one of the most critical steps in stopping boxwood blight from spreading.
The fungus produces thousands of sticky spores that travel easily through water splash and foot traffic. Start by picking up every fallen leaf beneath the infected shrub.
Use gloved hands or a rake dedicated to that area only. Place everything directly into a sealed plastic bag without shaking the debris, since shaking releases spores into the air around you.
Next, prune out visibly infected branches and stems. Cut back to healthy tissue and drop each clipping straight into your bag.
Do not pile infected material on the ground while you work, because even brief contact with the soil can leave spores behind to reinfect the area later.
Seal the bags tightly and place them in your regular trash, not your compost bin. Home compost rarely reaches the temperatures needed to neutralize this fungus, so finished compost can reintroduce blight into your garden.
After bagging, lightly rake the soil surface beneath the shrub and consider covering it with fresh mulch.
Clean removal of infected debris is one of the fastest ways to slow an outbreak and protect surrounding boxwoods from catching the same disease.
7. Apply Preventative Fungicide To Surrounding Plants

Once blight appears, nearby plants are already at risk. Applying a preventative fungicide to surrounding boxwoods creates a protective barrier on healthy foliage before spores can land and take hold.
Look for fungicides containing thiophanate-methyl, which has proven effective against boxwood blight.
Check your local Kentucky garden center or extension service for currently registered options, as product availability varies by state.
Read the label carefully before mixing and applying, because concentration and timing matter for the product to work properly.
Spray healthy plants thoroughly, covering both the top and underside of leaves. The underside is where spores often enter, so skipping that surface leaves your plants exposed.
Apply early in the morning so foliage has time to dry before evening, since wet leaves at night encourage fungal growth.
Repeat applications every seven to fourteen days during wet or humid stretches, always following the interval stated on your specific product label.
Kentucky summers bring exactly the kind of warm, moisture-heavy conditions where blight gains its strongest foothold, so consistent treatment during rainy periods is especially important. Keep a log of your spray dates to stay on schedule.
If replanting after an outbreak, consider blight-resistant cultivars such as NewGen Independence or NewGen Freedom, which carry far less susceptibility and give your garden a stronger foundation going forward.
Preventative fungicide use, combined with the other steps in this guide, gives your existing boxwoods the best chance of pulling through.
8. Improve Air Circulation Around Your Boxwoods

Crowded boxwoods stay wet longer, and wet foliage is exactly the environment boxwood blight needs to thrive.
Improving air circulation around your shrubs is one of the most effective and overlooked steps you can take to reduce the conditions that allow this fungus to spread and resettle after treatment.
Start by evaluating the spacing between your boxwoods and any surrounding plants. If shrubs are touching or growing tightly together, airflow through the canopy drops significantly and moisture lingers on the leaves well into the afternoon.
Thin out the interior of each shrub by selectively removing crossing branches and dense inner growth.
This opens the canopy so wind can move through freely rather than getting trapped inside the plant where humidity builds.
Avoid planting annuals or ground cover directly against the base of your boxwoods, because low-growing plants trap moisture at the soil level and keep the root zone wetter than it should be.
Raise your mowing height slightly near boxwood beds to reduce moisture buildup along the edges.
Also trim back any overhanging perennials that shade the shrubs through midday, because sunlight and airflow work together to dry foliage faster after rain.
Pruning for circulation is best done in early spring before new growth flushes, giving the shrub time to adjust before Kentucky’s humid summer arrives.
Clean your tools between cuts and bag all removed material to avoid reintroducing spores to a freshly opened canopy.