The One Task Pennsylvania Daylilies Need After Blooming Or They’ll Decline
Daylilies have a well-earned reputation for being one of the most agreeable plants in a Pennsylvania garden. They show up every summer, fill borders with bold color, shrug off heat, and generally ask for very little in return.
For a few years, anyway. Then something subtle starts to shift.
The clump gets thicker, the leaves get more impressive, and the flowers somehow get less so. If your daylilies are putting on a lot of foliage drama with noticeably fewer blooms to back it up, that is usually the plant’s way of telling you it needs a little intervention.
Crowded clumps run out of room and energy over time, and division is the most straightforward fix available.
A little careful work after bloom season or in early fall can bring a tired planting back to something genuinely worth looking at again.
1. Bloom Season Reveals Which Clumps Need Attention

Bloom season has a funny way of telling on a daylily clump. In May or June, everything may look leafy and full, but once the flowers start opening, you can see which plants are still pulling their weight and which ones are mostly taking up space.
A healthy Pennsylvania daylily clump usually sends up plenty of scapes, with flowers held above the foliage in a way that feels generous and easy. A crowded clump often tells a different story.
You may see lots of green leaves, but fewer flower stems than you remember from past years. The center may look packed, tired, or less productive, while the outer edges seem more active.
That is your cue to make a note for later. There is no need to rush in with a shovel while the plant is still blooming.
Just observe. Take photos, tie a soft marker near the clump, or jot down which bed needs attention.
In Pennsylvania gardens, daylilies are often tough enough to be ignored for years, which is part of their charm. But even tough perennials can get crowded.
After bloom season, those notes help you decide which clumps may benefit from division when the weather is cooler and the plant is ready to focus on roots and leaves.
2. A Thick Center Can Mean It Is Time To Divide

A thick daylily center is one of those garden clues you learn to spot after growing them for a few seasons. From a distance, the clump may look impressive because it is wide, leafy, and full.
Up close, though, you may notice the middle is packed tight with old crowns and tangled roots, while the strongest growth seems to have shifted toward the outside.
Sometimes the outer ring still sends up decent flowers, which can hide the fact that the middle has become crowded and less useful.
That crowded center can make the plant look bulky without giving you the flower show you expected. In many Pennsylvania perennial beds, this happens slowly.
One year the daylily looks fine, the next year it blooms a little less, and by the third or fourth year you realize the clump has become more of a green mound than a blooming feature.
Division helps refresh the planting by breaking that oversized clump into smaller, more useful sections.
It also gives you a chance to remove weak pieces and replant the strongest fans with healthier roots. When you reset the strongest sections with fresh spacing, the whole bed often looks cleaner and easier to manage.
I like to think of it as giving the plant some breathing room rather than forcing it to perform from a crowded old seat.
Not every clump needs this treatment on a set schedule, but when the center looks congested and flowering has slowed, dividing is a sensible next step.
3. Early Fall Is A Smart Time To Work

Early fall is one of my favorite times to divide daylilies in Pennsylvania because the garden usually feels more forgiving. The worst heat has often eased, the soil still holds warmth, and the plants are no longer putting energy into their main bloom show.
That combination makes the job easier on both the gardener and the plant. Spring can also work, especially as new growth begins, but after bloom season you have the advantage of knowing which clumps actually need attention.
You are not guessing. You have already seen which daylilies flowered well and which ones seemed crowded or less vigorous.
Try to choose a mild, cloudy day if you can, or work in the morning before the bed heats up. I would avoid tackling a large clump during a hot, dry spell unless you can keep the divisions watered afterward.
In Pennsylvania, early fall also gives newly planted sections a window to settle before colder weather arrives. That does not mean every division will look instantly lush.
Freshly divided daylilies often need a little patience. But if you divide when the plant is out of bloom and the weather is kinder, you give the new sections a much better chance to establish steady roots before the next growing season.
4. Lift The Clump When The Soil Is Moist

Moist soil makes daylily division feel less like a wrestling match and more like regular garden work. If the ground is hard and dry, the roots can cling tightly, the shovel bounces, and the whole job gets frustrating fast.
After a soaking rain, or a day after you water the bed well, the soil usually loosens enough to let you lift the clump with less effort. The goal is damp, workable soil, not a muddy bed that sticks to every tool and boot.
Start by digging several inches out from the outside edge of the plant, not right against the crown. Daylily roots can spread wider than expected, and giving yourself extra room helps preserve more of them.
Work around the clump with a garden fork or spade, lifting gently as you go. In older Pennsylvania gardens, daylily clumps can be surprisingly heavy, especially if they have been sitting in the same spot for years.
Once the clump is out, shake off loose soil or rinse it lightly so you can see the fans and roots. This makes division much easier.
You do not need to be delicate to the point of panic, since daylilies are sturdy plants, but careful lifting gives you better pieces to replant. A little patience at this step can save a lot of fuss later.
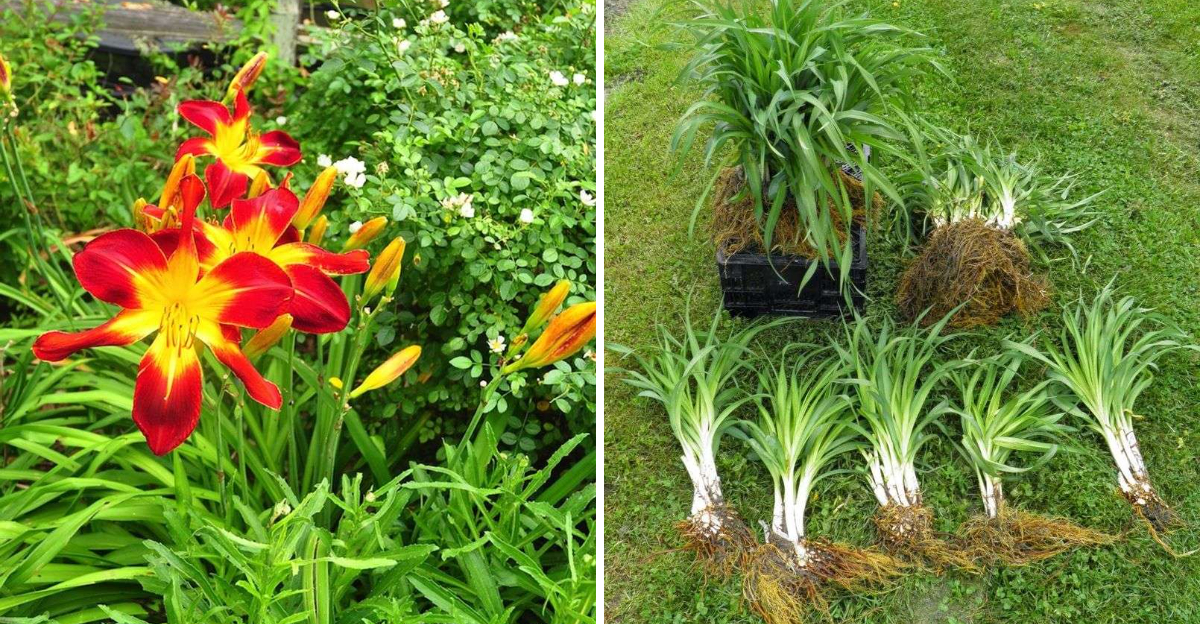
5. Separate Strong Fans With Healthy Roots

Once the clump is out of the ground, the real sorting begins. Daylilies grow in fans, which are those leafy sections that rise from the crown.
A good division should have a strong fan, and many gardeners prefer two or three fans with healthy roots attached when possible. That gives the new section a stronger start without making it so large that you have not really reduced the crowding.
Some pieces may pull apart by hand, especially if the clump is not too old. Others may need a clean, sharp knife or spade to separate them.
If the roots are tangled tightly, take your time and tease them apart instead of yanking the clump into pieces. I usually look for firm crowns, fresh-looking roots, and enough foliage to show the section has energy behind it.
Skip the weak, tiny pieces unless you enjoy nursing along small starts in a separate bed. In a Pennsylvania home garden, the goal is usually not to make the largest number of divisions possible.
The goal is to make good divisions that will settle in and bloom well in future seasons. A few sturdy divisions are usually more useful than a tray full of small pieces that need extra attention.
Trim the foliage back to a manageable height if needed so the plant is easier to handle. Then keep the divisions shaded and moist while you prepare their new spots.
6. Set Each Division At The Right Depth

Planting depth matters more than many gardeners realize with divided daylilies. Set the crown too deep, and the plant may sulk instead of growing strongly.
Set it too high, and the roots may dry faster than you want, especially in a sunny Pennsylvania border. The crown is the point where the leaves meet the roots, and it should sit close to the soil surface, generally just slightly below it.
When I replant daylilies, I like to make a wide hole rather than a narrow one. Then I form a small mound of soil in the center, spread the roots over it, and settle the fan so the crown sits at the right level.
Take a moment to hold the fan upright while you backfill, because a tilted division can settle awkwardly once watered. Backfill gently, firm the soil with your hands, and check again before watering.
It is easy for a division to sink a little if the soil is fluffy. This is also a good time to improve the bed with compost if the soil is tired, though you do not need to turn the planting hole into something wildly different from the surrounding soil.
Daylilies are adaptable, but they still appreciate a well-prepared spot. If the crown disappears under soil after watering, gently lift or brush the soil back before it settles too firmly.
Good depth helps the new division start off steady instead of spending the season correcting a rough planting job.
7. Give New Sections Room To Grow

Freshly divided daylilies may look small at first, but they do not stay that way for long. That is why spacing matters.
If you tuck the new sections too close together because the bed looks bare, you may be right back to a crowded clump sooner than expected.
Give each division enough room for the fan to expand, for air to move through the foliage, and for you to weed or mulch around the plant without feeling like you are threading a needle.
In Pennsylvania gardens, daylilies are often used along fences, walkways, slopes, and foundation beds because they are dependable and easy to place. A little open soil between divisions may look plain at first, but it gives the planting room to settle into a fuller shape.
The temptation is to line them up tightly for instant impact. I get it.
Empty space can look awkward for a while. But a little patience gives you a healthier, cleaner planting later.
Use the extra divisions to repeat the plant in another part of the yard, share with a neighbor, or fill a sunny bed that needs dependable summer color.
If you want the bed to look finished while the divisions fill in, a light mulch layer can make the spacing look intentional.
Spacing also helps you see each clump as an individual plant again, not one giant leafy mass. That makes future maintenance simpler and keeps the bed looking intentional rather than overstuffed.
8. Water Well After Replanting

Watering after replanting is the step that helps everything settle into place. Once the daylily division is planted, give it a slow, thorough drink so the soil settles around the roots and air pockets close up.
This does not mean keeping the bed soggy. Daylilies like moisture as they establish, but they also appreciate soil that drains well.
In Pennsylvania, early fall weather can swing from cool and damp to surprisingly dry, so it helps to check the bed every few days at first. If the top couple inches of soil are dry and the plant is newly divided, water deeply rather than giving it a quick sprinkle.
A watering wand or gentle hose setting works well because it soaks the soil without washing it away from the crown. A light mulch layer can help hold moisture and keep soil temperatures more even, but keep mulch from piling against the crown.
The foliage may look a little floppy for a short while after division, especially if the weather turns warm. That is not unusual.
Focus on steady care instead of fussing over every leaf. With good watering, proper depth, and enough space, the new sections can settle in before colder weather arrives.
By next season, those divided Pennsylvania daylilies should have a better chance to grow with fresh energy and bring back the bloom show you were missing.