Why Tomato Leaves Turn Yellow In New York, And How To Handle It
Your tomato plants looked healthy last week. Now the leaves are going yellow, and you have no idea what changed.
This is one of the most common moments of panic for home gardeners across New York. It happens in raised beds in Rochester just as often as it does in containers on a Brooklyn fire escape.
Yellowing leaves can point to a dozen different things. Sometimes it is a simple watering mistake. Other times it is a fungal issue quietly working its way through the soil.
Most causes are diagnosable, and most fixes are simpler than you think. Here is what is actually going on with your tomato plants in New York and how to fix it.
The Main Culprits Behind Yellow Tomato Leaves In New York

Something feels off when your tomato plant starts looking more yellow than green. Tomato leaf yellowing in New York gardens happens for several reasons, and most of them are completely manageable.
The first thing to understand is that yellowing rarely has just one cause. Often, two or three factors team up to stress your plant at the same time.
The local climate plays a big role here. New York summers swing between humid heat waves and cool, rainy stretches, and tomatoes feel every bit of that instability.
Heavy clay soil common in many New York yards can hold more moisture around roots than they need. That soggy environment cuts off oxygen and starts the yellowing process from the ground up.
Container gardeners on patios and rooftops face the opposite problem. Pots dry out fast in summer heat, leaving roots scrambling for water and nutrients.
Lower leaves yellowing first is usually a natural process as the plant matures. But when yellowing climbs up quickly or spreads unevenly, that signals something needs your attention.
Older tomato varieties sometimes show more sensitivity to environmental shifts than modern hybrids. Knowing which type you are growing gives you a head start on troubleshooting.
The best approach is to treat yellowing like a puzzle. Look at where it starts, how fast it spreads, and whether other symptoms appear alongside it.
Getting the diagnosis right saves you time and keeps your harvest on track. Healthy, green leaves mean a thriving plant and a season full of ripe tomatoes worth the effort.
How Nutrient Deficiencies Show Up On Tomato Plants

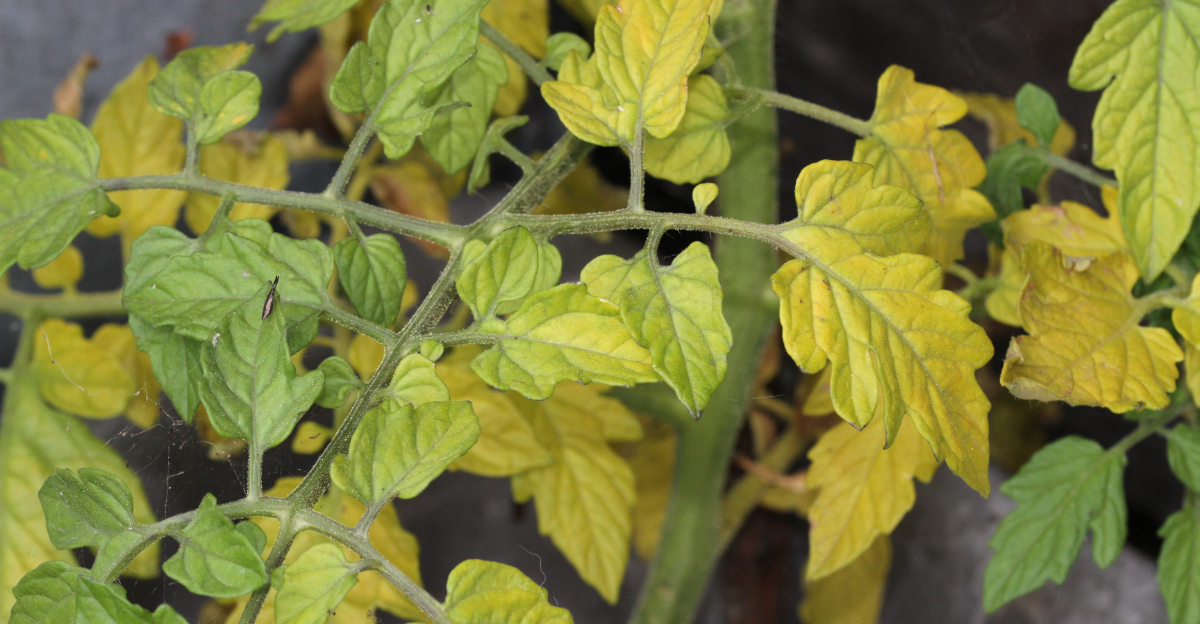
Pale leaves with green veins running through them are a classic distress signal from a hungry tomato plant. Nutrient deficiencies are among the sneakiest causes of tomato leaf yellowing because they mimic other problems.
Nitrogen deficiency is the most common culprit in home gardens. It shows up as uniform yellowing that starts on the oldest, lowest leaves and works its way upward over time.
Iron deficiency looks different because it causes yellowing between the veins while the veins themselves stay green. That pattern, called chlorosis, often points to a soil pH problem rather than a true shortage of iron in the ground.
New York soils often run slightly acidic, especially in wooded or suburban areas. When pH climbs too high, iron becomes less available to plant roots even when the soil contains plenty of it.
Magnesium deficiency causes a similar between-the-veins yellowing but tends to show up on the older, lower leaves first. A simple fix is dissolving one tablespoon of Epsom salt in a gallon of water and applying it at the base of the plant.
Calcium deficiency tends to affect new growth and can also cause blossom end rot on the fruit. Crushed eggshells or garden lime worked into the soil can help restore balance over time.
Getting a soil test from your local Cornell Cooperative Extension office costs very little and gives you exact numbers. Armed with that data, you stop guessing and start feeding your plants exactly what they need.
When Watering Habits Are The Real Problem

Too much love can hurt a tomato plant just as fast as neglect can. Watering mistakes are behind a surprising number of yellow leaf cases, and the fix is often simpler than gardeners expect.
Overwatering is one of the most common offenders in New York gardens, especially during rainy stretches in June and early July. Roots sitting in waterlogged soil cannot breathe, and stressed roots send a distress signal straight to the leaves.
The leaves respond by turning yellow, starting at the base of the plant and spreading upward if the problem continues. Pulling back on watering and improving drainage may start to improve early symptoms within a week or two in mild cases.
Underwatering creates a different pattern, with leaves that curl inward and yellow at the tips before spreading across the blade. Consistent soil moisture is the goal, not alternating between bone dry and soaking wet.
A simple finger test works better than any schedule. Push your finger two inches into the soil, and only water when it feels dry at that depth.
Mulching around your plants with straw or wood chips helps lock in moisture between waterings. A two to three inch layer keeps the soil temperature stable and reduces how often you need to water.
Drip irrigation or soaker hoses deliver water directly to the root zone without wetting the leaves. Wet foliage left overnight creates the perfect setup for fungal problems to take hold.
Steady, consistent watering makes more of a difference than most gardeners expect.
Fungal Diseases That Cause Yellowing In New York Gardens

New York summers create perfect conditions for fungal diseases, and tomato plants are prime targets. High humidity combined with warm nights gives spores exactly what they need to spread fast.
Early blight is one of the most widespread fungal problems in the region. It appears as brown spots surrounded by yellow halos, starting on the lowest leaves and climbing upward as the season progresses.
Septoria leaf spot looks similar but creates smaller, more circular spots with dark borders and light centers. Both diseases spread through rain splash and contaminated soil, which is why keeping leaves dry matters so much.
Fusarium wilt and Verticillium wilt attack from the roots up, blocking water movement inside the plant. The result is a one-sided yellowing pattern where leaves on just one branch or one side of the plant fade first.
Removing affected leaves as soon as you spot them slows the spread significantly. Place removed leaves in a sealed bag and toss them in the trash, not the compost pile.
Copper-based fungicide sprays applied every seven to ten days offer solid protection during wet stretches. Always spray in the morning so leaves dry completely before nightfall.
Crop rotation is one of the most effective long-term defenses against soil-borne fungi. Avoid planting tomatoes in the same spot two years in a row, and choose disease-resistant varieties labeled with initials like F, V, or N on the seed packet.
Staying ahead of fungal pressure early in the season reduces how much you need to manage later on.
Pests That Trigger Leaf Yellowing On Tomato Plants

Tiny bugs can cause big problems on tomato plants, and yellowing leaves are often their calling card. Pests are easy to overlook because many of them are small enough to hide on the undersides of leaves.
Spider mites thrive during hot, dry spells in July and August. They create a stippled, speckled yellowing pattern by piercing leaf cells and draining the contents, often leaving fine webbing behind as evidence.
Aphids cluster on new growth and the undersides of leaves, sucking out plant sap in large groups. Their feeding weakens the plant and causes leaves to curl, yellow, and drop prematurely.
Whiteflies look like tiny white moths that scatter when you brush against the plant. They feed similarly to aphids and also excrete a sticky substance called honeydew that can lead to sooty mold growth on leaves.
Tomato hornworms are large enough to spot by eye, but heavy feeding can stress the plant and contribute to overall leaf decline. Check for dark green droppings on the soil as a sign these caterpillars are nearby.
A strong blast of water from the hose knocks aphids and mites off plants without any chemicals. Repeating this every few days breaks their population cycle before serious damage sets in.
Insecticidal soap spray works well on soft-bodied pests like aphids, mites, and whiteflies. Apply it in the evening to avoid harming beneficial insects like bees that visit your garden during daylight hours.
Keeping pests in check protects your entire garden ecosystem. Healthy plants resist pest pressure far better than stressed ones.
Practical Fixes For Yellow Tomato Leaves

Spotting the problem is only half the battle when tomato leaf yellowing strikes your garden. The real win comes from taking fast, targeted action that addresses the root cause instead of just the symptoms.
Start by doing a full inspection of your plant from the soil up to the newest growth. Note where the yellowing begins, what pattern it follows, and whether any spots, webbing, or insects are visible.
If soil nutrition is the issue, a balanced tomato fertilizer with nitrogen, phosphorus, and potassium may show improvement within two weeks in mild cases. Follow the label directions carefully because over-fertilizing causes its own set of leaf problems.
Adjusting your watering routine often brings dramatic improvement within days. Water deeply but less frequently, aiming for about one inch per week including rainfall as a general guideline.
For fungal issues, remove affected foliage immediately and apply a copper spray on a dry morning. Keep tools clean between uses to avoid spreading spores from one plant to another.
Pest problems respond well to a combination of physical removal and organic sprays. Check plants every few days during peak summer heat when pest populations grow fastest.
Improving airflow around your plants reduces humidity and fungal risk at the same time. Prune suckers and lower branches to keep leaves off the ground and air moving freely through the canopy.
Tomato leaf yellowing is a solvable problem for any gardener willing to pay attention. With the right fix in place, your plants can bounce back and deliver a harvest worth every bit of effort you put in.