The Right Way To Divide Georgia Perennials Without Stressing The Plant
There is something satisfying about watching a favorite plant come back bigger and fuller every year. After a while, though, even the healthiest perennial can start looking crowded, produce fewer blooms, or simply outgrow the space you gave it.
That is usually the moment gardeners wonder if it is finally time to step in, but many hesitate because they worry about doing more harm than good.
The truth is that dividing perennials is not just about making room in the garden. Done at the right time and in the right way, it can help plants stay vigorous for years to come.
A little care during the process goes a long way, especially in Georgia, where warm weather can add extra pressure on recovering plants.
Knowing a few simple techniques can make the whole job much easier while giving your garden an even better display next season.
1. Divide Perennials After They Finish Blooming

Timing is everything when it comes to dividing perennials. Splitting a plant mid-bloom puts it under serious strain.
Wait until the flowers fade and the plant starts pulling energy back into its roots.
Most spring bloomers in the Southeast do best when divided in early fall. Fall bloomers respond well to division in early spring before new growth pushes up.
Matching your timing to the plant’s natural cycle keeps stress levels low.
Soil temperature matters too. Cooler ground helps roots recover faster.
Dividing during summer heat is rough on plants and makes recovery unpredictable.
Watch for signs that a plant is ready.
An open center, fewer blooms, or a clump that looks tired and overcrowded are all clear signals. Those are not signs to ignore.
Mark your calendar based on what’s growing in your beds. Daylilies, coneflowers, and black-eyed Susans all have slightly different ideal windows.
Knowing each plant’s bloom cycle takes the guesswork out of the process.
Skipping this step is one of the most common mistakes home gardeners make. Patience here pays off with faster recovery and stronger regrowth.
A plant divided at the right moment bounces back with noticeably more vigor than one divided at the wrong time.
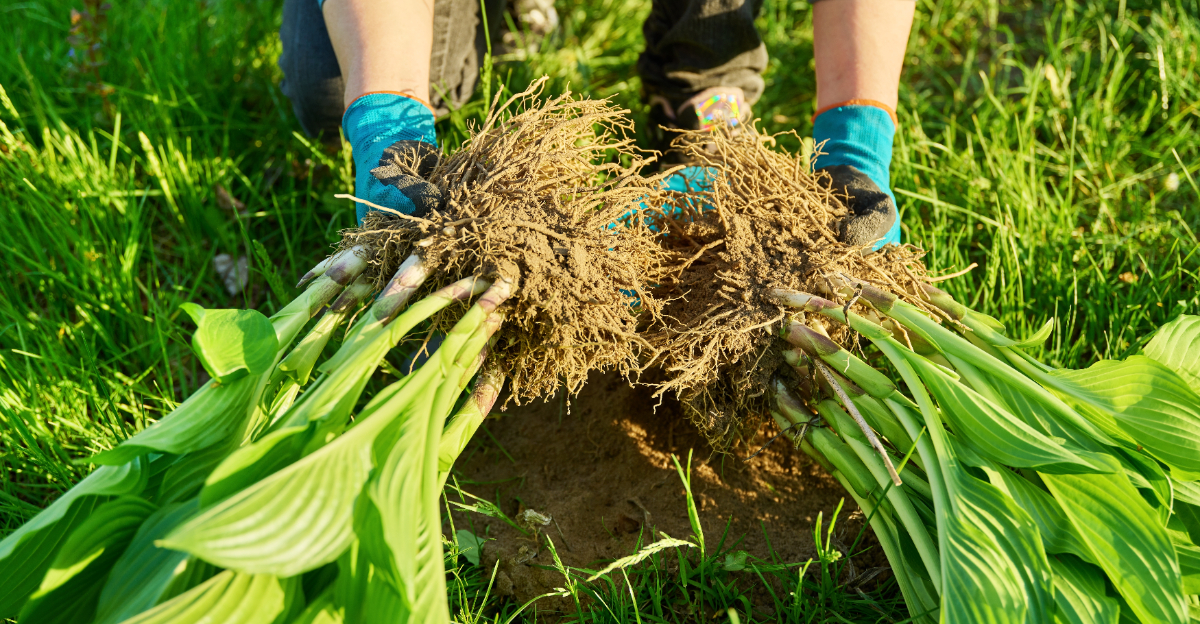
2. Dig Wide To Protect The Root System

Roots spread farther than most people expect. Digging too close to the crown tears off feeder roots that the plant depends on for recovery.
A wide arc keeps the root ball intact.
Start your shovel or garden fork at least eight to ten inches from the outer edge of the clump. Work the tool down at an angle and loosen the soil in a full circle before lifting.
Rushing this step causes unnecessary root loss.
Clay-heavy soil, which is common across much of Georgia, makes this trickier. It grips roots tightly and resists lifting.
Watering the bed a day before you plan to divide softens the ground and makes the whole process smoother.
Once the clump lifts free, set it on a tarp or flat surface. Getting it off the ground gives you better visibility and makes it easier to work without damaging surrounding plants.
Look at the root mass before you start splitting anything. Healthy roots are firm and light-colored.
Dark, mushy sections signal rot and should be removed before replanting any division.
A wide, careful dig protects the investment you’ve already made in that plant. It takes an extra five minutes but saves weeks of recovery time.
3. Split Each Clump Into Healthy Sections

Not every clump divides the same way. Some pull apart easily by hand.
Others need two garden forks placed back-to-back and leveraged apart. A few require a sharp spade or even a pruning saw.
Match your tool to the plant. Soft-rooted perennials like hostas and daylilies usually separate without much force.
Woody-centered clumps like ornamental grasses or thick rudbeckia need something with more cutting power.
Each division needs at least three to five healthy shoots and a solid chunk of root attached. Sections smaller than that struggle to establish and may not survive a hot Southern summer without extra care.
Avoid splitting a clump into too many pieces at once. More divisions sound productive, but tiny sections take much longer to recover.
Fewer, stronger pieces outperform many weak ones every time.
Work quickly once the clump is out of the ground. Exposed roots dry out fast, especially on warm afternoons.
Keep divisions in the shade and cover roots with a damp cloth or burlap if you’re not replanting immediately.
Inspect each section before committing to replanting it. A division without enough root mass or with only one or two shoots is a gamble.
4. Trim Away Weak Or Damaged Roots

Damaged roots are a liability, not an asset. Leaving them attached to a fresh division wastes the plant’s energy and can invite rot or fungal problems into the new planting site.
Use clean, sharp pruners or scissors for this step. Dull blades crush rather than cut, leaving ragged edges that heal slowly.
Disinfect your pruning tools between plants before moving to the next plant.
Look for roots that are dark brown, black, or soft when you squeeze them. Healthy roots feel firm and look white or tan.
Cut away anything that looks questionable without hesitation.
Trim back overly long roots too. Roots that are far longer than the division itself can fold or bunch up in the planting hole, which leads to poor establishment.
Cutting them back by a third helps them settle into new soil more naturally.
If the foliage looks stressed or floppy, trim that back as well. Reducing top growth lowers the demand on a compromised root system.
Smaller leaves mean less water loss while roots are still getting established.
Clean divisions establish faster and with far less setback than untreated ones. Taking five extra minutes to remove weak material at this stage prevents much bigger problems down the road.
Strong roots give each new plant section a real fighting chance in your garden bed.
5. Replant Every Division At The Right Soil Depth

Planting depth is one of the most overlooked parts of the division process. Too shallow and roots dry out.
Too deep and the crown rots before the plant ever gets going.
Set each division so the crown sits at the same level it was before. That’s the point where roots meet stems.
Use your thumb to feel for it if the foliage makes it hard to see.
Prepare the hole before lowering the division in. Loose, amended soil lets roots spread out immediately instead of hitting a wall of compacted ground.
Mix in compost to improve both drainage and moisture retention.
Press soil firmly around the roots as you backfill. Air pockets left in the hole cause roots to dry out from below.
Firm pressure without stomping creates good root-to-soil contact.
Water the division in thoroughly right after planting. A slow, deep soak settles the soil and pushes out remaining air gaps.
Avoid a light sprinkle, which only wets the top inch and leaves roots dry underneath.
Spacing matters at this stage too. Crowding new divisions too close together defeats the purpose of dividing in the first place.
6. Add Mulch To Hold Moisture Around New Divisions

Freshly divided plants are vulnerable. Their root systems are smaller and less established than a mature clump.
Mulch acts as a buffer between the plant and the conditions that stress it most.
Apply two to three inches of organic mulch around each division right after planting. Pine bark, shredded leaves, or wood chips all work well.
Keep mulch pulled back slightly from the crown to prevent moisture buildup against the stem.
Mulch slows evaporation from the soil surface. During warm fall days or the unpredictable weather swings common across the region, that moisture retention can make a real difference in how quickly divisions establish.
Weed suppression is a bonus benefit. Weeds compete aggressively with new divisions for water and nutrients.
A solid mulch layer cuts down on that competition without requiring extra work on your part.
Refresh mulch if it thins out over the first few weeks. Rain and wind break it down faster than expected.
Keeping a consistent layer protects roots through temperature swings and unexpected dry spells.
Mulch also moderates soil temperature. Roots recovering from division do better in stable soil conditions than in ground that heats up and cools down sharply.
7. Give Fresh Divisions Time To Establish Before Dividing Again

Patience is genuinely part of the process. A freshly divided plant needs at least one full growing season to rebuild its root system before it can handle being split again.
Resist the urge to divide again too soon. Plants that get split repeatedly without enough recovery time weaken over successive seasons.
Root mass shrinks, blooms become sparse, and overall vigor drops noticeably.
Watch for signs of healthy establishment instead of rushing the timeline. Strong new growth, improved bloom production, and a visibly expanding clump all indicate the plant has settled in and is ready to be worked with again when the time comes.
Watering consistently during the first season makes a significant difference. Newly divided sections have a reduced capacity to pull moisture from the soil.
Supplemental watering during dry stretches keeps stress at a manageable level.
Fertilizing lightly in the first season is fine, but avoid heavy feeding. Pushing rapid top growth before roots are established can actually slow recovery.
A light application of balanced, slow-release fertilizer is enough.
Most well-established perennials in Southern gardens benefit from division every three to five years. Some vigorous growers may need it sooner.