How To Diagnose And Treat Yellow Tomato Leaves Before Wisconsin Harvest Time
Your tomato plants looked perfectly fine last week. Now the leaves are turning yellow fast. Wisconsin summers are unpredictable, and tomatoes feel every single shift.
Nitrogen deficiency, fungal disease, root stress, inconsistent watering each cause distinct visible symptoms.
Identifying the right one matters. Acting on the wrong diagnosis wastes time you do not have.
Leaves yellowing from the bottom signal something very different from yellowing between the veins.
Wisconsin gardeners face compressed growing seasons, which means every single week counts.
Yellowing leaves are not a forfeit. They are data your plant is sending you. Soil holds answers. Discoloration patterns reveal causes.
Ignoring the signs accelerates decline in ways that surprise even experienced growers. Reading them correctly, however, changes the entire outcome for your garden this season.
Stop guessing, start diagnosing, and take back the full harvest that is already rightfully yours.
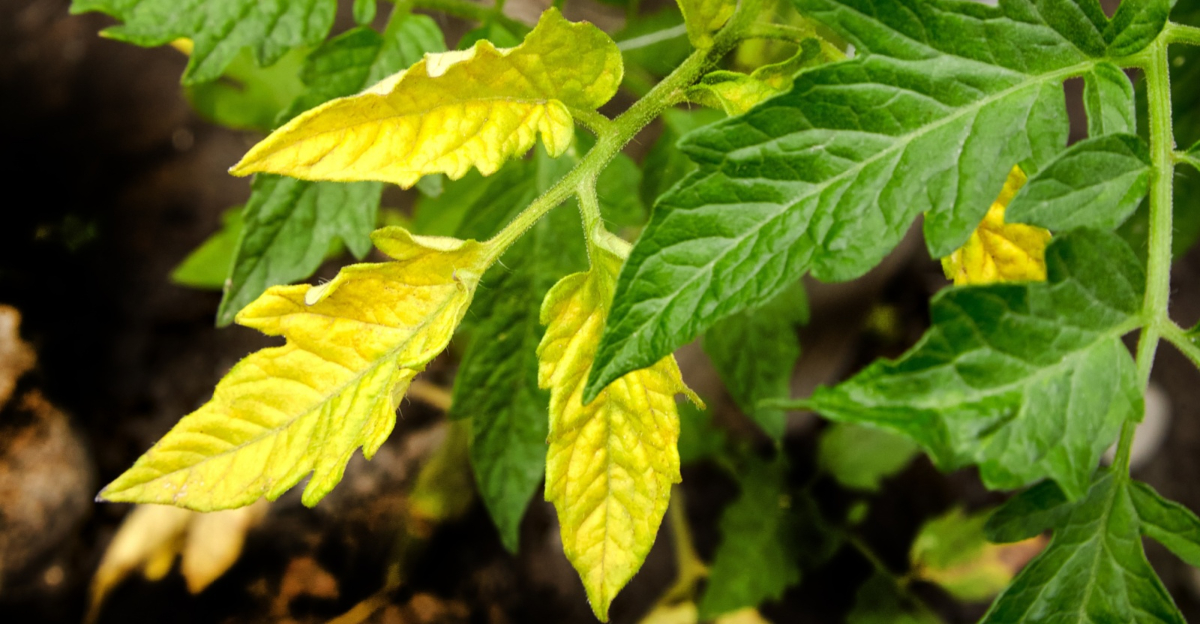
Nitrogen Deficiency Drains Color From Older Leaves

Pale yellow leaves creeping up from the bottom of your plant? That is a classic nitrogen deficiency signal, and it spreads fast if you ignore it.
Nitrogen is the nutrient that keeps leaves green and lush. When soil runs low, the plant pulls nitrogen from older leaves to feed new growth at the top.
The bottom leaves turn yellow first, then curl slightly before dropping off. Younger leaves near the top stay green, which is your biggest clue that nitrogen is the culprit.
Wisconsin gardens with sandy or light soils lose nitrogen quickly, especially after heavy rain. The nutrient simply washes away before your plant can absorb it.
A quick soil test from your local garden center will confirm the deficiency in minutes. Most kits cost under ten dollars and give clear, easy-to-read results.
Once you confirm low nitrogen, act the same day. Waiting even a few days allows the yellowing to climb higher up the plant.
Blood meal, fish emulsion, and balanced granular fertilizers all deliver nitrogen fast. Mix according to package directions and apply directly to the base of each plant.
Avoid overloading with nitrogen, though. Excess nitrogen causes lush green leaves but reduces fruit set, which defeats the whole purpose of your garden.
Check your plants weekly after treating. New green growth near the top is your sign the plant is recovering toward a strong, productive harvest season.
Overwatering Blocks Nutrient Absorption

Soggy roots cannot breathe, and a plant that cannot breathe cannot eat. Overwatering is one of the sneakiest causes of yellow tomato leaves.
When soil stays waterlogged, oxygen gets squeezed out of the root zone. Without oxygen, roots begin to suffocate and lose their ability to pull nutrients from the soil.
The result looks a lot like nutrient deficiency, which confuses a lot of gardeners. They add more fertilizer, which makes things worse because the roots still cannot absorb anything.
Wisconsin summers bring unpredictable rain, and that makes it easy to accidentally overwater. You water on schedule, then a three-day rainstorm rolls in and saturates the soil entirely.
Stick your finger two inches into the soil before you water. If it feels moist, skip the watering session entirely and check again the next day.
Your Wisconsin Garden Changes Every Week. Your Plan Should Too.
Gardening in Wisconsin changes quickly throughout the season. Every Friday you’ll receive a simple weekly plan showing exactly what to plant, prune, fertilize, harvest, and protect so you never miss the right timing.
Yellowing from overwatering usually appears across the whole plant rather than just the bottom leaves. Leaves may also feel soft and limp instead of crisp and firm.
If your soil is consistently wet, consider improving drainage by mixing in perlite or coarse sand. Raised garden beds are a smart long-term fix for low-lying Wisconsin yards.
Let the soil dry out between watering sessions. Your tomatoes will actually thank you for the break, and you will notice firmer, greener foliage within a week.
Tomato leaves turning yellow from overwatering recover quickly once roots get oxygen again. Patience and consistent, deliberate restraint are your most powerful tools here.
Fungal Diseases Spread Fast In Humid Summers

Humid Wisconsin summers create ideal conditions for fungal diseases to spread rapidly through your garden. Warm, wet air invites early blight and Septoria leaf spot.
Both diseases show up as small brown or dark spots surrounded by yellow halos. The spots usually appear on lower leaves first and work their way up the plant quickly.
Early blight is caused by a fungus called Alternaria solani. It thrives when temperatures rise above 80 degrees Fahrenheit with high humidity.
Septoria leaf spot looks similar but produces tiny, water-soaked circles with dark edges. Both spread through splashing water, which is why overhead watering makes things much worse.
Spacing your plants properly helps air circulate between them. Good airflow keeps leaf surfaces drier and makes it harder for fungal spores to settle and grow.
Remove any leaf that shows spots immediately. Do not compost them, because fungal spores survive in compost piles and reinfect your plants next season.
Water at the base of the plant using a soaker hose or drip system. Keeping foliage dry is one of the simplest and most effective ways to prevent fungal outbreaks.
Copper-based fungicide sprays are highly effective against both diseases. Apply early in the morning so leaves dry before evening, reducing the chance of further fungal spread.
Tomato leaves turning yellow from fungal disease can be managed effectively with quick action. Catch it early enough and your entire harvest stays fully on track.
Cold Nights Below 50°F Shock Plants

Wisconsin nights can turn cold fast, even in July. When temperatures drop to around 50 degrees Fahrenheit or below, tomato plants go into stress mode almost immediately.
Tomatoes are warm-weather plants that evolved in tropical climates. Cold air slows down every biological process inside the plant, including nutrient uptake and photosynthesis.
When photosynthesis slows, leaves cannot produce enough chlorophyll. Chlorophyll is the green pigment that keeps leaves healthy, and without it, yellow patches start appearing across the plant.
The yellowing from cold stress often looks patchy and uneven. You might see some leaves yellow while others right next to them stay green, which makes diagnosis tricky.
Check your local forecast every evening during the growing season. Wisconsin weather swings can catch even experienced gardeners off guard, especially in late August and September.
Row covers made from lightweight fabric trap warmth around your plants on cold nights. You can find them at most garden centers for just a few dollars per roll.
Remove the covers during the day so plants get full sun and airflow. Leaving covers on too long in warm weather can raise temperatures too high and create new problems.
A thick layer of mulch around the base of each plant also helps. Mulch insulates the soil and keeps root zone temperatures more stable during those unpredictable Wisconsin cold snaps.
Cold-stressed plants bounce back quickly once temperatures warm up. Give them a few warm days and some extra care, and they will reward you at harvest time.
Feed Plants With Nitrogen-Rich Fertilizer Immediately

Speed matters when your tomato leaves are turning yellow from nutrient loss. Getting nitrogen back into the soil quickly can stop the spread before it reaches your upper leaves.
Liquid fertilizers work faster than granular ones because they are absorbed directly through the roots. Fish emulsion and liquid seaweed blends are popular organic options that work within days.
If you prefer granular fertilizer, choose one with a high first number on the label. The three numbers on fertilizer bags represent nitrogen, phosphorus, and potassium in that order.
A 10-5-5 or 12-6-6 blend delivers a strong nitrogen boost without overloading other nutrients. Follow the package directions carefully and do not apply more than recommended.
Apply fertilizer in the early morning when soil is cool and moist. This helps the roots absorb nutrients more efficiently and reduces the risk of burning the plant.
Water the plant thoroughly after applying granular fertilizer. Watering helps move nutrients down into the root zone where they can actually be absorbed and used.
Do not fertilize right before a heavy rainstorm. Rain washes fertilizer away before roots can absorb it, which wastes your money and stresses the plant further.
After your first application, check the plant every five days. New growth near the top turning green is a great sign that nitrogen levels are climbing back up.
Feeding your tomatoes consistently through the season prevents deficiencies from creeping back. A monthly fertilizer schedule keeps plants strong all the way through Wisconsin harvest time.
Adjust Watering Based On Soil Moisture, Not Schedule

Less is more when it comes to watering tomatoes. Cutting back to every two or three days gives roots the breathing room they need to function properly.
Tomato roots need alternating periods of moisture and air. When soil dries slightly between waterings, roots stretch deeper in search of moisture, building a stronger root system overall.
A deeper root system means better access to nutrients stored lower in the soil. It also means your plant becomes more resilient during dry spells and heatwaves.
The best time to water is early morning, before the heat of the day sets in. Morning watering gives soil time to absorb moisture before evaporation kicks in during afternoon sun.
Avoid watering in the evening whenever possible. Wet soil overnight encourages fungal growth and creates the exact leaf problems you are already trying to fix.
Use a soaker hose or drip irrigation to deliver water directly to the root zone. This method keeps foliage dry and reduces disease pressure significantly.
If you are using a garden hose, aim the stream at the base of the plant. Splashing water onto leaves spreads fungal spores and bacteria that cause more yellowing.
Check the soil moisture before every watering session, not just by schedule. Actual soil conditions vary based on rain, sun, and temperature, so adjust your routine accordingly.
Consistent, measured watering keeps your tomatoes healthy and productive. Plants that are watered correctly grow stronger and hold their color all the way to harvest.
Remove Affected Leaves And Apply Copper Fungicide

Grab your pruning shears and get to work. Removing affected leaves is the fastest way to stop fungal diseases from spreading to healthy parts of the plant.
Always cut leaves cleanly at the stem rather than tearing them off. Tearing creates jagged wounds that invite new infections and slow the plant’s recovery process.
Place removed leaves directly into a sealed plastic bag. Never toss them onto the ground near your garden, because fungal spores can splash back onto healthy plants during rain.
After pruning, apply a copper fungicide spray to the remaining foliage. Copper-based products create a protective barrier that prevents new spores from landing and taking hold.
Read the label carefully before mixing or spraying any fungicide. Applying too much can damage leaves, and applying too little will not give you the protection your plants need.
Spray in the early morning so the product dries before evening temperatures drop. Wet leaves at night increase the risk of further fungal activity, which would undo all your hard work.
Reapply copper fungicide according to the product label, typically every seven to ten days during humid stretches of summer. Wisconsin summers can stay muggy for weeks, so consistent applications keep your plants protected.
Wear gloves and eye protection when handling fungicide products. Safety first, always, even with products labeled as organic or natural.
Pruning and treating together is a powerful one-two punch against disease. Stay consistent with both practices and your tomato plants will reward you with a strong, colorful finish to the season.
Mulch Around The Base To Regulate Soil Temperature

A good layer of mulch is one of the simplest upgrades you can make to your tomato garden. Few garden inputs deliver as many compounding benefits for the cost.
Mulch regulates soil temperature by acting as an insulating blanket around the roots. In Wisconsin, where nights can cool off sharply, stable soil temperature keeps nutrient absorption running smoothly.
When soil temperature stays consistent, roots stay active and healthy. Active roots keep pulling in the water and nutrients your plant needs to stay productive.
Straw, shredded leaves, and wood chips all make excellent mulch for tomato gardens. Avoid dyed wood mulches as a precaution.
Dye formulations vary widely and their long-term effects on vegetable roots are not established. Apply a layer about two to three inches thick around each plant.
Do not pile mulch directly against the stem, which can trap moisture and encourage rot at the base. Mulch also suppresses weeds that compete with your tomatoes for nutrients and water.
Fewer weeds mean more resources go directly to your plants and eventually to your harvest. As organic mulch breaks down, it adds nutrients back into the soil.
This slow, steady feeding supports your plants throughout the entire growing season without any extra effort from you. Mulch also reduces soil splash during rainstorms.
Less splash means fewer fungal spores landing on lower leaves, which directly reduces the yellowing problem you started with. Tomato leaves turning yellow can often be prevented with this one simple step.
Mulch your garden beds now and protect your harvest all the way to the end of Wisconsin’s growing season.