How To Set Up A Rain Barrel System In North Carolina That Feeds A Container Garden All Summer
Container gardens are thirsty, and anyone who has kept a full patio of pots through a North Carolina summer knows how fast that watering obligation adds up in both time and water cost.
A well-designed rain barrel system solves that problem quietly in the background, making rainwater available on demand through the dry stretches that show up reliably between July and September across most of the state.
Setting one up correctly from the beginning makes the difference between a system that works effortlessly all season and one that causes more frustration than it relieves.
The setup decisions you make around placement, overflow management, and distribution determine how much of your container garden actually benefits from the water being collected every time it rains.
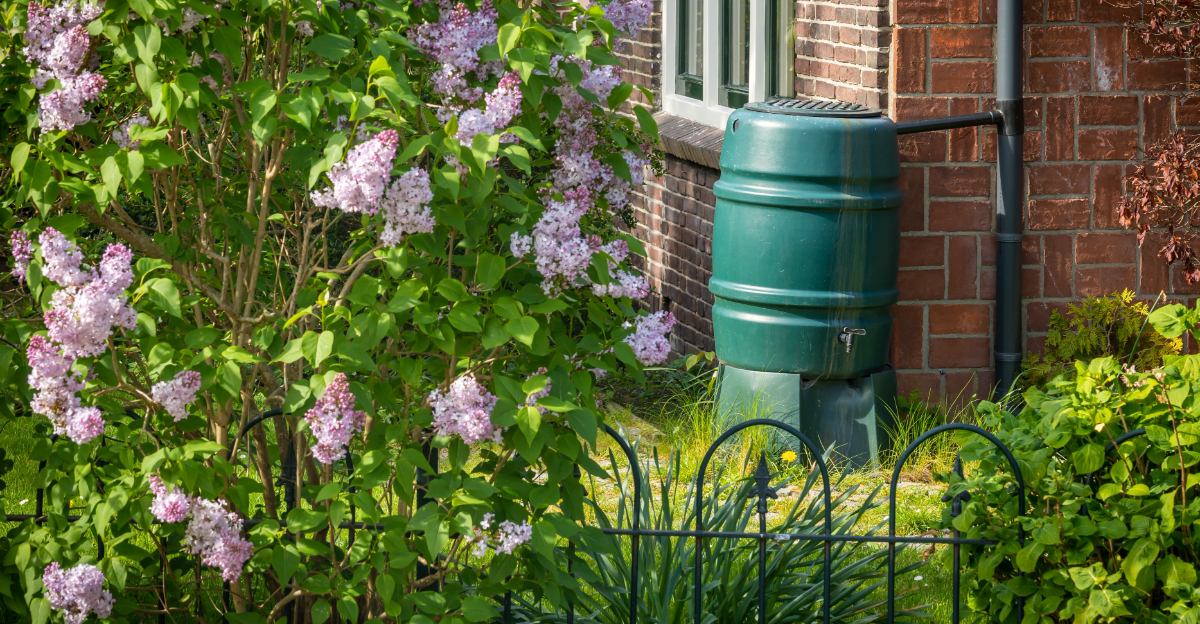
1. Choose The Right Location For Your Rain Barrel

Finding the perfect spot for your rain barrel is the foundation of the whole system, and it matters more than most people expect. You want to place the barrel as close to a downspout as possible, since that is where rainwater flows off your roof.
The shorter the distance between the downspout and the barrel, the easier the setup and the less water you lose to splashing or runoff.
Stability is a big deal here. A full 55-gallon barrel can weigh over 450 pounds, so a wobbly or soft surface is not going to work.
Place your barrel on a flat, solid base like a concrete pad, cinder blocks, or compacted gravel. This keeps the barrel level and prevents tipping, especially during heavy North Carolina summer storms.
Proximity to your container garden is another smart thing to consider. The closer the barrel is to your plants, the easier it is to run a hose or drip line without pressure loss.
In North Carolina, afternoon thunderstorms are common from June through August, so positioning the barrel under an active downspout on the side of your house facing those storms can maximize collection.
A spot with partial shade is also helpful, since it slows algae growth inside the barrel and keeps the water cooler.
Take a walk around your house before committing to a location, and you will likely spot the ideal setup quickly.
2. Select A Suitable Rain Barrel

Not every barrel you find at a hardware store or online is built for this job, so knowing what to look for saves you a lot of hassle later. The best rain barrels for a North Carolina container garden are food-grade plastic barrels, usually 55 gallons or larger.
Food-grade materials do not leach harmful chemicals into the water, which matters when that water is going directly to plants you might be eating.
A secure, tight-fitting lid is non-negotiable. North Carolina summers bring mosquitoes, and standing water is their favorite place to breed.
A lid with a fine screen or locking seal blocks insects from getting inside while still allowing water to flow in from the downspout. Look for a barrel that also has an overflow port near the top so excess water has somewhere to go during heavy rains.
Your North Carolina Garden Changes Every Week. Your Plan Should Too.
Gardening in North Carolina changes quickly throughout the season. Every Friday you’ll receive a simple weekly plan showing exactly what to plant, prune, fertilize, harvest, and protect so you never miss the right timing.
The spigot is one of the most important features to evaluate. You want a spigot positioned near the bottom of the barrel so gravity pulls water out efficiently.
Brass spigots tend to outlast plastic ones and create a better seal. For a single container garden with six to twelve pots, one 55-gallon barrel can last several days between rains during moderate summer heat.
If you have a larger setup or grow thirsty plants like tomatoes and peppers, consider linking two barrels together for double the capacity. Investing in quality up front means fewer repairs and a more reliable water supply all summer long.
3. Connect The Barrel To A Downspout

Connecting your barrel to the downspout is where the system really comes to life, and there are two clean ways to do it.
The most beginner-friendly method is using a downspout diverter, which is a small device that attaches directly to your existing downspout.
It redirects water into the barrel when it is not full and automatically sends overflow back down the downspout when the barrel reaches capacity.
The second approach involves cutting the downspout at the right height and directing it straight into the barrel opening. This method works well but requires a bit more precision.
You need to cut the downspout high enough so the barrel sits beneath it with room to spare, and the cut edge should be smooth to prevent debris buildup.
Adding a flexible elbow connector between the cut downspout and the barrel inlet makes the setup more secure and easier to adjust.
Preventing leaks from the start saves a lot of frustration. Use waterproof sealant or rubber gaskets around any fittings to keep joints tight.
Make sure the barrel inlet has a screen over it to catch leaves, shingle grit, and other roof debris before they enter the barrel. North Carolina rooftops can collect a surprising amount of grit, especially after summer storms.
Test your connection on a dry day by running a garden hose into the downspout above the diverter and watch for any drips or weak spots. A little extra effort during setup means consistent, clean water capture all season.
4. Add A Screen Or Filter

Clean water is everything when it comes to keeping your container plants healthy, and a good screen is your first line of defense.
Even with a diverter in place, small particles like pollen, leaf fragments, insect eggs, and roof grit can sneak into the barrel during a heavy rain.
A fine mesh screen stretched tightly over the barrel opening catches these before they contaminate your water supply.
Hardware cloth with a mesh size of around 1/16 inch works well for blocking most debris while still allowing water to flow through freely. You can cut it to fit and secure it with a bungee cord, zip ties, or a barrel ring depending on your barrel design.
Some barrels come with a built-in screen, but adding an extra layer on top is always a smart move, especially during fall when leaf debris is heavy.
In North Carolina, mosquito control is a serious concern from late spring through early fall. Even a tiny gap in your screen is enough for a mosquito to slip through and lay eggs.
Check your screen after every major storm and clear off any collected debris so water can still drain into the barrel efficiently. Over time, screens can develop small tears or rust spots, so inspect them monthly and replace them as needed.
Algae can also begin forming inside the barrel if sunlight gets through, so pairing your screen with an opaque barrel lid or barrel cover keeps the interior dark and the water fresher for longer. Clean water means healthier roots and stronger plants all summer.
5. Set Up A Watering System For Containers

Getting water from the barrel to your containers smoothly is where a little planning pays off big. The simplest setup is a standard garden hose attached directly to the barrel spigot.
Since rain barrels rely on gravity rather than water pressure, keep the hose short and the containers close to the barrel for the best flow rate. Long hoses reduce pressure significantly, especially if the barrel is not elevated very high.
Raising the barrel on a sturdy platform adds critical gravity pressure. Every foot of elevation adds roughly 0.43 PSI of water pressure, which makes a real difference when filling watering cans or running a drip line.
A platform made from cinder blocks or pressure-treated lumber, built to safely hold the full weight of the barrel, can raise it 12 to 18 inches and dramatically improve flow.
For a hands-free approach, a drip irrigation kit connected to the spigot works beautifully with container gardens. You can run small drip lines to each pot and set up a simple timer or manual valve to control watering sessions.
This is especially useful during the hot, dry stretches that hit North Carolina in July and August when containers can dry out within a day.
A watering wand with a gentle rose head is another great option for hand-watering multiple pots without disturbing the soil surface.
Whichever method you choose, always water in the early morning to reduce evaporation and give your plants the best chance to absorb moisture before the midday heat sets in.
6. Monitor Water Levels And Overflow

Keeping an eye on your barrel’s water level is a habit that will save your garden during dry stretches and protect your yard during wet ones.
After a good rain, it feels satisfying to see a full barrel, but knowing when the level is getting low gives you time to plan ahead.
Some barrels come with a clear sight tube or water level gauge on the side, and adding one to a plain barrel is a quick and inexpensive upgrade.
Overflow management is just as important as water collection. When the barrel fills up and rain keeps falling, that extra water has to go somewhere.
Without a proper overflow plan, water can pool against your home’s foundation, which leads to erosion, basement seepage, and damaged landscaping.
A dedicated overflow hose or pipe attached to the overflow port near the top of the barrel solves this problem cleanly.
Direct your overflow hose toward a rain garden, a mulched planting bed, or a grassy area at least five feet from the foundation. This turns excess water into a resource rather than a problem.
In North Carolina, summer storms can dump several inches of rain in a single afternoon, so do not assume your barrel will never overflow just because it starts the day half empty.
Check the overflow connection after every storm to make sure it has not come loose or become blocked.
Staying on top of water levels and overflow keeps your system running smoothly and your containers perfectly hydrated through every weather swing summer throws your way.
7. Rotate And Use The Water Consistently

Rainwater does not stay fresh forever, and using it consistently is the best way to keep your barrel system working at its peak.
Stagnant water left sitting in a barrel for more than a week or two can develop a slight odor, encourage algae growth, and become less appealing for your plants.
The good news is that a thriving container garden during a North Carolina summer will use water fast enough to keep things fresh naturally.
Water your containers from the barrel every one to two days during hot stretches, especially for plants like tomatoes, cucumbers, and herbs that need consistent moisture.
Containers dry out faster than in-ground beds because they have limited soil volume and more surface area exposed to sun and wind.
Keeping the barrel actively cycling through water ensures you are always pulling from a fresh supply.
If you have more than one barrel, connecting them in sequence is a smart move. Link the overflow from the first barrel into the inlet of the second using a connector hose.
Use the first barrel until it empties before switching to the second, which keeps water moving and reduces the chance of stagnation. This two-barrel setup can hold 110 gallons or more, giving your container garden a serious buffer during dry weeks.
Labeling your barrels with the date of the last refill is a simple trick that helps you track freshness. Consistent use, combined with smart rotation, keeps your rainwater system productive and your plants lush from June all the way through September.
8. Winter And Maintenance Considerations

Rain barrels are a long-term investment, and taking care of them between seasons keeps them performing year after year.
North Carolina winters are generally mild, but temperatures can drop below freezing, especially in the Piedmont and mountain regions.
Water left inside a barrel during a freeze can expand and crack the plastic, which turns a perfectly good barrel into an expensive piece of yard trash.
As fall arrives and your container garden winds down for the season, start by using up as much stored water as possible. Give your garden a final deep watering, then disconnect the barrel from the downspout and drain any remaining water completely.
Tipping the barrel upside down or storing it on its side helps any residual moisture escape and prevents cracking.
Before storing the barrel, give it a good cleaning. Mix a diluted bleach solution of about one tablespoon of unscented bleach per gallon of water and swirl it around inside the barrel to remove algae, mineral deposits, and any organic buildup.
Rinse thoroughly with clean water before storage. Store the barrel in a garage, shed, or covered area away from direct winter sunlight, which can degrade plastic over time.
Also reconnect your downspout to its original position so rainwater flows away from the foundation properly during winter months. Come spring, inspect all fittings, screens, and spigots before reinstalling.
A quick maintenance session each season adds years to the life of your barrel and keeps your container garden system ready to go the moment warm weather returns.