The Mistakes That Ruin Amaryllis Blooms Indoors And How To Avoid Them In North Carolina
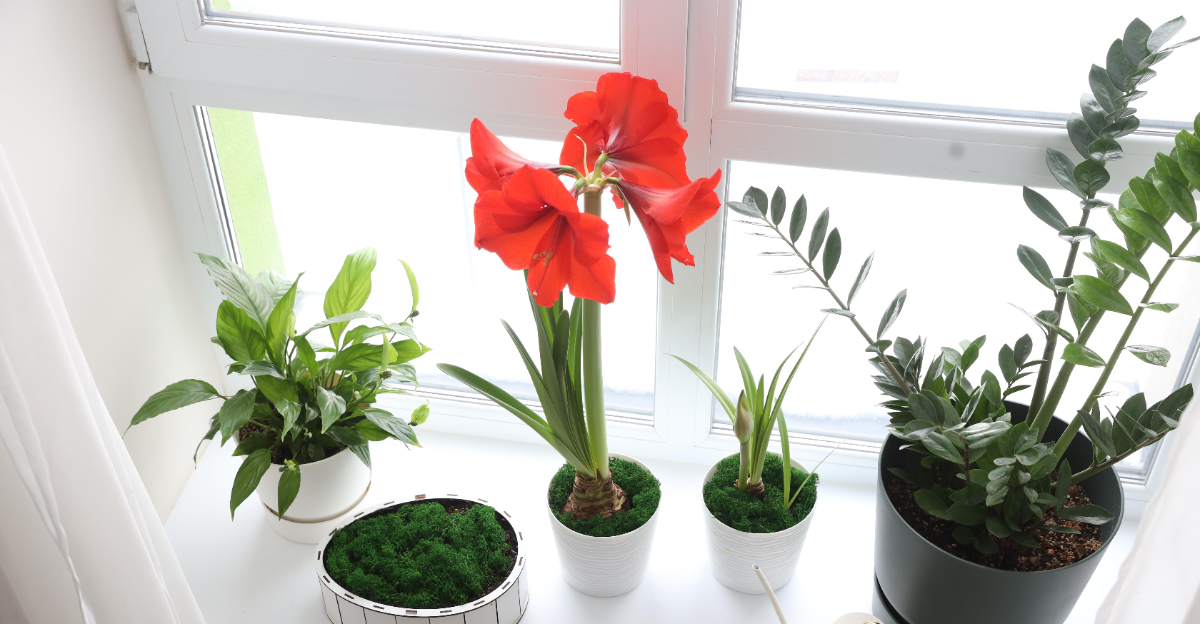
Amaryllis bulbs arrive looking like they have everything figured out already. The bulb is big, firm, and practically ready to grow on its own, which gives a lot of North Carolina plant owners the impression that success is basically guaranteed.
Then the bulb produces weak stems, blooms that open halfway and fall over, or flowers that last only a few days before looking spent and tired. These disappointments are not random, and they are not the result of a bad bulb in most cases.
They trace back to specific mistakes made during the growing process, some of them before the bulb ever goes into a pot.
North Carolina’s indoor environment adds layers to the challenge, with winter heating that dries the air significantly, variable light through the coldest months, and the temptation to move plants around as conditions shift inside the home.
Understanding which decisions actually determine bloom quality here, and which common habits quietly work against the plant, makes the difference between amaryllis that delivers and amaryllis that leaves you wondering what went wrong.
1. Overwatering The Bulb

Water might seem like the ultimate act of kindness for your plants, but with amaryllis, too much of it is one of the fastest ways to ruin a perfectly good bulb.
Amaryllis bulbs store their own energy and moisture, so they simply do not need constant watering, especially when they are just getting started indoors.
In North Carolina homes during the cooler fall and winter months, indoor air tends to stay fairly humid, which means the soil holds moisture longer than you might expect.
Watering heavily before active growth appears keeps the bulb sitting in wet conditions, which quickly leads to rot.
The base of the bulb softens, roots struggle to form properly, and the whole plant loses its ability to push up those gorgeous blooms.
The smart approach is to water very lightly right after planting, just enough to settle the soil around the bulb. Wait until you see the first green shoot pushing up before you gradually increase watering.
Always check the top inch of soil first, and if it still feels damp, hold off for another day or two. Using a well-draining potting mix designed for bulbs makes this process much easier.
Your patience during this early stage is exactly what sets a thriving amaryllis apart from one that never quite gets going.
2. Keeping Plants In Low Light

Amaryllis plants are sun lovers at heart, and placing them in a dim corner of your home is a recipe for disappointment. Low light causes the leaves to stretch upward and outward as the plant desperately searches for more energy.
The result is a tall, floppy-looking plant with weak flower stalks that cannot support the weight of those large, beautiful blooms.
In North Carolina, homeowners actually have a nice advantage because the state enjoys a good amount of natural sunlight even in winter. Placing your amaryllis near a south or east-facing window gives it access to several hours of bright, indirect light each day.
Your North Carolina Garden Changes Every Week. Your Plan Should Too.
Gardening in North Carolina changes quickly throughout the season. Every Friday you’ll receive a simple weekly plan showing exactly what to plant, prune, fertilize, harvest, and protect so you never miss the right timing.
Morning sun is especially ideal because it provides strong light without the intense afternoon heat that can sometimes stress the plant or fade the flowers faster than you would like.
If your home does not have great natural light options, a grow light placed about six to twelve inches above the plant works wonderfully as a supplement. Run it for roughly twelve to fourteen hours each day to mimic natural conditions.
Rotating the pot every few days also helps the plant grow evenly instead of leaning to one side. Strong, consistent light from the very beginning encourages compact, sturdy growth and sets the stage for thick, vibrant stalks loaded with spectacular flowers.
Good light is truly one of the easiest upgrades you can make for your indoor amaryllis this season.
3. Planting The Bulb Too Deep

Here is something that surprises a lot of first-time amaryllis growers: these bulbs are not meant to be fully buried.
Unlike most garden bulbs you might plant outdoors in a North Carolina yard, amaryllis bulbs actually need to sit with their top third or even half peeking above the soil surface.
Burying the whole bulb traps moisture around the neck, which is one of the most vulnerable parts of the plant.
When that neck stays wet and covered, it creates a perfect environment for fungal issues and soft rot to set in. Even if the bulb does manage to sprout, it often produces weaker stalks and smaller flowers than it is truly capable of producing.
The blooms you were so excited about end up being a disappointment compared to what a properly planted bulb can deliver.
Getting the depth right is actually very simple once you know what to look for. Choose a pot that is only slightly wider than the bulb itself, roughly an inch or two on each side.
Fill the bottom with fresh, well-draining potting mix, set the bulb in place, and then add soil around the sides while leaving the upper portion exposed. Firm the soil gently so the bulb stands upright on its own.
This small detail makes a huge difference in how confidently your amaryllis grows and blooms throughout the indoor season in North Carolina.
4. Ignoring The Dormancy Cycle

One of the most overlooked secrets to getting an amaryllis to rebloom year after year is understanding that these plants need a real rest.
The dormancy cycle is not optional, it is a biological necessity that allows the bulb to recharge and store enough energy to produce flowers again.
Skipping this step is one of the most common reasons why a once-glorious amaryllis never blooms a second time.
After your amaryllis finishes flowering and the foliage has had time to grow and gather energy through photosynthesis, it is time to start the winding-down process. For North Carolina growers, late summer is usually the right window to begin this transition.
Stop watering gradually, move the plant to a cooler spot away from direct light, and let the leaves fade and dry out naturally over a few weeks.
Once the foliage has fully dried, remove it cleanly and store the bulb in a cool, dark location at around 50 to 55 degrees Fahrenheit for at least eight to ten weeks. A basement corner or a cool closet works perfectly for this in many North Carolina homes.
After the rest period ends, bring the bulb back out, repot it in fresh soil, and begin watering lightly again. Within a few weeks, you will likely see that first green tip pushing up, and the whole exciting cycle begins again.
Respecting dormancy is what separates a one-season plant from a long-term blooming success.
5. Fertilizing Too Early

Excitement is a totally natural feeling when you first pot up a fresh amaryllis bulb, and it is tempting to give it every possible advantage right from the start.
However, reaching for the fertilizer before the plant has even sprouted is one mistake that can actually slow things down rather than speed them up.
A newly planted bulb does not have an active root system yet, so it simply cannot absorb or use those nutrients effectively.
Applying fertilizer to a bulb that is not yet actively growing can create a salt buildup in the soil that stresses the roots as they begin to form. In some cases, it can even interfere with early root development, leaving the plant weaker during one of its most critical growth stages.
The bulb already carries everything it needs to push up that first spectacular flower stalk, so early feeding is genuinely unnecessary.
The right time to start feeding your amaryllis is once you can clearly see strong leaf growth emerging, usually a few weeks after the initial sprout appears. At that point, use a balanced liquid fertilizer with a ratio like 10-10-10 or one slightly higher in phosphorus to support blooming.
Feed every two to three weeks through the active growing season. In North Carolina, where indoor growing conditions vary by season, timing your fertilizing to match visible growth keeps your amaryllis healthy, well-nourished, and on track for a truly breathtaking floral display.
6. Allowing Flower Stalks To Overheat

Finding the perfect spot for your amaryllis indoors feels like a win, until you realize the nearby heating vent is quietly working against you.
Amaryllis flowers are sensitive to sudden temperature changes and prolonged heat exposure, and placing them near a heat source is one of the sneakiest ways to shorten their bloom time.
What could have been two to three weeks of gorgeous flowers can shrink down to just a few disappointing days.
North Carolina winters often mean homes are running central heat consistently from November through February, which creates warm, dry pockets near vents, fireplaces, and radiators.
These spots might feel cozy to you, but to an amaryllis stalk loaded with open blooms, that dry heat causes the flowers to age rapidly and drop petals well before their time.
The colors fade faster, the petals feel papery, and the overall display looks tired before it ever gets a chance to shine.
Keeping your amaryllis in a spot where temperatures stay consistently between 60 and 70 degrees Fahrenheit gives the blooms their best chance at lasting as long as possible. Avoid windowsills that get blasted by afternoon sun combined with radiator heat below.
A bright but cool room is genuinely ideal. Moving the plant to a slightly cooler spot at night, around 55 to 60 degrees, can actually extend the bloom period even further.
Small adjustments to placement make a noticeable difference in how long those stunning flowers stay fresh and vibrant indoors.
7. Using Pots Without Drainage

Decorative pots are beautiful, and it makes total sense why so many people want to display their amaryllis in a stylish container that matches their home decor.
The problem is that most decorative pots do not have drainage holes, and for a moisture-sensitive bulb like amaryllis, that missing hole at the bottom can cause serious trouble.
Water has nowhere to escape, so it collects at the base of the pot and keeps the lower roots sitting in soggy conditions.
North Carolina homes tend to have moderate indoor humidity, especially during the spring and fall months when windows stay cracked and air moves through.
That extra ambient moisture combined with a pot that traps water below the soil creates exactly the kind of environment where bulb rot takes hold quickly and quietly.
By the time you notice the plant looking off, the damage underneath the soil may already be significant.
The easiest fix is to use a simple nursery pot with drainage holes as the actual growing container, then slip it inside your decorative pot for display. This way you get the look you love without sacrificing the plant’s health.
Always empty the decorative outer pot about thirty minutes after watering so standing water does not wick back up into the soil. Choosing a well-draining potting mix and adding a small layer of perlite at the bottom of the nursery pot also helps water move through more freely.
Your amaryllis will thank you with strong roots and spectacular blooms all season long.