When To Take Blueberry Cuttings In Georgia And How To Root Them Easily
One good blueberry bush has a way of making gardeners want more. Fresh berries disappear fast in summer, and plenty of people in Georgia start thinking about extra plants while picking fruit straight off the branch.
Cuttings sound difficult until someone actually tries rooting a few at home. Then it quickly becomes obvious why so many gardeners keep doing it instead of buying new bushes every season.
The part that catches people off guard is how sensitive blueberries can be to timing.
A cutting taken during the right stage can root surprisingly well and start turning into a strong new plant much faster than expected.
1. Late Spring And Early Summer Usually Work Best For Cuttings

Timing a blueberry cutting correctly can be the difference between a stem that roots and one that simply sits in the soil doing nothing. In Georgia, late spring through early summer is widely considered the most practical window for taking softwood cuttings.
Softwood refers to the new, flexible green growth that appears after winter dormancy ends and temperatures begin climbing steadily.
Around May through June, Georgia’s warmth encourages active cell growth in blueberry stems. That active growth makes it easier for cut stems to produce roots when placed in a rooting medium.
Stems taken during this period tend to be pliable, not brittle, which is a good sign you are working with the right material.
Hardwood cuttings taken during winter dormancy are another option for Georgia gardeners, typically from December through February. Both methods can work, though softwood cuttings often root faster under the right conditions.
Whichever season you choose, consistency in care afterward matters just as much as the timing itself.
2. Cut Just Below A Leaf Node Before Planting

Leaf nodes are small but mighty. A leaf node is the point on a stem where a leaf attaches or where a bud forms, and cutting just below one gives your blueberry cutting its best shot at producing roots.
Roots tend to emerge from these nodes because that tissue is biologically active and responsive to rooting conditions.
Sharp, clean tools are non-negotiable here. Use pruning shears or a clean knife that has been wiped down with rubbing alcohol before you start.
A ragged or torn cut creates more surface area for pathogens to enter, which can slow or prevent rooting entirely. One smooth cut just below a node, made at a slight angle, is all you need.
Aim for cuttings that are roughly four to six inches long. Shorter stems sometimes lack the stored energy needed to push out roots, while longer ones can lose moisture too quickly before roots form.
Georgia summers can be intense, so keeping your cutting at a manageable length helps it stay hydrated during the rooting phase.
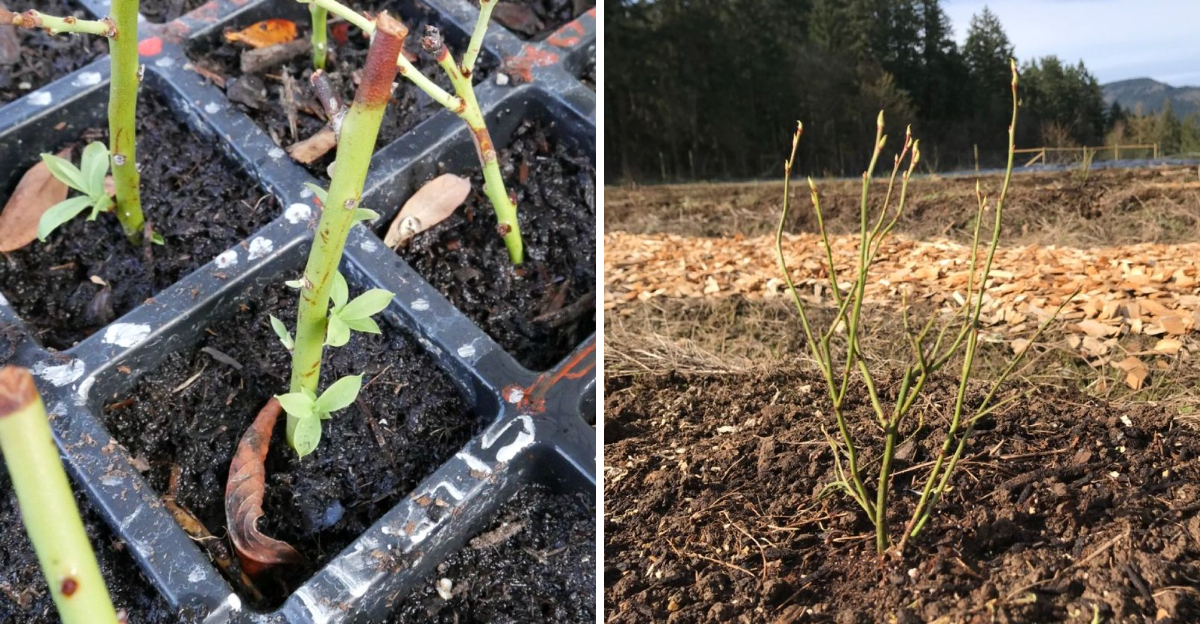
After cutting, work quickly to get the stem into your rooting medium.
3. Remove Lower Leaves Before Stems Go Into Soil

Stripping the lower leaves off your blueberry cutting is a step that beginners sometimes skip, and it almost always causes problems.
Your Georgia Garden Changes Every Week. Your Plan Should Too.
Gardening in Georgia changes quickly throughout the season. Every Friday you’ll receive a simple weekly plan showing exactly what to plant, prune, fertilize, harvest, and protect so you never miss the right timing.
Leaves buried in soil or potting mix will break down quickly, encouraging mold and creating conditions that work against root development.
Removing them before planting is a simple habit that protects your cutting from the start.
Leave only the top two or three leaves on each cutting. Those remaining leaves do important work by continuing to photosynthesize and supply the stem with a small but steady stream of energy.
Without any leaves at all, the cutting has no way to support itself while waiting for roots to form. Balance is the goal here, not stripping the stem completely bare.
Georgia’s humidity can be both helpful and challenging during the propagation process. On one hand, moisture in the air reduces how much the cutting loses through its leaves.
On the other hand, excess moisture around buried plant material speeds up breakdown and can invite fungal issues. Removing lower leaves eliminates one of the main entry points for those problems.
After stripping, take a quick look at the bottom inch or two of the stem. It should be clean, smooth, and free of any remaining leaf stubs.
4. Dip Stem Ends In Rooting Hormone For Faster Results

Rooting hormone sounds more complicated than it actually is. Available at most garden centers across Georgia, it comes in powder, gel, or liquid form and contains synthetic versions of auxin, a natural compound that encourages plants to produce roots.
Dipping your blueberry cutting into rooting hormone before planting can noticeably speed up the process compared to skipping it entirely.
Powder form is the easiest to use for most home gardeners. Tap a small amount into a separate container rather than dipping directly into the original jar.
Cross-contamination from a wet stem can introduce moisture into the powder and cause clumping over time. Dip the bottom inch of your cutting into the powder, tap off any excess, and proceed straight to planting.
Gel rooting hormones have become popular because they cling to the stem surface more consistently than powder. Whichever form you choose, the concentration level matters.
Products labeled for softwood cuttings are appropriate for the green blueberry stems taken during Georgia’s late spring window. Hardwood formulas have higher concentrations designed for dormant stems taken in winter.
Rooting hormone is not a guarantee of success on its own. Soil moisture, temperature, and light all influence whether roots actually form.
5. Use Moist Potting Mix Instead Of Heavy Garden Soil

Grabbing a scoop of backyard dirt might seem like the easiest option, but garden soil is usually the wrong choice for rooting blueberry cuttings. Heavy soil compacts around delicate new roots, limits oxygen flow, and often holds too much water in the wrong places.
A lightweight potting mix gives young roots the airy, moist environment they need to develop properly.
Blueberries prefer acidic conditions, and that preference does not disappear during propagation. A mix of peat moss and perlite, roughly equal parts, creates a medium that is both moisture-retentive and well-draining.
Peat lowers pH naturally and holds moisture without becoming waterlogged. Perlite keeps the structure loose so air can reach the developing root zone.
Georgia gardeners sometimes add a small amount of pine bark fines to the mix for extra drainage and to mimic the acidic forest floor conditions blueberries naturally thrive in.
Avoid mixes that contain fertilizer, since newly forming roots are sensitive and can be damaged by nutrients before they are established enough to handle them.
Plain, unfertilized mixes work best during the early rooting phase.
Moisten the mix before inserting your cuttings rather than watering heavily afterward. Squeeze a handful and check that it holds its shape without dripping.
6. Cover Containers Loosely To Hold In Humidity

Humidity is quietly one of the most important factors in successful blueberry propagation. Before roots form, cuttings cannot pull water from the soil the way established plants do.
Covering your containers helps trap moisture in the air around the leaves, reducing how much the cutting loses while it focuses energy on producing roots instead of staying hydrated.
A simple clear plastic bag placed loosely over the pot works well for most home gardeners in Georgia. Clear material lets light through while holding moisture inside.
Leave a small gap at the bottom or poke a few small holes in the bag so some air circulation remains. Completely sealed environments can encourage mold, especially in Georgia’s already humid summer conditions.
Check under the cover every few days. Condensation on the inside of the bag is a sign that humidity levels are adequate.
If the inside looks completely dry, mist lightly with a spray bottle and replace the cover. If water is pooling at the base of the pot, ease off on moisture and allow more ventilation until conditions balance out.
Commercially available humidity domes designed for seed starting trays fit neatly over standard propagation trays and are reusable season after season. Either option works fine as long as airflow is not completely blocked.
7. Keep Fresh Cuttings In Bright Indirect Light

Sunlight placement is something a lot of first-time propagators overlook, and it shows up in the results.
Direct afternoon sun in Georgia can be fierce, especially from June through August, and freshly cut stems without an established root system simply cannot handle that kind of heat exposure.
Bright indirect light strikes the right balance between providing energy and avoiding stress.
A north or east-facing window indoors works well for most of the rooting period. Cuttings placed near a south or west-facing window should be shielded with a sheer curtain to diffuse the intensity.
Outdoors, a shaded porch or a spot under a tree canopy that receives filtered light throughout the day can also work, provided temperatures stay manageable.
Adequate light keeps the remaining leaves on your cuttings functioning. Even without roots, those leaves are still converting light into energy that supports the stem during the rooting process.
Placing cuttings in a dark corner to avoid heat might seem protective, but low light slows everything down and leaves the cutting in a kind of limbo where neither rooting nor recovery progresses well.