When To Prune Clematis In Tennessee, And How To Do It Right For A Fuller Bloom
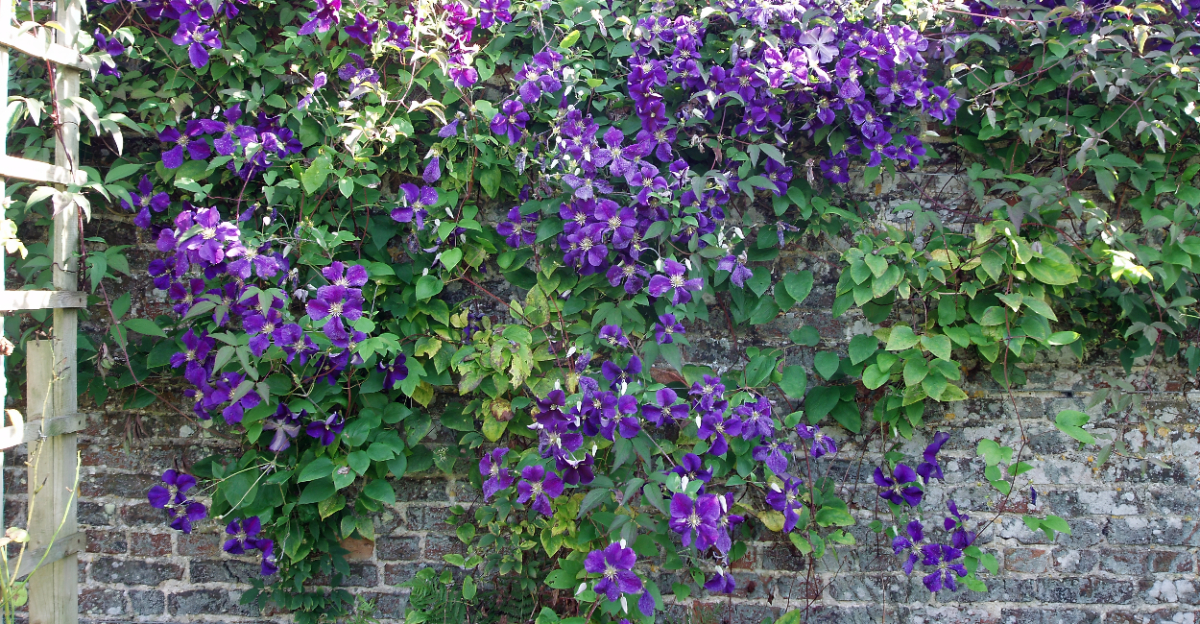
Clematis can stop a neighbor mid-walk. One glance at a fence covered in those blooms and suddenly everyone wants to know your secret. The truth is, growing clematis in Tennessee is not the hard part.
Keeping it blooming year after year is where most gardeners quietly lose the battle. One wrong cut at the wrong time, and you have just traded a full season of flowers for a tangle of green stems going nowhere.
Tennessee’s climate adds another layer to the puzzle, with its unpredictable springs and humid summers that do not always play by the rulebook.
But once you understand when to prune and what you are actually cutting, everything clicks.
The Best Time To Prune Clematis In Tennessee

Spring in Tennessee sneaks up fast, and so does your pruning window. Timing your cuts correctly is the single biggest factor in getting a full, gorgeous bloom season.
Most clematis varieties in Tennessee benefit from pruning in late winter or very early spring. Aim for late February through mid-March, just before new growth really kicks off.
The state’s climate is a tricky mix of warm spells and late cold snaps. Pruning too early risks frost damage on fresh cuts, so watch the forecast carefully.
A good rule of thumb is to wait until you spot tiny green buds swelling on the lower stems. That is your green light to grab the shears.
Late-blooming varieties, known as Group 3 clematis, can handle a hard cutback right around this same window. Early bloomers need a lighter touch and a later trim after their first flush of flowers.
Tennessee’s long growing season actually works in your favor here. You get a generous stretch of mild weather that lets pruned vines recover quickly and push out strong new growth.
Not every clematis follows the same schedule, and that is where a lot of gardeners get tripped up. Mixing up your pruning timing between groups is one of the fastest ways to lose a season of blooms without ever knowing why.
Mark your calendar now so you do not miss the sweet spot. A well-timed cut sets the entire season up for success, and your neighbors will likely notice the difference.
Clematis Pruning Groups

Not all clematis are created equal, and that matters a lot when you pick up your pruning shears. Knowing your plant’s group number is the foundation of every good pruning decision.
Group 1 clematis bloom on old wood from the previous season. These early bloomers, like Clematis montana, should only be lightly trimmed right after their spring flowers fade.
Cutting Group 1 vines hard in late winter would remove most of the flower buds you worked so hard to develop. A gentle cleanup is all they need to stay tidy and healthy.
Group 2 varieties are the showiest of the bunch, producing large, showy flowers in late spring and again in late summer. Prune these lightly in early spring, removing only weak or damaged stems.
A second light trim after the first bloom wave encourages that gorgeous late-season repeat performance. Think of it as giving the plant a mid-season refresh rather than a dramatic overhaul.
Group 3 clematis, including popular varieties like Jackmanii and Sweet Autumn, bloom on fresh new growth each year. These tough plants can be cut back hard, down to about 12 inches from the ground, every late winter.
Identifying your group before you cut is non-negotiable. Check your plant tag, look it up online, or ask your local nursery, because one wrong cut could cost you a whole season of blooms.
Tools You Need Before You Start Pruning

Sharp tools are not optional in the garden; they are essential. Dull blades tear plant tissue instead of cutting cleanly, and torn stems invite disease right through the open wound.
A quality pair of bypass pruners is your most important tool for clematis work. They make clean, precise cuts on stems up to half an inch thick without crushing the wood.
For thicker, older woody stems near the base, a pair of loppers gives you the extra leverage you need. Look for a model with a ratchet mechanism if your hands tire easily.
Always clean your blades before you start pruning. A quick wipe with rubbing alcohol or a diluted bleach solution prevents spreading any fungal issues from plant to plant.
Gardening gloves protect your hands from the rough, wiry stems that clematis develops over time. A pair with a thin, flexible grip lets you feel what you are doing while still offering protection.
A small folding hand saw comes in handy for removing the thick, gnarled base stems on older, neglected vines. Sometimes those lower stems need serious attention that pruners simply cannot handle.
Keep a bucket nearby to collect trimmings as you go. Tidying up as you work keeps the job manageable and helps you see your progress clearly from start to finish.
Step-By-Step Guide To Pruning Clematis In Tennessee

Standing in front of a tangled mass of old clematis stems can feel overwhelming at first. Breaking the job into clear steps makes it manageable and actually enjoyable.
Start at the base of the plant and work your way upward, looking for green buds on the lower stems. These small, reddish-green nubs tell you exactly where the live wood begins.
For Group 3 varieties, cut all stems back to just above the lowest pair of healthy buds. This usually puts you somewhere between 12 and 18 inches from the ground.
Always cut at a slight angle, just above a leaf node or bud. This angle helps water run off the cut surface rather than pooling and causing rot.
For Group 2 clematis, remove only the damaged or spindly stems entirely. Trim the remaining healthy stems back to the first set of strong buds you can find near the top of the vine.
Once your cuts are made, gently untangle the old stems from the support structure. Pull them out slowly to avoid snapping the new growth that may already be threading through the trellis.
Finish by loosely tying the remaining stems to your support, spacing them out evenly so each shoot gets plenty of sunlight. Good airflow and light exposure now will translate directly into more blooms come summer.
Common Pruning Mistakes Tennessee Gardeners Make

Every gardener has been there: you prune with confidence, then summer arrives and the vine barely blooms. Understanding where things go wrong is just as valuable as knowing the right technique.
The most common mistake is pruning at the wrong time of year. Cutting a Group 1 or Group 2 clematis in late winter removes the very buds that would have opened into flowers.
Another frequent error is cutting too high on the plant. When cuts are made too high up the stem with no buds below, the vine has less to work from when pushing out new growth.
Some gardeners skip pruning entirely because they are afraid of making a mistake. A neglected vine becomes a tangled, woody mess that produces fewer blooms with each passing season.
Using dirty or dull tools is a mistake that often goes unnoticed until problems show up. Ragged cuts and transferred fungal spores can weaken an otherwise healthy plant over a full season.
Pruning during a late frost warning is another misstep that catches many Tennessee growers off guard. Fresh cuts and tender new growth are vulnerable to cold damage, so always check the ten-day forecast first.
Finally, many gardeners forget to label their clematis varieties after planting. Without knowing which group your plant belongs to, every pruning season becomes a guessing game with real consequences for your bloom count.
Simple Tricks To Get More Blooms From Your Clematis

More blooms are not just about pruning; they are about the full picture of care you give your plant throughout the season. A few small changes can produce dramatic results by midsummer.
Feed your clematis with a balanced, slow-release fertilizer in early spring just as new growth begins. A second feeding after the first bloom wave encourages that coveted second flush of flowers.
Clematis loves having its roots in the shade while its stems reach for the sun. Plant low-growing perennials or place flat stones around the base to keep the root zone cool and moist.
Consistent moisture is critical during the first two to three years of establishment. Deep, infrequent watering encourages roots to grow downward rather than staying shallow and vulnerable to heat stress.
Train new shoots horizontally along your trellis rather than letting them grow straight up. Horizontal stems produce more lateral shoots, and each lateral shoot is a potential bloom site.
Remove spent flowers promptly on repeat-blooming Group 2 varieties. Removing spent blooms signals the plant to redirect its energy toward producing a second round of buds rather than forming seed heads.
Mulch generously around the base every spring with two to three inches of compost or wood chips. Knowing when to prune is the starting point, but consistent care throughout the season is what truly transforms a clematis vine.