Do These 8 Things To Save Your Storm-Damaged Garden Before The Minnesota Heat Rolls In

Your Minnesota garden took a serious hit. What was thriving is now leaning, torn, and exposed.
Soil has washed away, roots are vulnerable, and your prized tomatoes have lost their footing completely. Can you still turn this around?
You can, but the window is closing fast. Heat is already pressing in, and every hour you wait, the stress compounds.
Weakened plants lose their grip quickly. Recovery spreads when you catch it early, so timing is everything right now.
Each fix targets exactly what the storm left behind, and none of them require special skills or tools. Acting fast is the only advantage you have.
Minnesota gardens face unique pressure after a serious storm, and your plants are already signaling for help. Conditions will not stay forgiving forever.
This is the moment that separates a garden that bounces back from one that quietly fades. Your garden is worth fighting for.
1. Check For Downed Power Lines Before Touching Anything

Stop right there. Before you grab your gloves or pruning shears, scan your entire yard for downed power lines. No garden repair is worth the risk of electrocution.
Lines on the ground can still carry active current, even when they look harmless. Call your utility company first and wait for an all-clear signal. Do not assume a line is safe just because it is not sparking.
Wet soil and standing water make the danger even worse after a storm. Electricity travels through wet ground faster than most people expect.
Keep kids and pets indoors until a professional confirms the yard is safe. This step takes only a phone call but can save everything.
Your storm-damaged garden will still be there once the hazard is cleared. Rushing into a dangerous yard helps no one and fixes nothing.
Utility crews in Minnesota respond after major weather events, and most companies provide emergency contact lines for exactly this situation.
Check your provider’s website for current response information and contact details. Once you get the green light, document where the lines were.
That information can matter when filing claims or working with contractors later. Take a slow walk around the perimeter of your property.
Look up, look down, and look sideways before assuming the coast is clear. Safety is not a formality here. It is the foundation that makes every other step on this list possible and worthwhile.
2. Photograph All Damage For Insurance

Pull out your phone before you touch a single broken branch. Insurance adjusters need to see the damage exactly as the storm left it.
Walk every inch of your yard and shoot photos from multiple angles. Wide shots show the full scope, and close-ups capture specific plant damage.
Include timestamps if your phone allows it. That small detail can make a big difference when processing a claim.
Do not just photograph plants. Capture fencing, raised beds, irrigation systems, and any outdoor structures that took a hit.
Video walkthroughs are even more powerful than still photos. Narrate what you see as you record to add helpful context for adjusters.
Back up everything to a cloud service immediately. Losing your documentation to a failed phone battery would be a frustrating setback.
Make a written list alongside your photos. Note each damaged plant, tool, or structure and estimate its replacement cost if possible.
Contact your homeowner’s insurance provider the same day if damage is significant. Many policies have time limits on storm-related claims.
Ask your agent specifically about garden structures like greenhouses or pergolas. Coverage varies widely between policies, so knowing your plan matters.
Some gardeners skip this step and regret it later when they realize reimbursement was possible. A few minutes of documentation can translate into real financial relief.
Once your records are solid, you can begin the physical cleanup with confidence. Your storm-damaged garden recovery starts with proof, not guesswork.
3. Trim Broken Branches With Clean Cuts

Jagged breaks create entry points for disease and slow the plant’s natural healing process. When a storm splits a branch, it leaves raw, ragged wood exposed to bacteria and fungal spores.
Grab a sharp pair of pruning shears or a hand saw before starting. Dull blades crush plant tissue instead of cutting cleanly, which slows healing.
Always cut just outside the branch collar, which is the slight swelling where branch meets trunk. Cutting too close or too far both cause problems.
Make your cut at a slight angle so water runs off rather than pooling on the wound. Standing moisture on a fresh cut is an open invitation for rot.
Wipe your blades with rubbing alcohol between cuts on different plants. Spreading pathogens from one stressed plant to another is easy to do accidentally, especially when working with plants already showing signs of fungal or bacterial disease.
Remove any hanging or partially attached branches completely. A half-broken limb swinging in the wind causes more damage with every breeze.
Do not seal cuts with paint or pruning sealant. Research shows that most plants heal better when wounds are left open to air naturally.
Pile trimmed material away from your garden beds. Diseased wood left nearby can reintroduce problems you worked hard to eliminate.
Check smaller perennials and annuals too, not just trees and shrubs. Even split flower stems benefit from a clean trim to encourage regrowth.
Every clean cut you make now speeds up recovery before the heat arrives. Your storm-damaged garden needs precision, not just enthusiasm.
4. Redirect Standing Water Away From Plant Bases

Standing water is sneaky trouble for plants. It looks harmless, but roots sitting in waterlogged soil can begin to suffocate within just a few hours.
Grab a garden hoe or spade and create shallow channels leading water away from your beds. Direct it toward a low area of your yard or a drainage point.
Work carefully around plant bases to avoid cutting roots. You want to move water, not cause more damage in the process.
Check for areas where soil has compacted from heavy rain. Compacted ground stops water from draining naturally, creating puddles that linger for days.
Gently loosen compacted spots with a hand cultivator. Even a few inches of loosened soil can dramatically improve drainage speed.
Raised beds are especially vulnerable after heavy storms. If the sides shifted or soil washed out, the drainage structure may need rebuilding.
Avoid walking directly on wet garden beds. Your weight compresses soil further and undoes the drainage work you just completed.
Use a level or even a simple visual check to spot low points in your yard. Water always finds the path of least resistance.
If flooding is a recurring issue, consider adding a French drain or gravel channel as a longer-term fix. One storm can reveal a flaw that has always been there.
Getting water moving quickly protects roots before the heat rolls in and compounds the stress. A dry root zone is a resilient one.
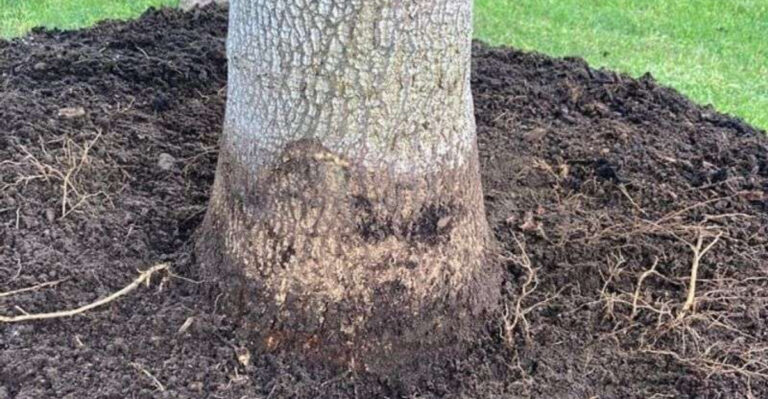
5. Reanchor Exposed Roots And Top Up Washed-Away Soil

Seeing roots poking out of the ground is a jarring sight after a storm. It means the soil that was protecting and feeding your plant got swept or eroded away.
Act on this quickly before sun and heat dry out those exposed roots. Even a few hours of exposure in warm air can cause serious setbacks.
Gently press any surface roots back down and cover them with fresh topsoil or garden soil. Do not pack the soil too tightly around the base.
For larger plants or shrubs that shifted or tilted, use garden stakes to hold them upright. Soft ties work better than wire, which can cut into stems.
Water the replanted area slowly and deeply after adding new soil. This helps settle the ground around the roots without creating air pockets.
Check nearby plants too, even if they look fine on the surface. Storm runoff often disturbs roots several feet away from the main impact zone.
Add a layer of compost on top of the fresh soil to give stressed plants a gentle nutrient boost. Keep it a few inches away from stems to avoid rot.
Avoid using heavy clay soil as fill. It compacts easily and can restrict root movement during the recovery period.
Mark any plants that needed significant reanchoring and watch them closely over the next two weeks.
They may need extra water or shade during the hottest parts of the day. Stable roots mean a stable recovery for your storm-damaged garden.
6. Mulch Around Stressed Plants To Retain Moisture

Mulch might be the most underrated tool in a storm recovery plan. A fresh layer around your plants acts like a shield against the intense heat that follows summer storms.
Spread two to three inches of organic mulch around each plant base. Wood chips, straw, or shredded leaves all work well for this purpose.
Keep the mulch a few inches away from the actual stem or trunk. Piling it directly against the base traps moisture and encourages rot over time.
After a storm strips topsoil or disrupts the ground, mulch helps stabilize what remains. It slows evaporation and keeps soil temperature from spiking on hot afternoons.
Stressed plants lose moisture faster than healthy ones. A good mulch layer can significantly reduce water loss during peak heat hours, keeping soil cooler and more stable beneath the surface.
Mulch also suppresses weeds that would otherwise compete with your recovering plants for water and nutrients. Fewer weeds mean less stress during an already tough time.
If you do not have mulch on hand, a trip to a local garden center in Minnesota is worth it. Many stores carry bulk options that are affordable for larger yards.
Reapply mulch if rain washed away what you had before the storm. A thin or patchy layer offers far less protection than a consistent two-inch blanket.
Think of mulch as your garden’s summer armor. It works quietly in the background while your plants focus on bouncing back from the storm.
7. Flush Debris And Contaminants With Deep Clean Watering

Storms do not just bring wind and rain. They drag in road runoff, sediment, and debris that can linger in your soil long after skies clear.
A deep watering session helps rinse surface debris and dilute residue that storm runoff leaves behind. It will not resolve serious chemical contamination, but it clears what a garden hose realistically can.
Focus first on plants that had standing water pooling around them. Those areas are most likely to have accumulated runoff from nearby roads or lawns.
Check your garden hose or irrigation system for storm damage before turning it on. A cracked hose or shifted drip line can make your cleanup effort counterproductive.
Water deeply enough to push residue past the active root zone. For shallow-rooted vegetables and annuals, that means soaking the soil to at least six inches deep.
Larger shrubs and perennials benefit from deeper penetration.
Repeat this rinse watering once a day for two or three days. Consistency matters more than a single heavy application when dealing with surface residue.
Avoid watering during the hottest part of the afternoon. Morning watering gives moisture time to soak in before heat pulls it back out.
If you suspect significant chemical contamination from nearby flooding, consider having your soil tested. Many local extension offices in Minnesota offer affordable testing options. Check with your nearest office for current availability.
Clear visible debris like leaves, sticks, and clumps of mud from around plant bases before watering. Removing blockages lets water penetrate evenly across the bed.
A thorough rinse now sets your storm-damaged garden up for cleaner, healthier growth ahead.
8. Skip Fertilizing Until Conditions Cool

Fertilizing a stressed plant after a storm is like handing someone a five-course meal right after surgery. The timing is completely wrong, and the result can cause more harm than good.
When plants are already struggling, their roots cannot absorb nutrients efficiently. Fertilizer salts build up in the soil instead, creating conditions that further stress weakened root systems and slow recovery.
Heat compounds this problem significantly. High temperatures cause fertilizer to release too quickly, which can set back recovery by weeks.
Hold off on any granular or liquid fertilizer until your plants show clear signs of stable new growth. That is the signal that roots are functioning well again.
In the meantime, a light top-dressing of compost is the gentler option. Compost releases nutrients slowly and also improves soil structure during recovery.
Watch for yellowing leaves or stunted growth once the storm passes. Those symptoms suggest stress, not a nutrient deficiency, and fertilizer will not fix them.
Watering consistently is far more helpful than feeding during this period. Hydration supports root function and helps plants manage heat stress on their own.
Once temperatures drop and your plants perk back up, you can return to your normal feeding schedule. Patience during the recovery window pays off with stronger, healthier growth.
Many gardeners make the mistake of over-caring after a storm by adding too much too soon.
Restraint is a skill, and your storm-damaged garden will reward it. Let the plants lead. When they are ready to grow, they will show you.