Why Ohio Arborvitae Turn Brown In July And Whether They’ll Come Back
Brown arborvitae in July is one of those problems that lands differently depending on where the color shows up and how fast it spread. Sometimes it is cosmetic.
Sometimes it is the beginning of something more serious. Most Ohio homeowners cannot tell the difference until they have waited too long to do anything useful about it.
July is actually prime time for arborvitae stress in Ohio. Heat, drought, spider mites, root problems, and other causes all produce similar browning from a distance.
Up close, they require very different responses. The question most people are really asking is not just why it happened.
It is whether the plant is coming back. That answer depends on the cause, how far along the damage is, and what gets done about it in the next few weeks.
Both questions have answers worth knowing before anything gets cut or replaced.
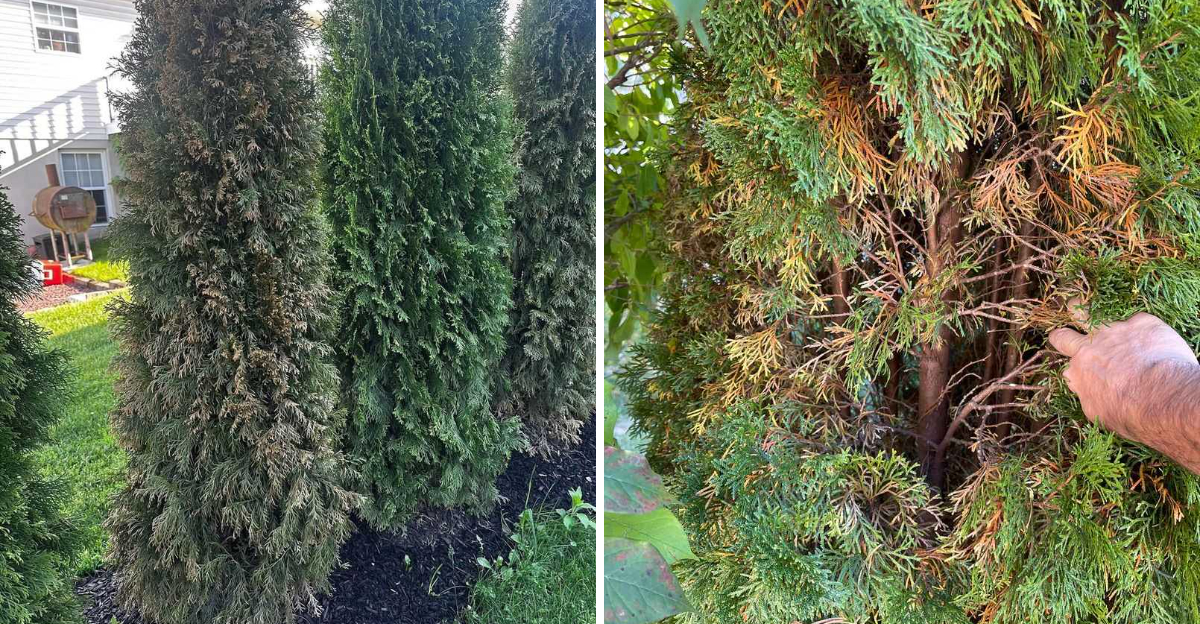
1. Check Whether Browning Is Inside Or On The Tips

A privacy screen can look fine from the street, then reveal something surprising up close. When you part the outer branches of an arborvitae, you may find a layer of brown needles tucked deep inside the plant.
That inner browning is often normal. Arborvitae shed older interior foliage every one to three years as part of their natural growth cycle.
The outer green tips stay healthy while the inner needles turn tan or brown and eventually fall.
The key is knowing what pattern you are looking at. Interior browning that stays contained and leaves green growth on the branch tips is usually not a cause for alarm.
But browning that starts at the tips, spreads outward, or covers whole branches from top to bottom is a different story. That kind of pattern points to something beyond normal shedding.
Check several branches in different spots before drawing any conclusions. If only inner needles are brown and the outer growth is still green and flexible, the plant is likely shedding normally.
If whole outer sections are turning brown in a spreading or uneven pattern, keep reading to find the real cause before deciding on any next steps.
2. Look For July Drought Stress Around The Roots

A drought-stressed hedge does not always look wilted the way a flower does. Arborvitae under heat and dry-soil pressure often show browning tips first, starting on the outer edges or the side facing reflected heat from pavement or walls.
July in this state can bring stretches of high heat with little rain, and arborvitae roots sitting in dry, shallow soil feel that stress quickly.
Newer plantings are especially vulnerable. A tree or hedge planted within the last two or three years has not yet developed a deep, wide root system.
Those shallow roots can dry out fast during a hot week without rain. Ohio hedges growing near driveways, south-facing walls, or paved surfaces face extra heat load that speeds up moisture loss from both the soil and the foliage.
Drought stress does not automatically mean the plant is lost. If you catch it early and the roots are still healthy, the plant can often stabilize with proper care.
But drought is only one possible cause of July browning. Before assuming the soil is dry, always check it first.
Watering a plant that already has wet roots can create a new set of problems that are harder to fix.
3. Check Soil Before Watering More

Soggy roots and dry roots can both cause arborvitae to turn brown, and the symptoms often look the same from the outside. That is why checking the soil before adding water is one of the most practical steps a homeowner can take.
Push your finger or a screwdriver several inches into the soil near the base of the plant. Dry, crumbly soil that pulls away from the roots needs water.
Wet, heavy soil that smells musty or feels spongy does not.
Overwatered arborvitae develop root problems that cut off the plant’s ability to take up moisture and nutrients. The foliage then turns brown as a response to that stress, even though the soil is saturated.
Adding more water to an already wet root zone makes the situation worse. Clay-heavy soils common in many parts of Ohio hold moisture longer and can stay soggy well after rain.
Check the soil in at least two or three spots around the plant, not just one. Moisture levels can vary depending on slope, mulch depth, and nearby structures.
Once you know what the root zone actually holds, you can make a smarter decision. You can decide whether to water, improve drainage, or simply wait and monitor the plant’s response.
4. Inspect Branches For Bagworms And Spider Mites

A small brown bag hanging from a branch tip might not look threatening at first. But a bagworm-covered arborvitae can lose significant foliage in a single season if the infestation goes unnoticed.
Bagworms are caterpillars that build protective cases from plant material and feed on arborvitae needles from inside those cases. Heavy feeding causes branches to brown and thin.
July is often when the damage becomes visible as the caterpillars grow larger.
Spider mites are a second pest worth checking in hot, dry July conditions. These tiny pests thrive during heat and drought.
They feed on needles by piercing the tissue and pulling out moisture, leaving behind a stippled or dusty-gray look. Fine webbing between needles or branches is a strong clue.
Tap a branch over a white piece of paper and watch for tiny moving specks to confirm mites.
Both pests require accurate identification before any control steps are taken. For bagworms, hand-picking small infestations is an option if caught early.
For larger problems or spider-mite damage, contact your local OSU Extension office or a licensed applicator for current, label-compliant guidance. Treating the wrong pest with the wrong product wastes time and may stress the plant further.
5. Watch For Browning From Winter Injury Showing Late

Winter does not always show its damage right away. Arborvitae exposed to harsh wind, prolonged sun on frozen soil, road salt, or extreme cold can suffer hidden injury.
That damage may stay hidden through spring and only become obvious as summer heat arrives. By July, the damaged tissue has fully dried out and turned brown, making it look like a new problem when it actually started months earlier.
The pattern of this kind of browning is often a useful clue. One-sided browning on the side facing a road, prevailing wind, or south-facing exposure is a clue.
It suggests winter desiccation or salt damage rather than a watering problem or pest. The branches on the sheltered side may still look healthy while the exposed side shows a clear line of brown foliage.
Winter-injury browning does not mean the whole plant is gone. Branches with any remaining green growth or flexible wood may still be alive.
Scratching the bark gently with a fingernail can reveal green tissue underneath if the branch still has life in it. Give the plant time to show whether new growth will emerge from the surviving green sections before removing anything.
Patience through late summer is often the right call in these situations.
6. Avoid Cutting Into Bare Brown Wood

Bare brown wood on an arborvitae is not a blank slate waiting to fill back in. Forsythia, spirea, and some other Ohio shrubs can push new growth from old bare stems.
Arborvitae generally does not regenerate from wood that has lost all of its green foliage. Cutting back into bare brown sections usually just leaves an open gap that stays open.
That is a hard truth that saves a lot of unnecessary pruning mistakes.
The safe rule is to cut only to the point where green growth still exists. If a branch has some brown at the tip but green needles further in, you can trim the brown portion back to where green tissue begins.
That green tissue can continue growing forward. But if an entire branch is brown from tip to trunk with no green anywhere along it, removing the branch entirely is usually a cleaner option than cutting it partway.
Before reaching for the pruners, step back and look at the full shape of the plant. Removing too many branches at once, even brown ones, can change the structure in ways that are hard to fix later.
Work slowly, remove one branch at a time, and check whether the remaining green sections can eventually fill the space. Patience here prevents regret later in the season.
7. Water Deeply If The Root Zone Is Dry

Once you have confirmed the root zone is actually dry, deep watering makes a real difference. A quick sprinkle that wets only the top inch of soil does not reach the roots where it matters.
Arborvitae roots spread outward and downward beyond the drip line of the branches. Getting water down several inches into that zone is the goal, and that takes time and a slow, steady delivery.
A soaker hose or slow-running garden hose placed at the base of the plant works better than overhead sprinklers for this purpose. Let water run long enough to penetrate several inches into the soil.
Then wait a day or two and check the soil again before watering a second time. Repeated daily watering without checking moisture levels can quickly shift a dry root zone into a soggy one.
Mulch applied around the base of the plant helps hold soil moisture between watering sessions. A two-to-three-inch layer of wood chip mulch kept a few inches away from the trunk can reduce how fast the root zone dries out during heat spells.
Avoid piling mulch against the bark directly. For newly planted arborvitae during a dry July, consistent deep watering every few days is often the single most helpful action you can take.
8. Wait For Green Growth Before Deciding It Is Gone

A brown patch in July can feel urgent, but acting too fast often leads to removing a plant that still had a chance. Before pulling anything out or cutting it down to the ground, look carefully at what green growth remains.
Flexible twigs that bend without snapping and patches of green foliage alongside the brown areas are signs that the plant still has life in it. Stiff, brittle twigs that snap cleanly with no green inside are a different signal.
Browning that stays stable over several weeks without spreading is often a better sign than browning that continues to expand through July and into August.
A plant holding its green sections steady while the brown areas remain contained may push new growth once heat eases and conditions improve.
Monitoring every week or two gives you real data instead of guesswork.
For situations where you are genuinely unsure, reaching out to your county OSU Extension office is a smart move. They can help you identify the cause of browning based on your specific site, soil, and plant history.
Recovery is possible when healthy roots remain and some green growth is still present. But fully brown bare branches with no green tissue and no flexible wood rarely come back.
Knowing the difference saves both the plant and your patience.