8 Easy-To-Make DIY Garden Edging Projects In Ohio
In Ohio, a garden can look a little unfinished even when the plants themselves are doing great. Beds start to blur into the lawn, mulch drifts out of place, and the whole yard loses some of that clean, pulled-together look people notice right away.
That is why garden edging can make such a big difference. It is one of those small upgrades that punches above its weight.
The good news is you do not need a big budget or a professional crew to make it happen. A lot of edging projects are simple enough to tackle over a weekend, and the right one can add charm, structure, and a more polished feel to your yard fast.
In Ohio, where spring cleanup and summer curb appeal go hand in hand, a smart edging project can completely change how a garden bed reads from the sidewalk. These ideas make that upgrade feel doable, creative, and worth the effort.
1. Brick Edging Creates A Clean, Classic Border That Lasts
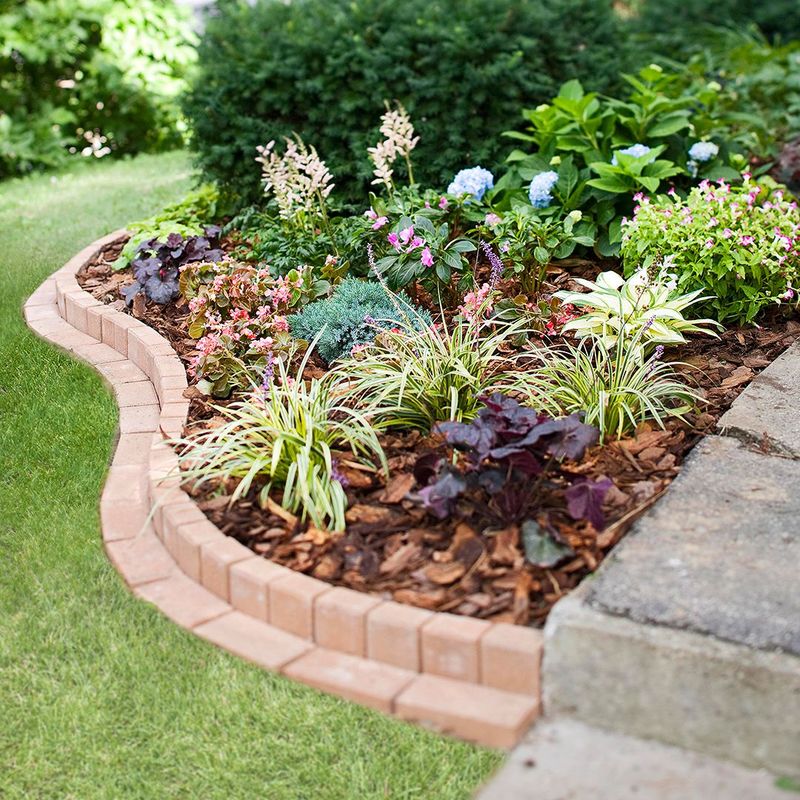
Few things make a garden look as polished as a clean brick border. Bricks have been used in garden edging for generations, and for good reason.
They are durable, widely available, and look sharp in both traditional and modern Ohio yards.
To get started, mark your edge using a garden hose or string line. Then use a flat spade to dig a trench about four to six inches deep and slightly wider than your bricks.
Fill the bottom with one to two inches of coarse sand and level it carefully. Lay your bricks end to end, pressing them firmly into the sand.
Set them just slightly below soil level so your mower can pass right over the top without catching.
Tools you will need include a flat spade, rubber mallet, level, and a bag of coarse sand. You can often find reclaimed bricks at salvage yards or Habitat for Humanity ReStores across Ohio for very little cost.
Ohio winters are the biggest challenge here. Freeze-thaw cycles cause the ground to shift, which can push bricks up or tilt them sideways.
To reduce this, make sure your sand base is at least two inches deep and well-compacted before laying. Check the border each spring and tap any lifted bricks back into place with a rubber mallet.
With basic annual maintenance, brick edging can last many years without needing major repairs.
2. Natural Stone Edging Blends In With Ohio Landscapes
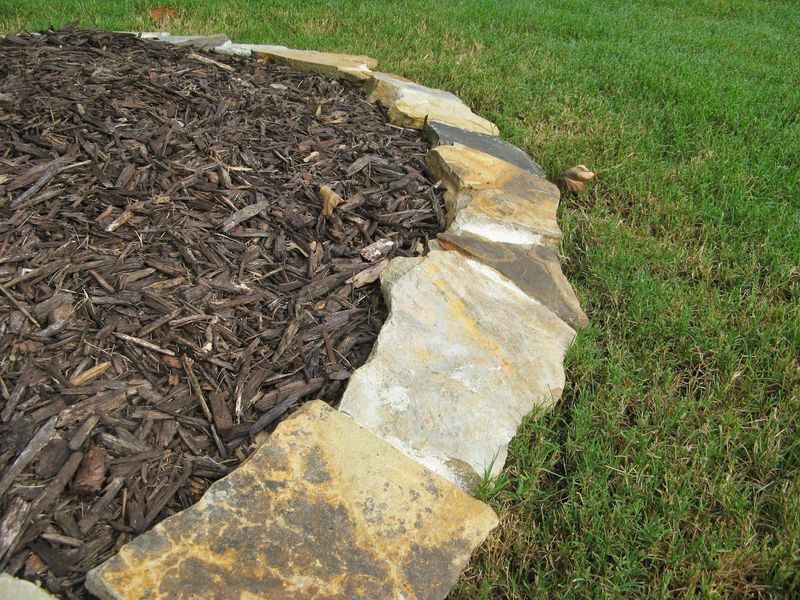
There is something grounding about using stones pulled straight from the earth to define a garden bed. Natural stone edging has a relaxed, organic quality that fits right in with Ohio’s rolling landscapes and wooded neighborhoods.
Best of all, you might not even need to buy your materials.
Check local Facebook Marketplace listings, Craigslist, or neighborhood groups. Plenty of Ohio homeowners clear stones from their yards every spring and give them away for free.
Look for flat fieldstones or limestone pieces that sit steadily without rocking.
To install, dig a shallow trench about three to four inches deep along your bed edge. Place each stone so that at least one-third of its height is buried below the soil surface.
Your Ohio Garden Changes Every Week. Your Plan Should Too.
Gardening in Ohio changes quickly throughout the season. Every Friday you’ll receive a simple weekly plan showing exactly what to plant, prune, fertilize, harvest, and protect so you never miss the right timing.
This keeps them stable and reduces the chance of them tipping over. Arrange them snugly together, filling small gaps with soil or smaller stones.
You do not need mortar for a casual, natural look.
Tools needed include a flat spade, hand trowel, and a garden kneeling pad. Gloves are strongly recommended since stones can have sharp edges.
In Ohio, uneven settling is common after a harsh winter. Freeze-thaw cycles push stones up and sideways, especially in clay-heavy soil.
Check your stone edging every spring and reset any pieces that have shifted. Over time, the border actually looks more natural and established as the stones settle into the ground.
3. Wood Log Edging Adds A Rustic Look Using Cut Branches
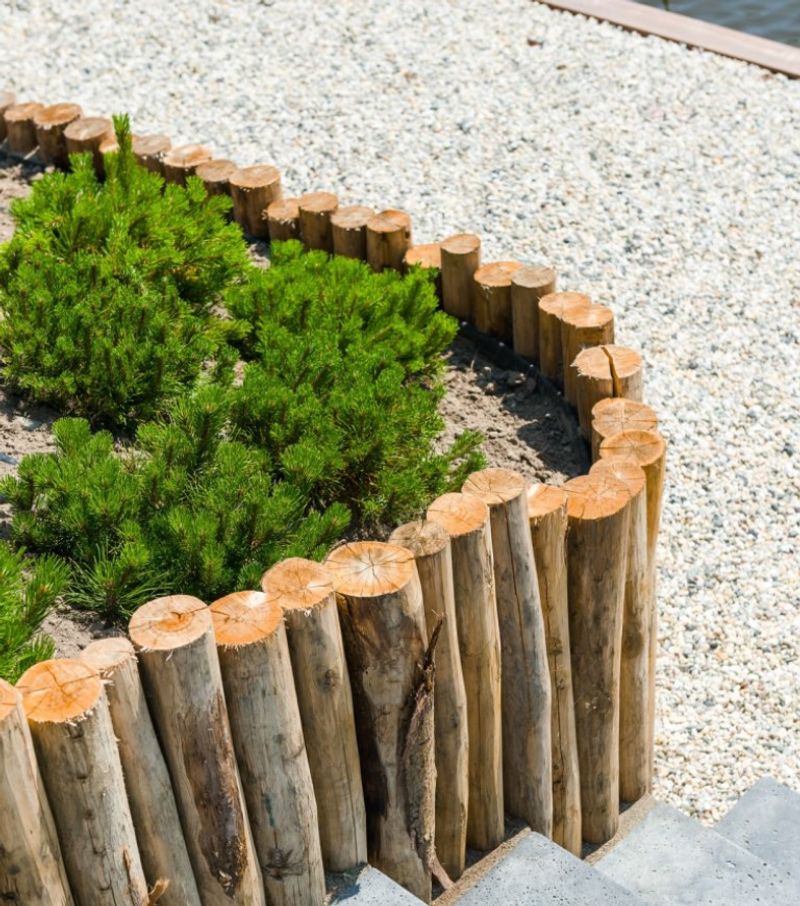
After a big storm or a tree trimming session, most Ohio homeowners end up with a pile of branches and logs they do not know what to do with. Wood log edging turns that leftover material into something genuinely useful and attractive.
Cut your logs or branches into equal lengths, somewhere between six and ten inches, using a hand saw or chainsaw. You can set them vertically, like a row of fence posts pressed into the ground, or horizontally end to end along the bed edge.
The vertical style looks especially tidy and holds its shape better over time.
Dig a narrow trench about three to four inches deep, then press each log piece firmly into the ground, making sure they stand level with each other. Pack soil tightly around each piece to hold them in place.
A rubber mallet helps seat stubborn pieces without splitting the wood.
For best results, use rot-resistant wood species like black locust, cedar, or osage orange, all of which grow naturally in Ohio. Avoid soft woods like cottonwood or silver maple, which break down quickly in moist soil.
Even rot-resistant wood will eventually need replacement. Expect most wood log edging to last three to seven years depending on the species and moisture levels in your yard.
Inspect the border each spring and swap out any pieces that have softened or crumbled. It is a simple fix that keeps the border looking fresh.
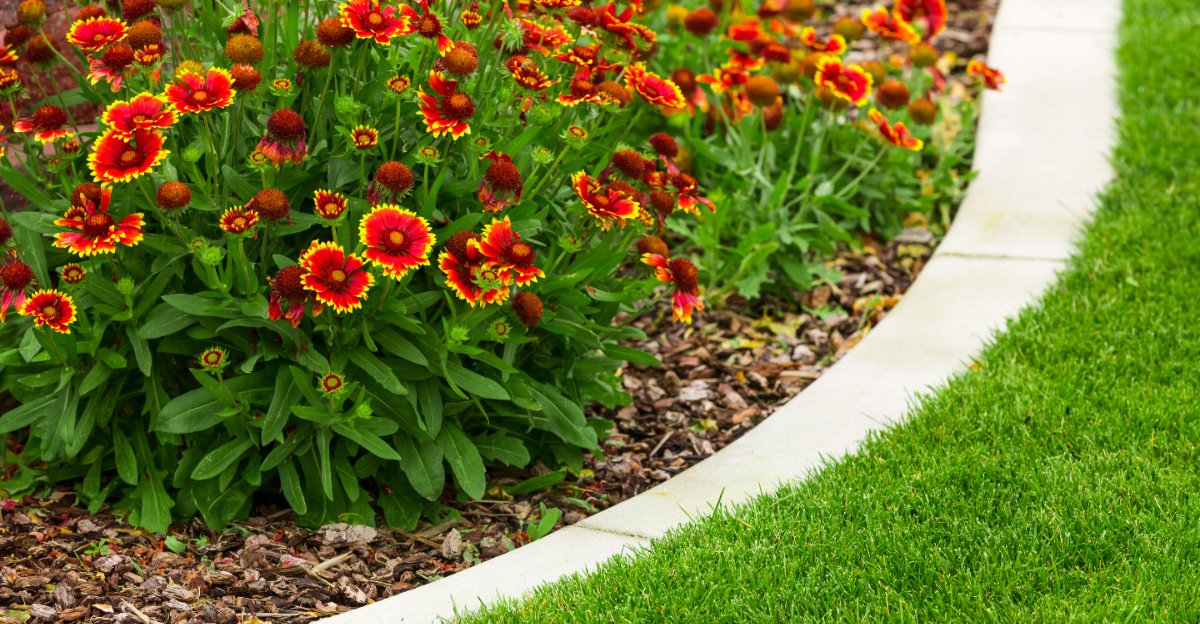
4. Mulch Trench Edging Keeps Beds Defined With Minimal Effort

Sometimes the simplest approach really is the best one. Mulch trench edging costs almost nothing and can be done in an afternoon with just a spade and a little muscle.
It is a favorite among Ohio gardeners who want clean lines without buying any materials at all.
Start by using a garden hose to lay out the shape of your bed edge. Once you are happy with the line, use a flat spade or a half-moon edging tool to cut straight down into the soil along that line at about a 45-degree angle.
Remove the cut turf and soil to create a shallow V-shaped trench roughly three to four inches deep. Toss the removed material into your compost pile or use it to fill low spots in the yard.
The trench itself acts as a physical barrier that slows grass from creeping into the bed. When you add mulch to the garden bed, it naturally stays on its side of the trench.
The visual contrast between the dark mulch and the green lawn creates a sharp, finished look.
Tools needed are minimal: a flat spade or edging tool, garden gloves, and a wheelbarrow for hauling away the extra soil.
Ohio’s wet springs and heavy clay soil can cause trench edges to blur over time as soil collapses back in. Re-cut the trench once or twice a season to keep it sharp and defined.
It takes about twenty minutes per bed and makes a noticeable difference in how clean your yard looks.
5. Recycled Paver Edging Gives Old Materials New Life
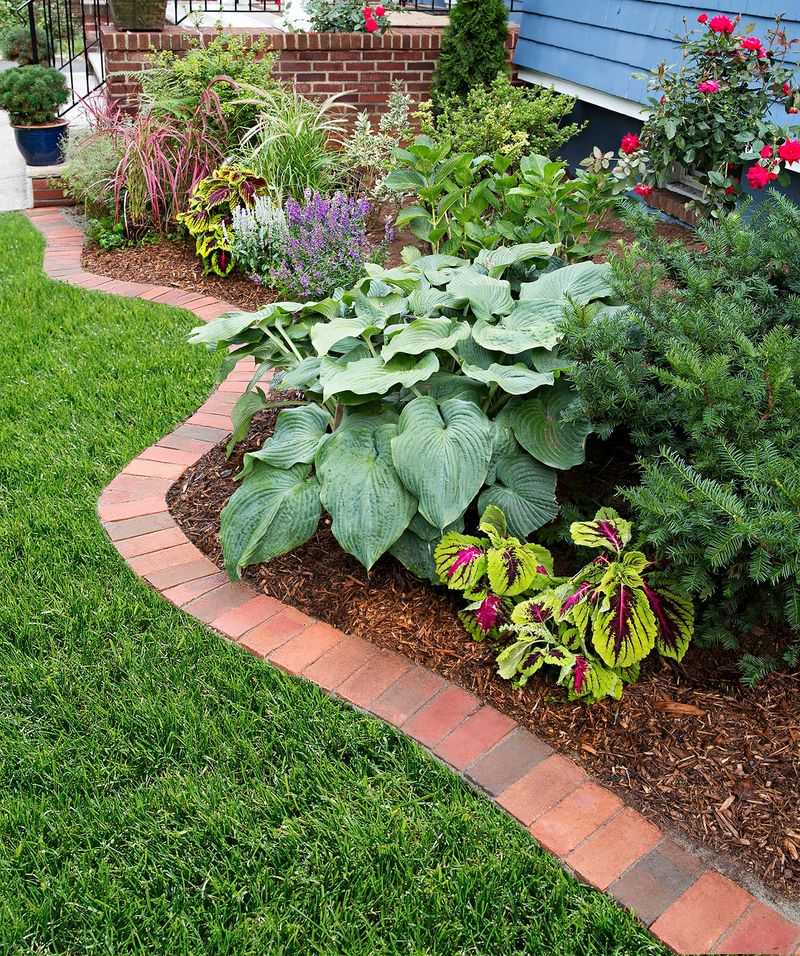
Got a stack of leftover pavers sitting behind the garage from an old patio project? You are already halfway done with this one.
Recycled paver edging is one of the most durable and budget-friendly options available, and it gives materials that would otherwise sit unused a second purpose.
Before laying anything, clear the edge line and remove any grass or weeds along the border. Dig a shallow trench about two to three inches deep and wide enough to fit your pavers.
Pour in an inch of coarse sand and level it carefully using a small board or hand trowel. Set each paver flat into the sand, pressing it down firmly and checking that each piece is level with its neighbors.
Use a rubber mallet to tap pavers into place without cracking them. Fit them snugly together to reduce gaps where grass can sneak through.
Backfill both sides with soil once all pavers are set.
Tools needed include a flat spade, rubber mallet, level, coarse sand, and garden gloves. Most of these items are already in a typical Ohio garage.
One advantage of pavers over new materials is that they have already been through freeze-thaw cycles and proven their durability. That said, Ohio winters can still cause slight shifting in clay-heavy soil.
Check the border every spring and reset any pieces that have tilted or lifted. The overall maintenance is low, and a well-laid paver edge can last a decade or longer with minimal fuss.
6. Metal Strip Edging Creates A Sleek, Low-Profile Border
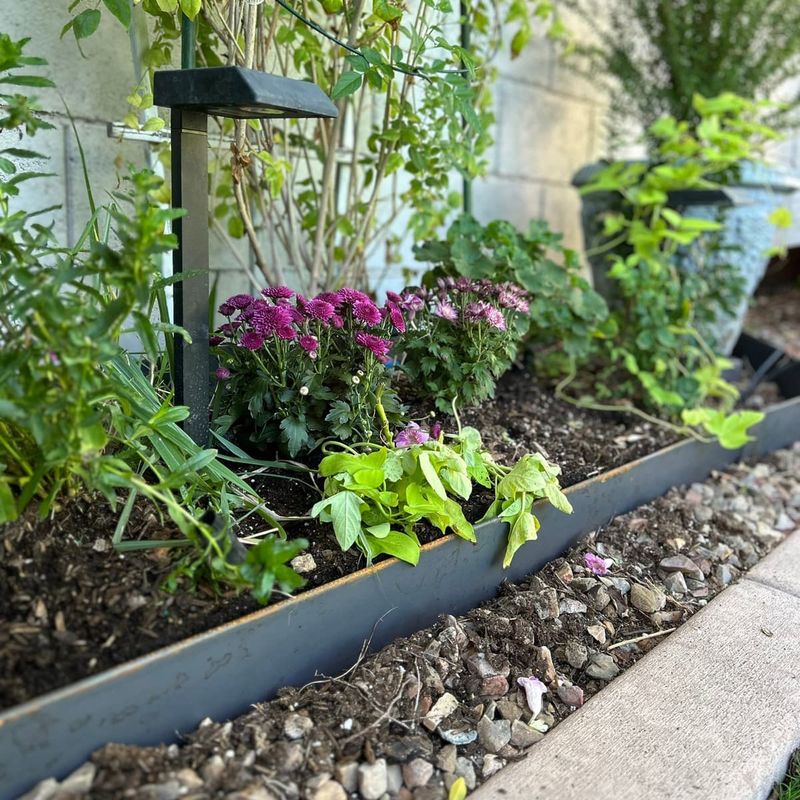
Metal strip edging has a clean, modern look that sits almost flush with the ground, making it nearly invisible once installed. It is a popular choice for Ohio homeowners who want defined beds without a border that visually competes with their plants.
Most metal edging comes in long flexible strips made from steel or aluminum. Aluminum is lighter and will not rust, while steel is heavier and more rigid.
Both work well in Ohio yards. To install, mark your edge line with a hose or string, then use a flat spade to cut a narrow slot about four to five inches deep along the line.
Slide the metal strip into the slot with the top edge sitting just above soil level. Secure it using the metal stakes that come with most kits, driving them through the pre-punched holes every two to three feet.
Connect multiple strips using the included connectors and make sure all joints are tight.
Metal strips are especially well-suited for curved garden beds since they flex easily around gentle bends. Tools needed include a flat spade, rubber mallet, and a hammer for driving stakes.
Ohio freeze-thaw cycles can push metal edging upward over winter, especially in clay soil that expands when wet. Check the edging in early spring and press any raised sections back down using your foot or a rubber mallet.
Adding extra stakes in areas that tend to heave can help reduce movement season to season.
7. Bottle Edging Adds A Creative Touch With Reused Glass
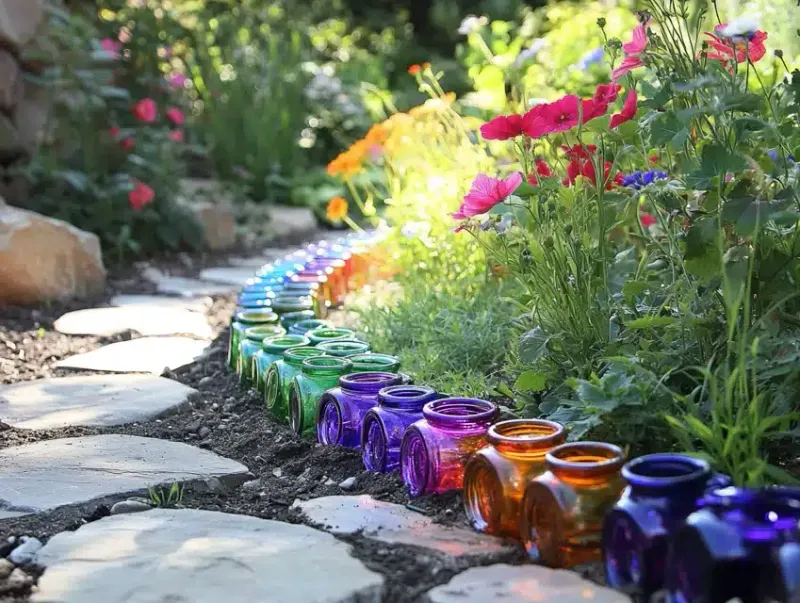
Bottle edging is one of those projects that stops people in their tracks. It looks like folk art, costs almost nothing, and puts something that would otherwise go into recycling to genuinely good use.
Wine bottles, beer bottles, or any uniform glass bottles work great for this project.
Collect bottles of the same size for the most consistent look. Clear, green, and brown glass all look attractive, especially when sunlight catches them in the morning.
Once you have enough bottles to line your bed, mark your edge and dig a narrow trench about six to eight inches deep.
Place each bottle neck-down into the trench, pressing it firmly into the soil. Space them evenly, about an inch or two apart, for a clean and intentional look.
The rounded bottoms should stick up above soil level by three to four inches. Backfill around each bottle and pack the soil tightly so they stand straight.
Tools needed include a hand trowel or narrow spade, garden gloves, and a measuring tape or stick for consistent spacing. Safety is worth mentioning here.
Handle bottles carefully during installation and avoid using cracked or chipped glass.
Ohio winters will cause some bottles to shift as the ground freezes and thaws. Check the border each spring and straighten any that have tilted or sunk.
Replacing a bottle is simple. Just pull it out, adjust the hole depth, and press a new one in.
The whole border can be refreshed in under an hour.
8. Simple Timber Edging Builds A Straight, Structured Border

Timber edging brings structure and clean geometry to a garden bed in a way that softer materials simply cannot match.
If you have a formal layout or a vegetable garden that needs straight, solid borders, landscape timbers are one of the most reliable options available at any Ohio hardware store.
Start by measuring and marking your bed edges using stakes and string. Cut your lumber to length using a circular saw or hand saw.
Standard landscape timbers are typically four inches by four inches or six inches by six inches and come in eight-foot lengths. Lay them along your marked line and check for level before securing anything.
Drive rebar stakes through pre-drilled holes in the timber, or use long metal landscape spikes, to anchor each board firmly into the ground. Space stakes every two to three feet for maximum stability.
For corners, cut boards at 45-degree angles and overlap them for a tighter fit.
Tools needed include a circular saw, drill, rubber mallet, rebar or landscape spikes, a level, and measuring tape.
One important consideration is wood treatment. Pressure-treated lumber resists rot and moisture, making it a smart choice for Ohio’s wet springs and humid summers.
However, untreated cedar or redwood also performs well and avoids any concern about chemical leaching near edible plants. Check the border each spring for any boards that have warped or shifted and re-drive any loose stakes.
With proper installation, timber edging can stay solid for five to ten years or more.