How To Propagate Swiss Cheese Plant (Adansonii Species)

Propagating our prized plants is one of the most interesting parts of caring for them. It may be tricky if you are doing it for the first time but with the right guidance, success is guaranteed.
Monsteras are always welcome in our plant collections and the best way to get more of them is by propagation.
In this article, I’ll show you how to propagate Swiss cheese plant using methods such as stem cuttings in soil, stem cuttings in water, and air-layering.
I’ll also answer the most common questions regarding adansonii propagation, such as whether it can be propagated through seeds.
Let’s start propagating!
3 Steps For Stem Cutting Propagation In Soil
One of the most popular and easy ways to multiply Swiss cheese plants is by using their stem cuttings.
You can root the cuttings using two mediums, soil and water. First, I’ll show you how to root adansonii cuttings in soil.
If you’re a novice at propagation, stem-cuttings are the best way to multiply your adansonii. As far as the rooting medium is concerned, let’s look at both to help you decide which one is better for you.
Before you start propagating your Swiss cheese plant, there are 2 essential things you need to do.
First, you need to make sure your adansonii is completely healthy and doesn’t have any discolored or deformed sections. If there are any damaged parts, you need to determine the cause and fix the issue if you want multiplication to succeed.
Second, you need to gather all the equipment listed below. Don’t skip this part because it can be messy to look for tools once you start propagating.
• Sharp knife or pair of scissors
• Sanitizing solution such as bleach or rubbing alcohol
• Root hormone (optional)
• Nursery pot(s) with holes in the bottom
• Well-draining and porous soil mix
Let’s get started!
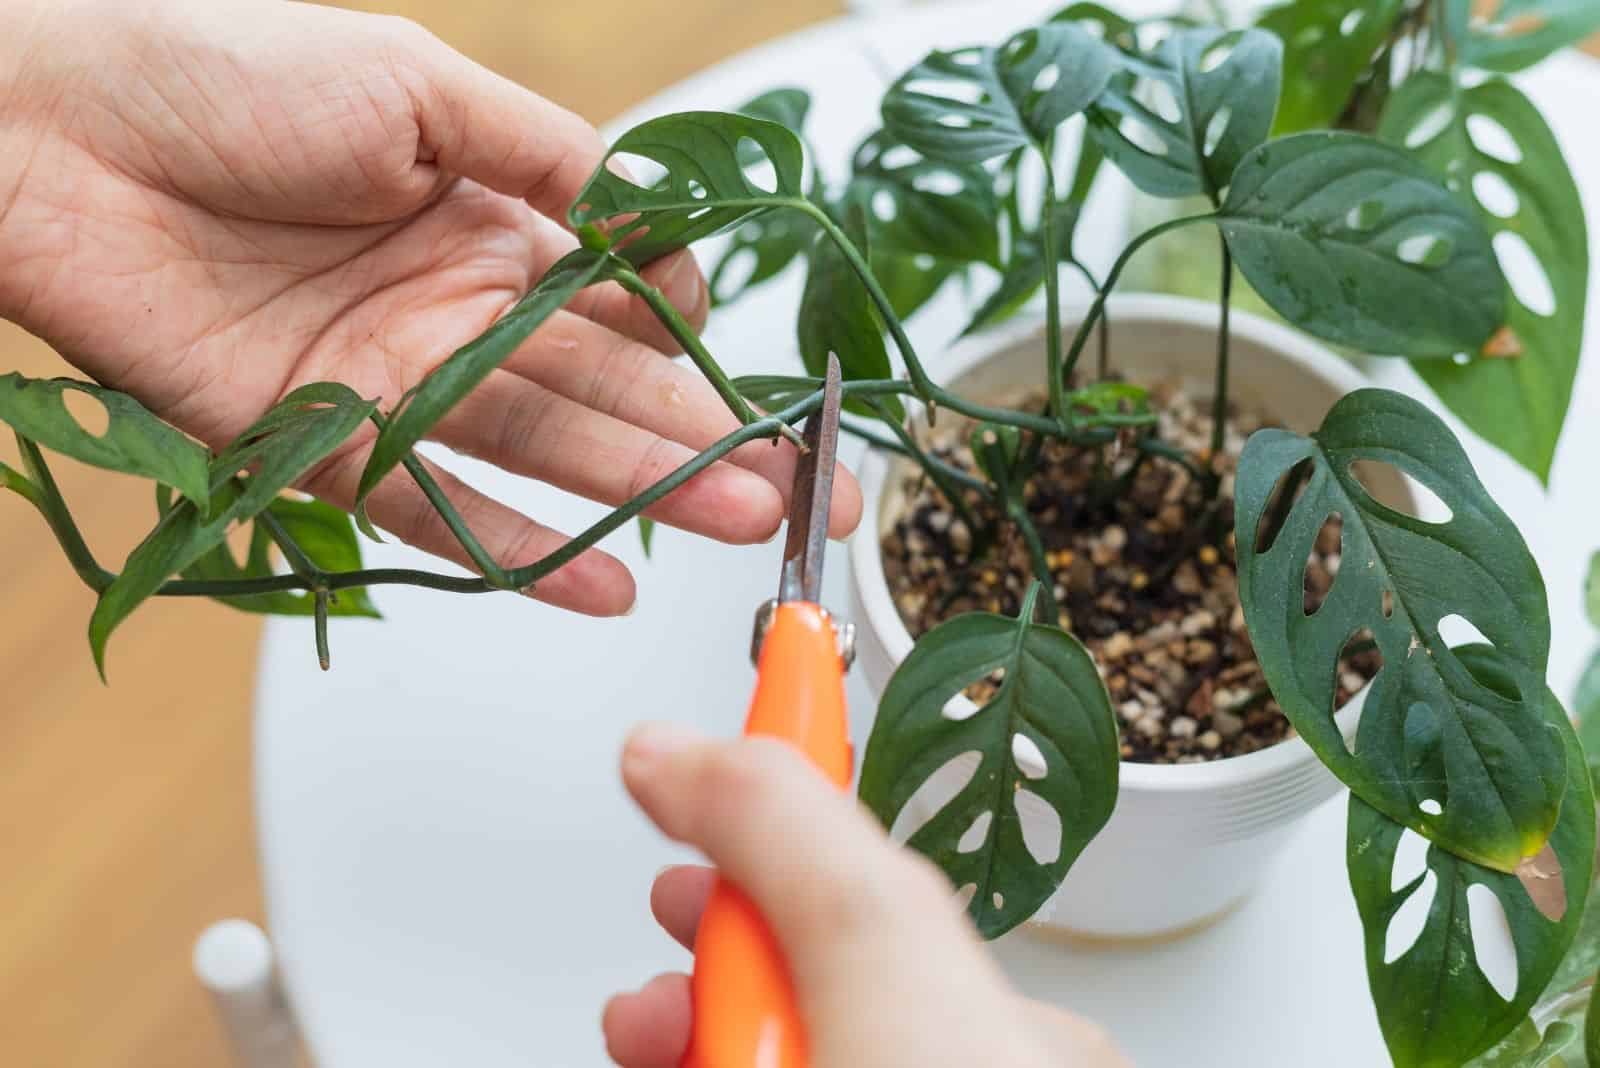
1. Take The Stem Cutting
NODE! Yes, that word needs to be in capital letters and bold. Propagating a Monstera without nodes isn’t possible because new growth emerges from them.
Your goal is to find a healthy adansonii stem with at least one node attached + a few leaves. The node is a swollen part (small bumps) on the adansonii stem where new leaves emerge. (1)
Here’s a video on how to identify the node:
When cutting the Swiss cheese plant stem, dip the knife or scissors in a sanitizing solution and make a clean incision ½ an inch below the node. You can take as many cuttings as you want as long as they’re healthy and have node(s) and leaves.
2. Root The Cutting
It’s time to root the adansonii cutting. Rooting hormone will enhance root development and the cutting will need less time to establish.
The cutting will generate new roots without the hormone but it’ll need more time. If you decide on this step, simply insert the adansonii cutting in the hormone or brush it if you have a powdered version.
Fill the nursery pot(s) with a proper soil mix for Monsteras. I usually mix equal amounts of standard potting soil, perlite, and orchid bark. This ensures good drainage and enough air for the Monstera roots to breathe.
Put the adansonii cutting(s) in the nursery pot(s) and mist the soil regularly to maintain moisture.
3. Transplantation And Care
One of the most challenging parts of adansonii soil propagation is knowing if and when the roots are long enough for the cutting to be transplanted.
I have an easy and reliable method for this. I simply pull the adansonii cutting gently and if it shows resistance, it’s established enough.
Take a new pot and fill it with the growing substrate described above. Take the rooted cutting out of the nursery pot and shake it a little bit to get rid of the surrounding soil.
Plant the rooted adansonii cutting in the new pot and put it in a room with bright indirect sunlight at temperatures between 65 and 75 degrees Fahrenheit.
Monstera plants are generally easy to maintain as long as you water them when the top 2 inches are dry, give them enough bright indirect light, and keep them in a warm and humid spot.
The 3 Steps Of The Stem-Cutting Water Propagation Method

We’ve seen how to use potting mix as a rooting medium for stem cuttings and now it’s time to find out how to use water propagation for Monsteras.
I find this method as easy as soil propagation, and beginner growers seem to love it too. The main reason is that you see the root development so it’s easier to determine if the cutting is ready for transplantation.
For me, the trickiest part of this process was avoiding contamination from the standing water, which attracts pathogens that can destroy the cutting. Don’t worry, I’ll show you an excellent way to avoid this!
Here is the equipment you need to prepare:
• A jar or transparent vase
• A knife or pair of scissors
• Sanitizing solution (bleach or rubbing alcohol)
• Nursery pot and potting mix
Let’s propagate!
1. Take The Cutting
The process of taking the adansonii cutting for water propagation is the same as for the method described above.
The Swiss cheese plant cutting needs to be healthy and must have a node(s) and a few leaves.
Make a clean incision; use sharp tools and never pull the cutting because it can quickly break and you can damage the mother plant.
We’ll now look at how to root the cutting in water!
2. Root The Cutting
Rooting adansonii cuttings in water is simple. You need to fill a jar or vase with fresh, clean room-temperature water.
When putting the cutting in water, make sure the adansonii leaves are not below the water line because they could rot and cause the propagation to fail.
On the other hand, the node should always be in the water because your adansonii cutting will generate new growth from there.
The easiest way to avoid water contamination is by refreshing the water 2-3 times a week. If you notice the water is muddy or smells bad, take the adansonii cutting out and clean it well.
3. Transplantation And Care
You should monitor the Swiss cheese plant cutting regularly and transplant it when the roots are a few inches long.
Fill the pot(s) with a growing substrate suitable for adansonii plants and plant the rooted cutting. The cutting needs a lot of moisture to grow healthily, so mist it and make sure the soil is never too wet.
The Monstera adansonii, aka Monstera friedrichsthalii, isn’t a fussy plant. You just need to ensure the same conditions you would for other Monstera plants.
Here’s a video with more tips for adansonii water propagation:
The 4 Steps Of The Air-layering Propagation Technique
When I first heard of the air-layering technique, I was kinda afraid of it because it looked too complicated. Luckily, I was wrong. This is another excellent way to propagate adansonii varieties with a high success rate.
The best thing about the air-layering technique is the low risk of infection. The only drawback of this method is that the mother adansonii looks quite unattractive during the process.
Here is the list of equipment you need to prepare:
• Sphagnum moss
• Plastic bag
• Twine, twist ties, or string
• Water for misting
1. Select The Part You’ll Propagate
Again, the mother adansonii must be completely healthy for propagation to succeed.
Inspect your plant and find a section with a node. It should be located below the stem you intend to multiply.
It’s essential to make a small incision near the node because it will encourage the plant to focus the energy to generate new growth.
Make sure the knife is sharp and don’t forget to dip it in bleach or rubbing alcohol before cutting!
2. Wrap It In Sphagnum Moss
First, you need to prepare the sphagnum moss by moistening then squeezing it to remove the excess water.
Take a handful of moss and wrap it around the selected section of your adansonii. At this point, you need to secure the moss with a plastic bag. Take twist ties, twine, or string, and wrap it around the plastic bag.
Remember, the moss should be pressed up against the nodes to allow the development of new roots. Leave a little bit of the top uncovered so that you can add water during the process.
You can also make a few holes in the bag to allow some air to get in there.
3. Maintain Moisture
Sphagnum moss should never be dry when propagating an adansonii via air-layering. The easiest way to keep it moist is by misting it.
A spray bottle filled with clean, fresh water will do the job. Never keep the sphagnum moss overly wet because pathogens could attack and destroy everything.
4. Transplantation And Care
When new roots appear and are a few inches long, it’s time to separate the section and plant it in a pot.
Carefully remove all the sphagnum moss around the roots and remove any discolored roots (brown or black) that you find.
Dip the knife in a sanitizing solution and cut off the rooted adansonii section. Make sure you don’t damage any roots and that the incision is clean.
Don’t worry about the mother adansonii; the cut end will develop a callus and new growth will occur in no time.
Now it’s time to pot the rooted part. Fill a new pot halfway up with a growing substrate for the Swiss cheese plant, put the cutting in it, and add more soil.
Here’s a video with more tips for adansonii propagation through air-layering:
Can You Propagate The Swiss Cheese Plant From Seeds?
Surprisingly, yes, you can propagate adansonii plants through seeds. However, this method is tricky for a few reasons.
For starters, you can’t collect adansonii seeds because these plants do not produce fruit indoors. All growing conditions must be perfect and the same as the conditions in the Monstera’s natural habitat.
Second, you need to find the seeds of a true adansonii that are viable, which isn’t as easy as it seems. You’ll need to find a trustworthy seller, and these are frequently hard to find online.
And third, from my own experience, seeds can be pretty pricey, and the fact they are not always ‘true seeds’ should make you think twice before buying them.
If you’re lucky enough to find viable adansonii seeds, here are the steps on how to propagate them:
1. Take a plastic lid with a container and put some sphagnum moss in the bottom.
2 Place the seeds on the moss; you don’t need to bury them down too deep.
3. Fill a spray bottle with water and spray the adansonii seeds and moss. The soil should be pretty wet but there shouldn’t be any water accumulated at the bottom.
4. Put the lid on the container and put it in bright indirect sunlight or use grow lights.
5. New growth should occur in about a week if everything is done correctly. Keep the seeds covered and check them regularly. Uncover when true sets of leaves form, which typically takes about a month and a half.
If you propagate a Swiss cheese plant from seeds, you can have an established plant in about 8 months.
Wrapping Up
If you wanted to know how to propagate a Swiss cheese plant, aka Monstera adansonii, you now have all the answers.
Some methods, such as stem cuttings in soil or water, are more suitable for beginners. Seed propagation can be tricky and is often recommended for experienced gardeners.
I guess air-layering is somewhere in the middle.
One thing is for certain, no matter which adansonii propagation method you choose, you’ll succeed if you follow our instructions!
Good luck and until next time!
References:
1. Vegetative plant parts. (2008, January 1). https://extension.oregonstate.edu/node/115961/printable/print#:~:text=A%20node%20is%20an%20area,to%20locate%20a%20plant’s%20nodes.