How To Revive A Drooping Peace Lily In Your North Carolina Home In Just 15 Minutes
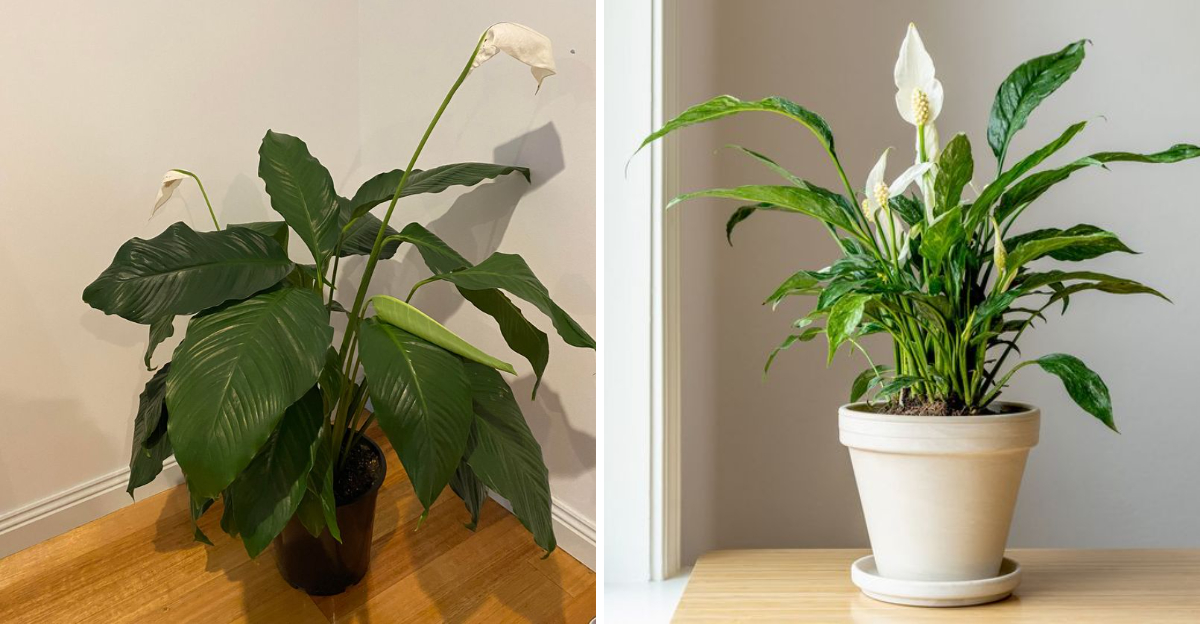
A peace lily with drooping leaves is one of the more dramatic distress signals any houseplant can send, and it tends to cause immediate panic. The good news is that peace lilies are built to communicate loudly before things get serious, and a drooping plant is almost never a lost cause.
In most cases the fix is fast, and the plant bounces back with a responsiveness that feels almost satisfying after the initial worry. North Carolina homes create a few specific situations where drooping happens more frequently than in other climates.
Summer air conditioning pulling moisture out of indoor air, bright windows that intensify during the warmer months, and the dry conditions that heating systems create in winter all push peace lilies toward stress faster than the same plant would experience somewhere with more consistent indoor humidity.
Knowing what actually causes the droop in your specific situation points you straight to the right fix, and in the most common cases the plant is standing upright and looking normal again in fifteen minutes or less.
1. Check Soil Moisture First

Before you do anything else, stick your finger about an inch into the soil. That one simple action tells you almost everything you need to know about why your peace lily is drooping.
Skipping this step and just watering automatically is one of the most common mistakes indoor plant owners make.
Peace lilies, scientifically known as Spathiphyllum hybrids, droop when soil gets too dry, but they also droop when roots are sitting in too much water.
Both problems look nearly identical from the outside, which is why checking the soil first saves you from making things worse.
In North Carolina homes, where air conditioning runs heavily in summer and heating dries things out in winter, soil moisture levels can shift faster than you expect.
If the soil feels dry and pulls away from the pot edges, underwatering is likely your culprit. If it feels soggy and heavy, overwatering may be the issue.
Learning to read your soil before reacting is the single most powerful habit you can build as a plant owner. A quick two-second check gives you all the direction you need to take the right next step and start turning things around for your plant right away.
2. Water Thoroughly When Soil Is Dry

Dry soil is the most frequent reason a peace lily droops, and thankfully it is one of the easiest problems to fix.
Once you confirm the soil feels dry, water your plant slowly and generously until you see water flowing freely out of the drainage holes at the bottom of the pot. That steady drainage tells you the entire root zone got a proper drink.
In North Carolina during summer, indoor air conditioning pulls moisture from both the air and the soil much faster than most people realize. Your peace lily might need water more often during those hot months than it does in cooler seasons.
Pay attention to how quickly the soil dries out and adjust your watering schedule accordingly rather than sticking to a rigid routine that ignores actual plant needs.
Your North Carolina Garden Changes Every Week. Your Plan Should Too.
Gardening in North Carolina changes quickly throughout the season. Every Friday you’ll receive a simple weekly plan showing exactly what to plant, prune, fertilize, harvest, and protect so you never miss the right timing.
One important thing to keep in mind is that extremely dry soil sometimes repels water rather than absorbing it. If water runs straight through without soaking in, try watering in slow, small amounts and waiting a few minutes between each pour.
You can also set the pot in a shallow dish of water for about ten minutes, letting the soil absorb moisture from the bottom up. After a thorough watering, many peace lilies begin to perk back up within an hour or two, showing visible improvement fairly quickly.
3. Empty Standing Water From Decorative Pots

Many people keep their peace lily inside a pretty decorative pot without drainage holes, placing the actual nursery pot inside it. That setup looks great on a shelf, but it creates a hidden problem most plant owners do not notice until their plant starts drooping.
Water collects at the bottom of that outer pot and keeps the roots sitting in soggy conditions for days.
Roots that stay wet for too long cannot breathe properly, and a peace lily under those conditions will droop just as dramatically as one that has gone without water.
Homes across North Carolina often stay cooler indoors thanks to air conditioning, which slows evaporation and means standing water lingers much longer than it would in a warmer environment.
That extra moisture sitting beneath your plant is quietly causing stress even when the soil on top feels normal.
Make it a habit to tip out any water collecting in the outer decorative pot after every watering session. You should also lift the inner pot occasionally to check whether water has pooled underneath without your knowledge.
If you notice roots poking through the drainage holes and sitting in water, that is a clear sign the situation has been going on for a while.
Keeping the outer pot dry gives your peace lily the breathing room its roots need to stay firm, strong, and fully capable of supporting those beautiful leaves.
4. Move The Plant Away From Harsh Direct Sun

North Carolina summers are no joke, and that afternoon sun pouring through south or west-facing windows can absolutely stress a peace lily that was perfectly happy in spring.
Peace lilies are naturally forest-floor plants, which means they evolved under a thick canopy where bright, direct sunlight rarely reached them.
Placing one in strong direct sun is a bit like asking someone who loves shade to stand in an open field at noon.
When a peace lily gets too much direct light, it loses moisture through its leaves faster than the roots can replace it. The result is wilting and drooping that looks exactly like thirst, even if the soil still has plenty of water.
If you notice the leaves looking washed out, a little pale, or crispy at the edges alongside the drooping, direct sun exposure is very likely part of the problem.
Moving your plant to a spot with bright indirect light makes a noticeable difference. A few feet back from a window, or near a window that faces north or east, usually works well in most North Carolina homes. Sheer curtains are also a simple and stylish fix if repositioning is not convenient.
Once your peace lily is out of that harsh light, moisture loss slows down and the plant can redirect its energy toward recovery instead of constantly fighting against stressful conditions it was never built to handle.
5. Raise Indoor Humidity To Support Recovery

Peace lilies come from tropical regions where the air feels thick and moist almost all year round. When you bring one into a North Carolina home where heating or air conditioning runs constantly, the air becomes much drier than what this plant naturally prefers.
Low humidity does not always cause immediate drooping on its own, but it absolutely slows down recovery when your plant is already stressed.
Dry air causes moisture to evaporate from the leaf surface faster than usual, which adds extra strain on a plant that is already struggling.
During North Carolina winters especially, indoor heating systems can drop humidity levels significantly, leaving your peace lily working overtime just to stay hydrated.
Adding a small humidifier near your plant is one of the most effective ways to create a more comfortable environment for it to recover in.
If you do not have a humidifier, grouping your peace lily with a few other houseplants creates a small pocket of slightly more humid air through natural transpiration.
Setting the pot on a shallow tray filled with pebbles and a little water also helps, as long as the pot itself sits above the waterline rather than in it.
Keep in mind that humidity alone will not instantly fix severe wilting, but it removes one more source of stress and gives your plant a noticeably better chance of bouncing back fully and staying healthy long term.
6. Remove Severely Damaged Leaves To Help The Plant Focus

After you water your peace lily and adjust its environment, take a close look at the individual leaves. Some will perk back up within a few hours, looking almost as good as new.
Others that were severely stressed, already yellowing, or completely collapsed before you started may not recover no matter how perfectly you care for the plant from this point forward.
Keeping those damaged leaves attached actually pulls energy away from the healthy parts of your plant. The peace lily keeps trying to support every leaf it has, even the ones that have no real chance of coming back strong.
Trimming them away at the base with clean, sharp scissors frees up that energy for new growth and for the leaves that are still actively recovering. It also makes your plant look much tidier and more cared for almost immediately.
Always use clean scissors or pruning shears to avoid introducing bacteria or fungal issues through the cut. Wipe your blades with rubbing alcohol before and after trimming, especially if you are not sure whether disease played any role in the drooping.
In North Carolina homes where humidity can fluctuate, open cuts can sometimes attract issues if tools are not clean.
Removing the worst leaves is not giving up on your plant, it is actually one of the most supportive things you can do to help it channel its remaining strength toward a full and healthy recovery.
7. Check For Root Rot If The Plant Does Not Improve

Sometimes a peace lily stays droopy even after you have watered it correctly and adjusted its light and humidity. When that happens, it is time to look deeper, literally.
Gently slide the plant out of its pot and take a good look at the roots. Healthy roots should look white or light tan and feel firm when you touch them.
Roots affected by rot look dark brown or black and feel soft and mushy, almost like they have lost all structure.
Root rot usually develops when soil stays wet for too long without enough drainage, which is surprisingly common in North Carolina during cooler months when evaporation slows way down.
Once roots are damaged, they cannot deliver water to the rest of the plant, which is why the leaves droop even when the soil feels moist.
If you spot rotted roots, carefully trim away the damaged sections using clean scissors and repot your peace lily into fresh, well-draining potting mix. Choose a pot with good drainage holes and resist the urge to water again right away.
Give the plant a day or two to settle into its new environment before resuming a regular watering routine.
Catching root rot early and taking action gives your peace lily a genuine opportunity to recover and grow healthy new roots over the coming weeks, which makes all the effort completely worthwhile.
8. Be Patient Because Full Recovery Takes Time

Here is something worth knowing before you start watching your peace lily every five minutes after watering: mild underwatering can show improvement pretty quickly, sometimes within an hour or two of a good drink.
But a plant that has been stressed for several days, or one dealing with root damage or extreme dryness, needs more time than a single afternoon to fully bounce back.
Expecting instant results can make the whole process feel more stressful than it needs to be.
Real recovery means the plant rebuilds moisture in its tissues, repairs any stressed root cells, and gradually pushes energy back into its leaves. That process simply takes hours, sometimes even a day or two, depending on how long the stress lasted.
In North Carolina, where seasonal changes can sneak up on indoor plants, it is worth building a regular check-in habit so you catch drooping early before it becomes a serious issue.
The best thing you can do after taking all the right steps is give your plant a calm, stable environment and check back in a few hours rather than hovering. Make sure it has indirect light, slightly moist soil, and comfortable humidity, and then trust the process.
Peace lilies are actually quite resilient plants, and most of them respond beautifully to good care once the source of stress is removed. With a little patience and consistency, your plant will reward you with full, glossy leaves and possibly even a bloom or two.