Stop Ignoring Cloudy Spots On Your Georgia Tomatoes (Do This Instead)
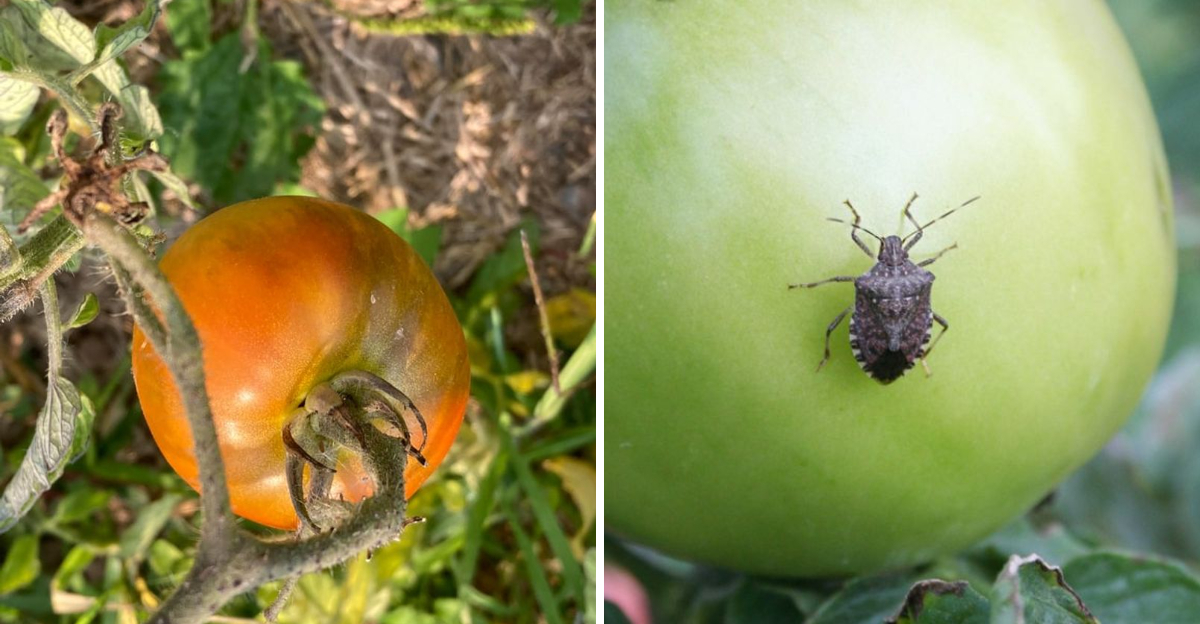
A tomato can look almost perfect until the light hits it.
Then the pale marks appear. A faint cloudy patch near the shoulder. A few tiny pinpricks across the skin. A yellowish smudge that does not look quite like sunscald, ripening trouble, or a simple scrape from a stem.
That is the clue worth slowing down for.
Those cloudy marks are not always a disaster, but they can point to feeding damage that happened while the fruit was still developing.
By the time the tomato turns red, the insect may be long gone, while the fruit still carries the evidence under the skin.
The next move matters.
A quick slice can tell you a lot. Firm white tissue beneath the spot tells one story. Soft decay, odor, or spreading breakdown tells another.
Meanwhile, green fruit still on the vine may need protection before the next round of feeding shows up.
So what should Georgia gardeners do when cloudy spots appear on tomatoes?
Start by reading the marks, checking the fruit, scouting the plant edges, removing eggs early, and using targeted controls only when the evidence supports it.
1. Cloudy Spots Usually Mean Bug Feeding
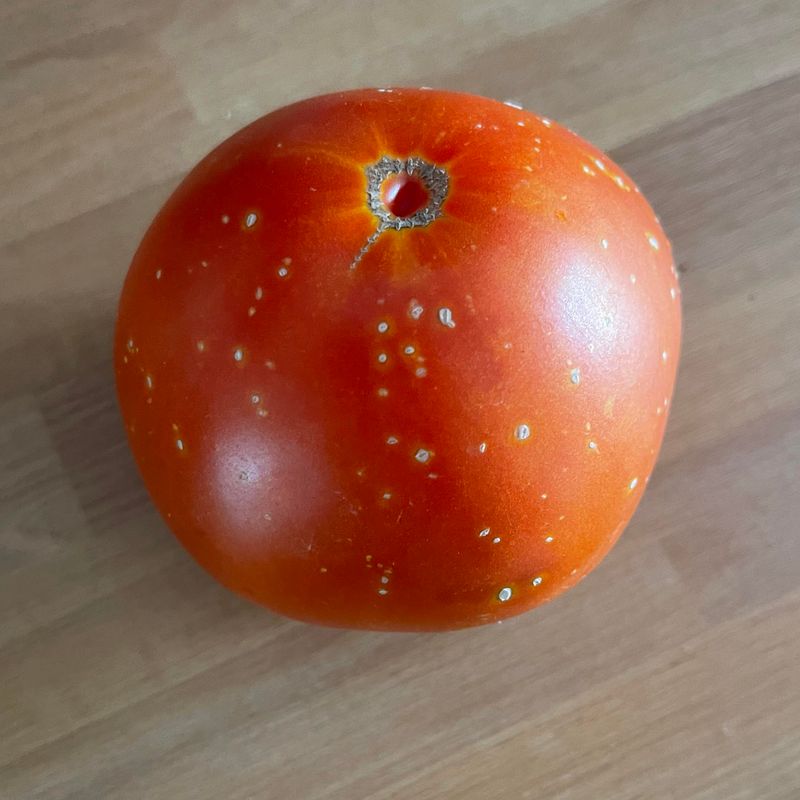
Cloudy spots often point to piercing insect damage.
The marks may look pale, yellowish, cloudy, or slightly smudged across the tomato skin. Some appear as tiny pinpricks. Others look like soft white patches under the surface, especially once the fruit ripens.
The injury usually starts early. Many tomatoes are fed on while they are still green and developing.
The fruit responds to the wound. Cells below the puncture can turn firm, white, and corky as the tomato walls off the damaged area.
That is why the mark may not look fresh. The feeding can happen weeks before you notice the cloudy patch on a ripe tomato.
Do not diagnose from one spot alone. Pale marks can also come from sunscald, uneven ripening, virus symptoms, rubbing, or weather stress.
Sunscald tends to look broader and papery. It often shows up on the side of the fruit that faced harsh sun after leaves stopped shading it.
Blotchy ripening looks different. It can create uneven yellow or orange areas that may not have the firm white tissue beneath the skin.
Ring patterns need extra caution. Distinct rings, streaking, or unusual leaf symptoms may point toward a different problem.
Slice before deciding. The inside of the fruit gives better clues than the skin alone.
Cloudy spots are not just cosmetic clues.
They can show that insects have already visited, and the rest of the crop needs closer attention now.
2. Stink Bugs Are The Main Suspects
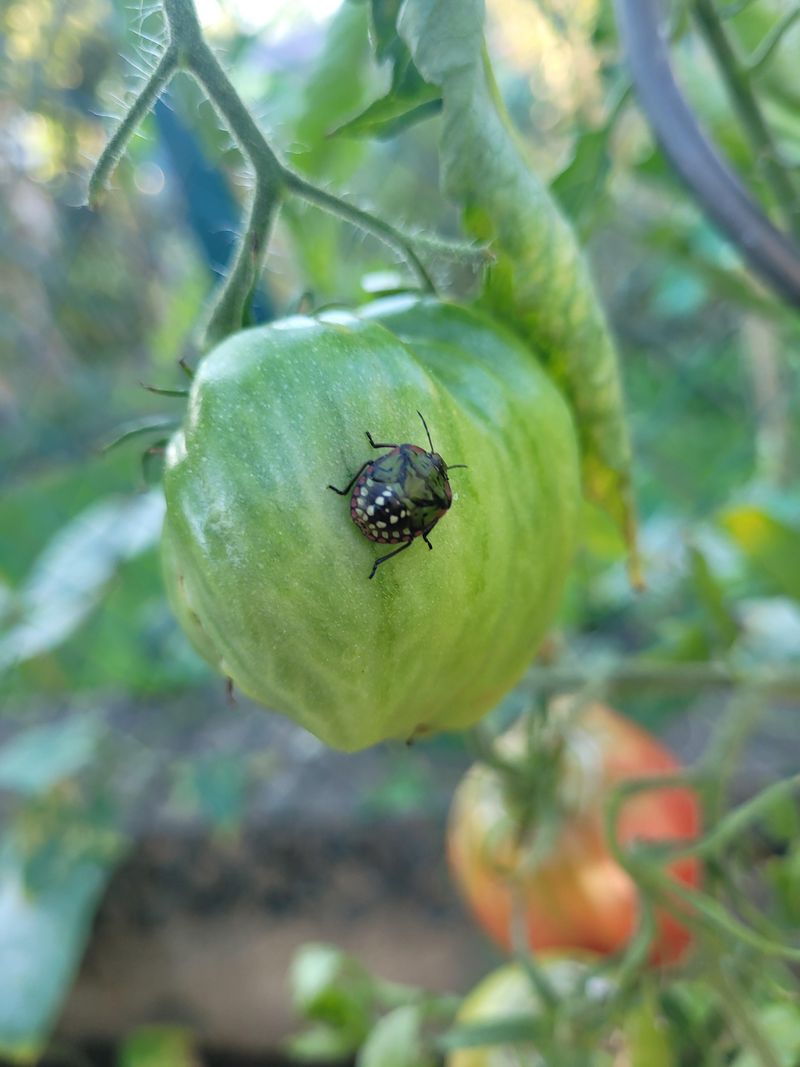
Stink bugs are frequent suspects in cloudy tomato spots.
They have shield-shaped bodies, piercing mouthparts, and a habit of moving quietly through vegetable gardens. Several species can feed on Georgia tomatoes, and their damage often looks very similar on fruit.
The insects pierce the skin. Then they draw out plant fluids from the developing tomato.
That feeding disrupts nearby cells. As the fruit grows and ripens, the damaged area can turn pale, cloudy, and firm beneath the surface.
Your Georgia Garden Changes Every Week. Your Plan Should Too.
Gardening in Georgia changes quickly throughout the season. Every Friday you’ll receive a simple weekly plan showing exactly what to plant, prune, fertilize, harvest, and protect so you never miss the right timing.
Adults can be hard to count. Stink bugs often drop from plants when disturbed and may disappear into mulch or nearby weeds.
Nymphs feed too. Younger stages may lack fully developed wings, but they can still damage fruit.
Check early in the day. Cooler morning temperatures make the insects slower and easier to spot.
Look at fruit clusters first. Stink bugs often tuck into sheltered spots where tomatoes touch leaves, stems, or each other.
Check leaf undersides. Adults and nymphs may rest out of direct sun during the hottest part of the day.
Watch the garden edges. Stink bugs often move in from weedy borders, fence lines, wooded edges, kudzu, wild blackberry, and ornamental plantings.
Do not ignore the first few marks. Early feeding can be the warning before more fruit begins showing the same pale patches.
Stink bugs are sneaky, not invisible.
A slow morning inspection can reveal them before the damage spreads through the best tomatoes on the vine.
3. Leaf Footed Bugs Leave Similar Marks
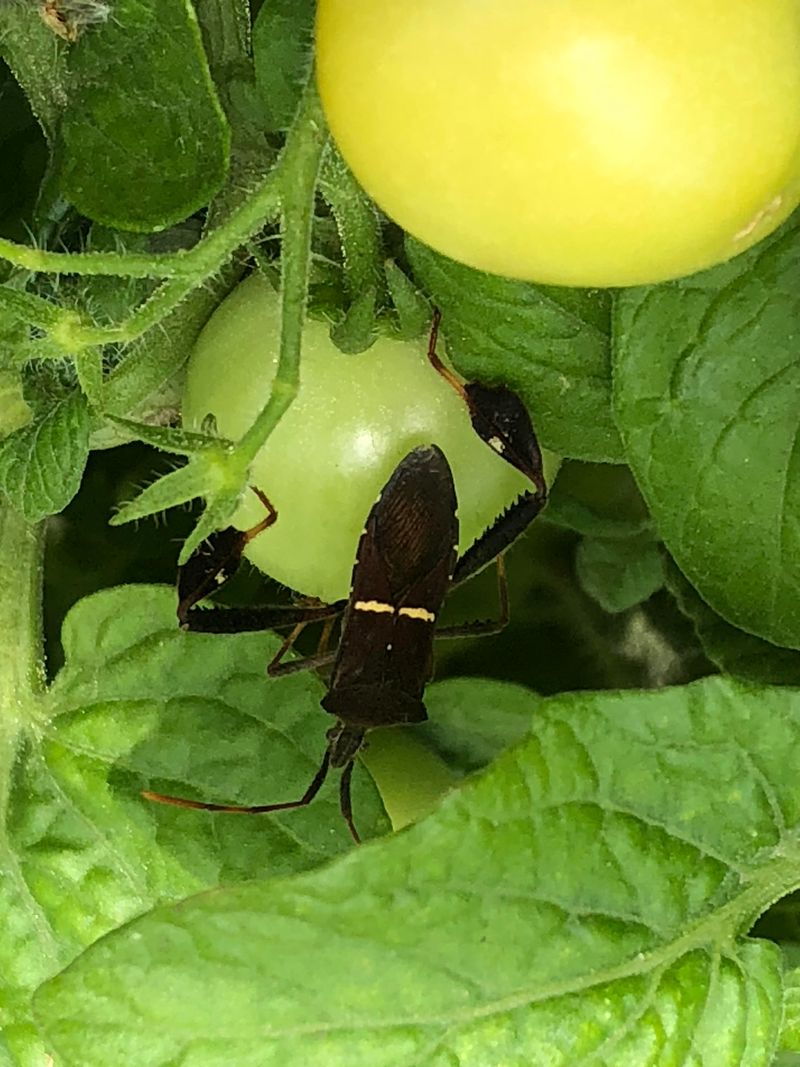
Leaf-footed bugs can cause the same kind of fruit damage.
They are larger than stink bugs and easier to recognize once you know the shape. The adults are usually brownish, long-bodied insects with widened hind legs that look like little leaves.
Their feeding method is similar. They pierce tomato fruit, draw out fluids, and leave behind pale entry marks that later reveal white firm tissue inside.
The adults move fast. They can slip around stems, fly to nearby crops, or drop when the plant is disturbed.
Nymphs often gather in groups. Young leaf-footed bugs may look reddish or orange, which makes them more noticeable on green foliage.
Eggs are a major clue. Females lay bronze, barrel-shaped eggs in neat chains along stems, leaf edges, or midribs.
Those egg chains are worth removing early. One small line of eggs can become a cluster of feeding nymphs in a short time.
Do not confuse every reddish nymph with a pest. Assassin bug nymphs can look somewhat similar and are beneficial predators.
Look at the body shape. Assassin bugs usually have a narrower, more predatory shape and a curved beak.
Take a photo when unsure. A local garden expert or county Extension office can often help confirm the insect from a clear image.
Check other crops too. Leaf-footed bugs may move among tomatoes, peppers, beans, squash, and fruiting plants nearby.
The cloudy spot may show up on the tomato.
The actual pest pressure may be moving across the whole summer garden.
4. Slice Fruit To Find Corky Tissue
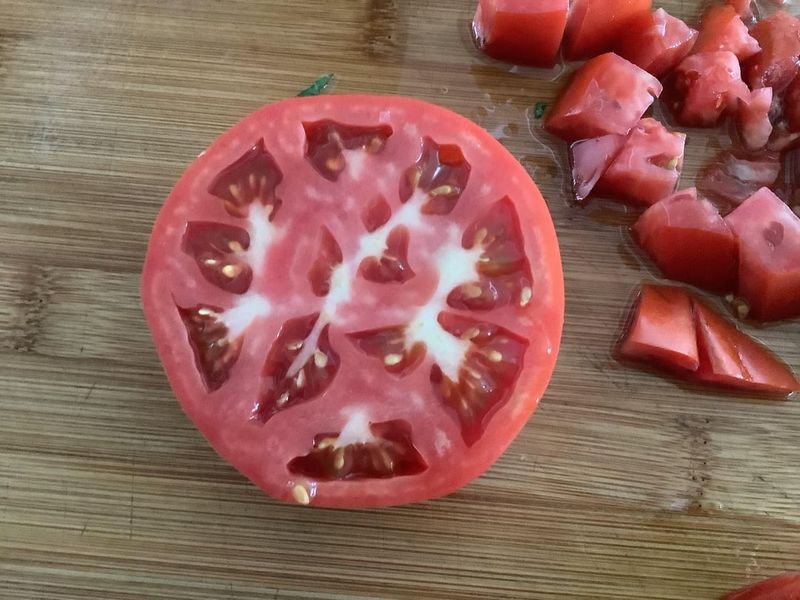
A knife gives you the fastest diagnosis.
Cut straight through the cloudy spot and look at the tissue beneath the skin. Feeding damage from piercing insects often shows up as a firm white area just under the surface.
The texture matters. Corky tissue feels firm, dry, or slightly spongy rather than wet and collapsed.
The smell matters too. Feeding injury alone should not have a sour or unpleasant odor.
The damage is often localized. Much of the tomato may still be usable after the affected section is trimmed away.
Use a clean knife. Cut out the firm white tissue and inspect the rest of the fruit.
Discard fruit with soft breakdown. Watery areas, spreading brown or gray tissue, or a bad smell point to decay rather than simple feeding injury.
Do not compost questionable fruit near the bed. Fruit with soft breakdown or heavy insect damage is better kept away from the tomato planting area.
Use marked fruit promptly. Even minor wounds can shorten storage life, especially in humid Georgia weather.
Separate damaged fruit from clean fruit. One soft tomato can make storage trays messy fast.
Do not try to treat fruit after marks appear. The feeding injury has already happened.
Protect the green fruit still forming. That is where your effort can save the next harvest.
The cloudy mark is the outside clue.
The slice tells you how serious the injury is and whether the rest of the tomato is still worth keeping.
5. Check Plant Edges Every Morning
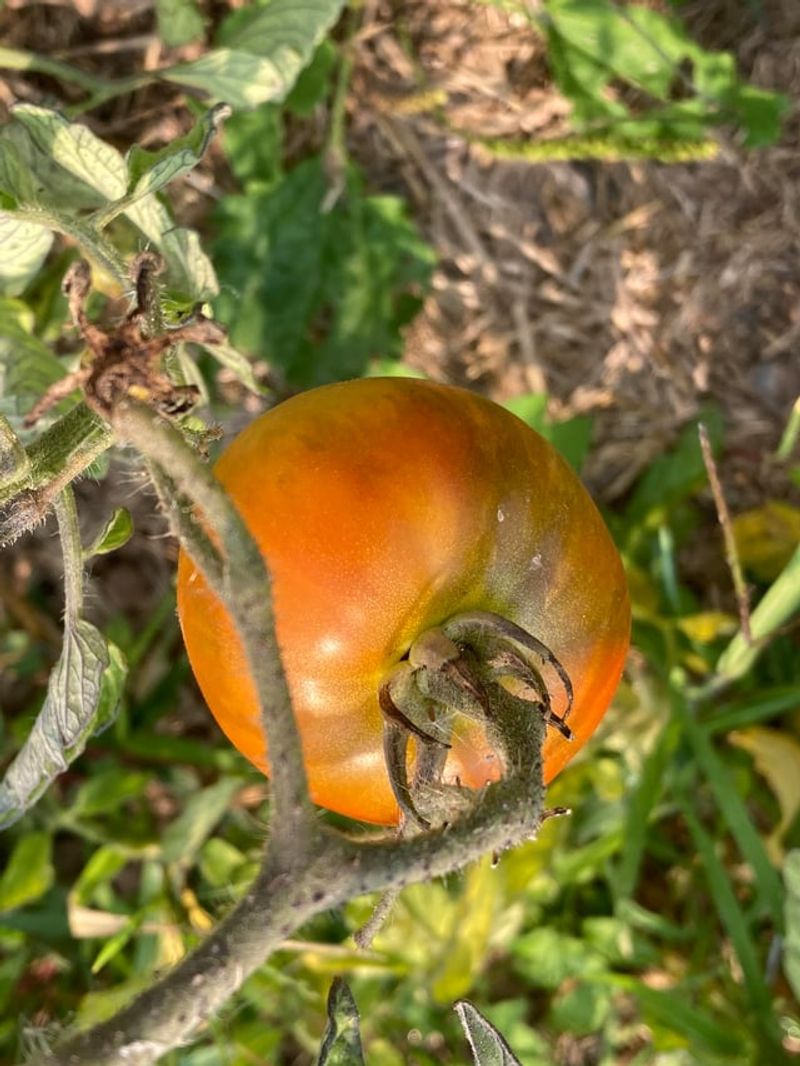
Morning scouting catches pests before they settle deeper.
Georgia heat makes insects more active and harder to follow later in the day. Early morning gives you cooler temperatures, softer light, and slower-moving pests.
Start with the outer rows. Stink bugs and leaf-footed bugs often move into tomato patches from weedy borders, field edges, shrub lines, and nearby ornamentals.
The first damage often appears there. Fruit closest to the edge may show cloudy spots before tomatoes in the center do.
Move slowly. Bumping the plant too soon can send adults dropping out of sight.
Check fruit clusters. Look where tomatoes touch each other and where leaves shade developing fruit.
Flip leaves carefully. Eggs, nymphs, and resting adults can hide on the underside.
Look at stems and midribs. Leaf-footed bug eggs may sit in tidy lines that are easy to miss at a glance.
Watch for fresh marks on green fruit. New punctures may appear as tiny pale dots before the cloudy patches become obvious.
Keep a small notebook. Write down the date, which plants had marks, and which insects you found.
Return to the same plants. Repeated checks tell you whether pest pressure is rising or holding steady.
A five-minute walk can save a lot of fruit.
The earlier you find the insects, the less likely they are to mark every tomato in the cluster.
6. Remove Egg Clusters Early
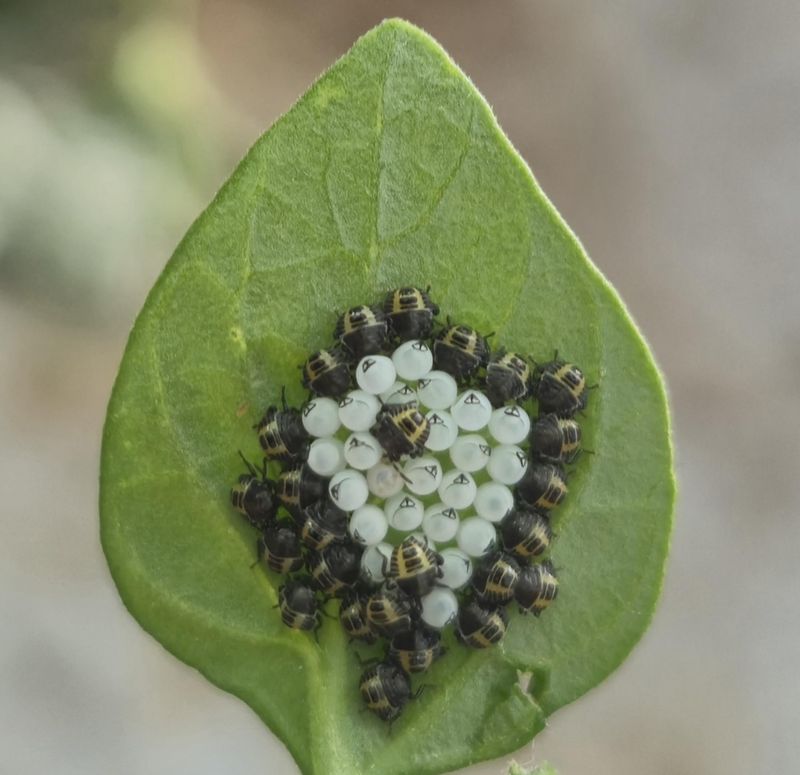
Egg removal is one of the smartest home-garden moves.
Adults are mobile. Nymphs can spread quickly. Eggs, however, stay exactly where they were laid until they hatch, which gives you a perfect chance to stop the next wave early.
Stink bug eggs often sit in tight clusters. They may look like tiny pale barrels arranged neatly on the underside of a leaf.
Leaf-footed bug eggs look different. They are usually bronze or brownish and placed in a single chain along stems or leaf veins.
Look before you remove. Some beneficial insect eggs can also appear on tomato plants.
Darkened stink bug egg masses may be parasitized. Tiny beneficial wasps can develop inside them, turning a pest egg cluster into a helpful insect source.
Leave parasitized eggs alone. Those wasps can help reduce future pest pressure.
Remove confirmed pest eggs with tape. Press tape gently over the cluster, lift it away, fold it closed, and dispose of it.
Crushing works too. Gloves make the job easier and cleaner.
Check the same areas again. Females may return to sheltered stems and leaf undersides repeatedly.
Teach your eye the patterns. Egg chains and clusters become much easier to spot after the first few finds.
This step feels small, but it pays off.
Removing one egg cluster can prevent a whole group of young insects from feeding on the next round of tomatoes.
7. Handpick Adults Into Soapy Water
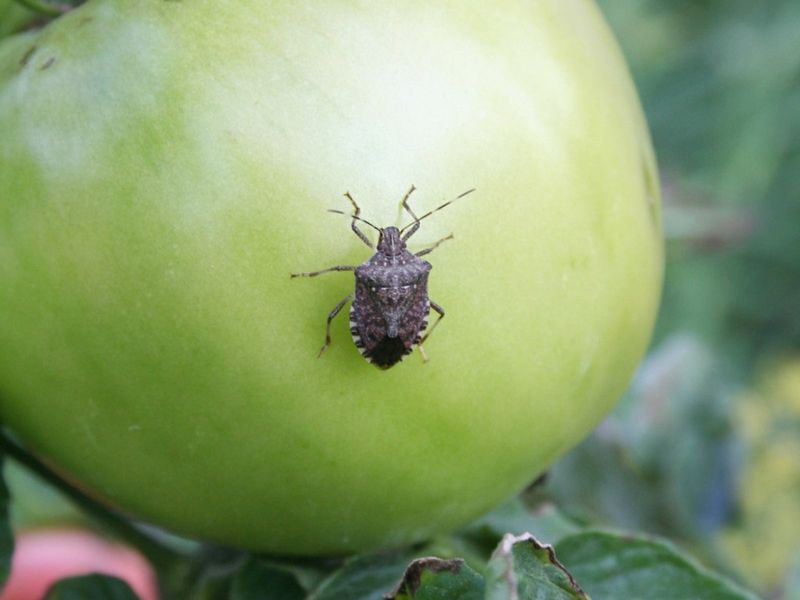
Handpicking works surprisingly well in small gardens.
The trick is to use the insects’ own escape behavior against them. Stink bugs and leaf-footed bugs often drop when disturbed, so placing a container beneath them before touching the plant gives you the advantage.
Use a wide container. A shallow bowl, bucket, or plastic tub gives more room for falling insects.
Add soapy water. A small squirt of dish soap breaks the surface tension so insects cannot float away.
Hold the container below the cluster. Place it under the fruit or branch before nudging anything.
Tap gently. A light shake or touch with a stick can send insects straight down into the container.
Wear gloves. Stink bugs can release a strong odor when handled, and gloves make the work less unpleasant.
Use a handheld vacuum for clusters. Some gardeners use a small battery-powered vacuum on nymph groups, then empty the contents into soapy water.
Work the edges first. That is where new adults often arrive from surrounding vegetation.
Repeat every few days. New insects can move in quickly during warm weather.
Do not crush unknown insects automatically. Beneficial predators may be working in the same tomato patch.
Hand removal keeps control focused.
It reduces pest numbers without coating the entire garden or pushing beneficial insects out of the system.
8. Use Targeted Controls Only When Needed
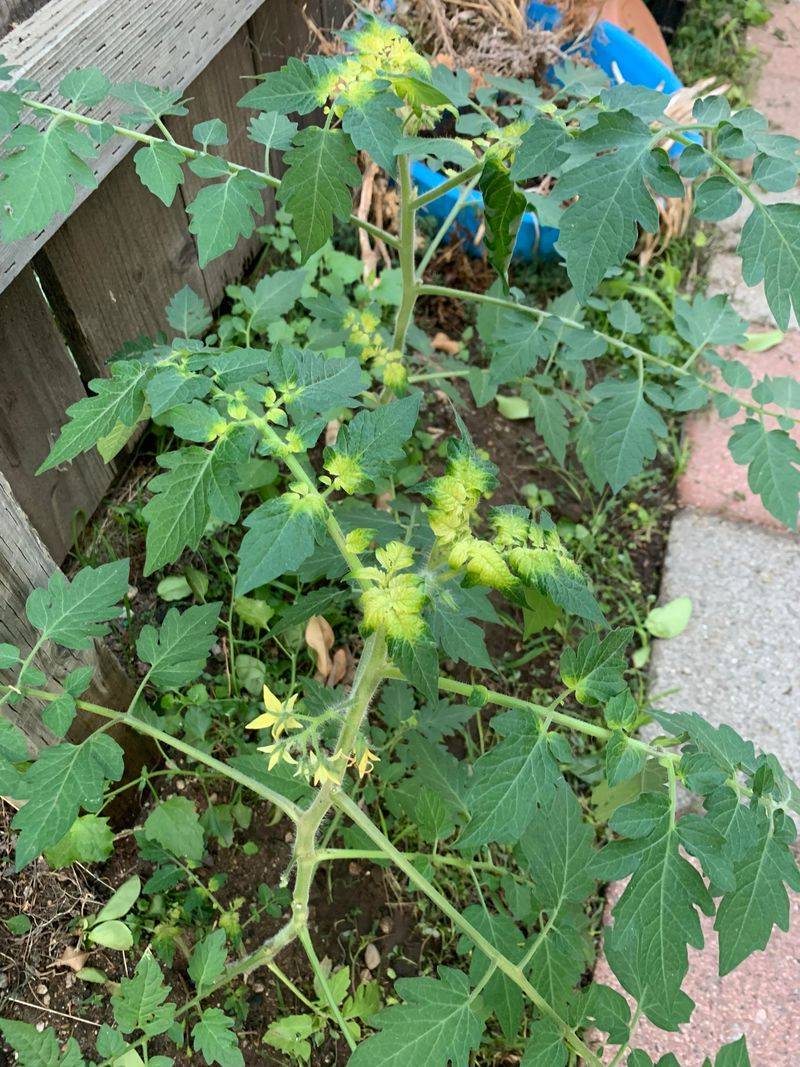
Spray should not be the first move.
Cloudy spots on a few tomatoes do not automatically justify treating the whole garden. First, confirm active insects, remove eggs, handpick adults, and track the pattern for several days.
Use products only when pressure is real. Active nymphs, repeated adult sightings, and fresh damage on green fruit carry more weight than old marks on ripe fruit.
Target the problem area. Outer rows and edge plants often need more attention than the whole planting.
Avoid spraying open flowers. Pollinators and beneficial insects move through vegetable gardens, even when tomatoes are the main crop.
Read the label every time. The product label controls crop use, rate, timing, protective gear, and harvest interval.
Respect preharvest intervals. Tomatoes close to harvest need special care before any product is applied.
Consider lower-disruption options first. Kaolin clay barriers, insect netting on small plantings, and continued hand removal may help reduce feeding without broad spraying.
Spray in calm weather. Drift can move product onto flowers, herbs, or neighboring plants.
Time applications carefully. Early morning or evening may reduce contact with beneficial insects, but the label still comes first.
Ask for help when unsure. A county Extension office can help confirm pest identification and treatment need.
Targeted control is smarter than panic spraying.
The goal is to protect the harvest while keeping as many natural allies in the garden as possible.