7 Mistakes North Carolina Gardeners Make With Camellias Under Shallow Rooted Trees
Camellias are one of the most beloved flowering shrubs in North Carolina, painting winter and early spring gardens with blooms that feel almost too beautiful to be real.
But tuck one of these beauties under a shallow-rooted tree, and you may be setting yourself up for a frustrating season of yellowing leaves and zero flowers.
Many gardeners make the same handful of avoidable mistakes when planting camellias near trees, and those errors rob the shrub of water, nutrients, light, and air before it ever has a real chance to perform.
North Carolina’s clay-heavy soils and humid summers make the stakes even higher, amplifying every mistake into something that shows up faster and hits harder than it would in a more forgiving climate.
The good news is that once you know what to watch for, fixing these problems is absolutely within reach.
Seven specific mistakes explain why so many North Carolina camellias underperform under trees, and each one has a clear, practical solution that can turn things around before the next bloom season arrives.
1. Planting Too Close To Surface Roots

Root competition happens underground, and camellias almost always lose.
When you plant a camellia directly into the zone where a shallow-rooted tree like a maple or beech has spread its feeding roots, you are dropping your shrub into a neighborhood that is already fully occupied.
Those tree roots are aggressive, fast, and well-established long before your camellia arrives on the scene.
Shallow-rooted trees typically spread their roots outward as far as two to three times the width of their canopy.
That means the competition zone is much larger than most gardeners expect. Your camellia’s young feeder roots simply cannot push through or around a dense mat of established tree roots to find the water and nutrients it needs to thrive.
NC State Extension recommends keeping new shrubs outside the drip line of aggressive shallow-rooted trees whenever possible.
If space is limited, aim to plant at the outer edge of the canopy rather than near the trunk. Root competition is a zero-sum game, and your camellia is playing with a much smaller team.
To give your camellia a fighting chance, loosen the soil gently in the planting area, add generous organic matter, and choose a spot where the tree root density is lowest.
A soil knife or thin spade can help you find gaps without causing serious damage to either plant. Spacing matters more than most North Carolina gardeners realize, and getting it right from the start prevents years of unnecessary struggle.
2. Digging Deep Around Established Trees

Grab a shovel near an old tree and you are essentially performing surgery without preparation.
Established trees, especially maples, sweetgums, and beeches common across North Carolina, keep most of their important feeder roots in the top six to twelve inches of soil.
One enthusiastic dig can slice through dozens of those roots in seconds, stressing or permanently weakening the tree above you.
Many gardeners assume that digging a wide, deep hole is the best way to prepare a planting site.
Your North Carolina Garden Changes Every Week. Your Plan Should Too.
Gardening in North Carolina changes quickly throughout the season. Every Friday you’ll receive a simple weekly plan showing exactly what to plant, prune, fertilize, harvest, and protect so you never miss the right timing.
For open garden beds, that is often true.
But under an established tree, deep digging causes two problems at once: it injures the tree and it loosens soil in a way that can create drainage problems or air pockets that harm your new camellia’s roots after planting.
Clemson Extension advises gardeners to work with the existing soil structure rather than fighting it when planting near trees.
Use a narrow spade or a soil knife to create a planting pocket just large enough for the root ball. Disturb as little of the surrounding soil as possible.
A raised planting mound can also help if the native soil is too compacted or root-filled to allow a proper planting hole.
Raised mounds keep the camellia’s crown above the competition and improve drainage without requiring you to excavate deep into the tree’s root zone. Work carefully and the tree will thank you for it too.
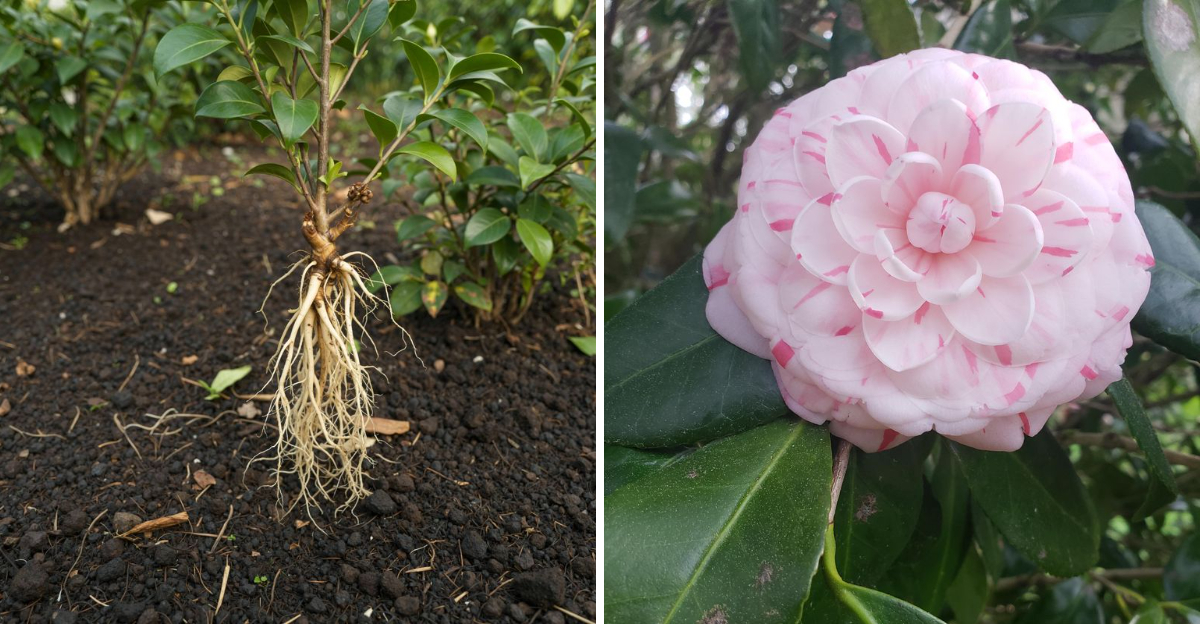
3. Burying The Root Ball Too Low

Depth matters more than almost any other planting detail with camellias. Plant the root ball too low, and you have essentially asked your shrub to hold its breath underground.
The crown, which is the point where the stem meets the roots, must sit at or very slightly above the existing soil line. Even two or three inches too deep can lead to crown rot, poor drainage, and slow decline.
North Carolina’s clay soils make this mistake especially damaging.
Clay holds water longer than sandy or loam soils, so a camellia planted too deeply in clay sits in a wet pocket that never fully drains.
Roots need oxygen as much as they need water, and waterlogged soil cuts off that oxygen supply fast. The shrub may look fine for a season, then suddenly stall or drop leaves for no obvious reason.
The American Camellia Society strongly recommends planting so that the top of the root ball sits about one inch above the surrounding soil, then sloping the backfill gently away from the crown.
This slight elevation encourages water to drain away from the stem rather than pooling around it. It also keeps the crown exposed to air, which reduces rot risk significantly.
Before you backfill, double-check the crown height from multiple angles.
Soil can settle after watering, so planting slightly high on purpose is always the smarter call in North Carolina’s heavy clay. A little elevation goes a long way toward a healthy, long-lived camellia.
4. Choosing Shade That Is Too Dark

Camellias have a reputation as shade-loving plants, and that reputation is not entirely wrong.
But there is a big difference between filtered light and full-on darkness, and plenty of North Carolina gardeners find that out the hard way when their camellia refuses to bloom.
Too much shade does not just reduce flowers. It weakens the entire plant over time.
The sweet spot for most camellia varieties is dappled or filtered light, meaning the sun reaches the plant for at least a few hours each day, even if it is broken up by leaves and branches overhead.
Under a very dense canopy, like a mature beech or a tightly branched magnolia, light levels can drop low enough to shut down flower bud formation entirely. Leaves may stay green, but buds either fail to set or drop before opening.
NC State Extension notes that Camellia japonica and Camellia sasanqua both perform best with morning sun and afternoon shade in North Carolina’s warmer regions.
Morning light is especially valuable because it dries dew off the foliage quickly, reducing fungal disease risk. Afternoon shade protects blooms from heat stress during summer establishment.
Before planting, observe the spot throughout the day and note how much direct or filtered light actually reaches the ground.
If the area stays dim from sunrise to sunset, selective pruning of lower tree branches can open up the canopy enough to let your camellia bloom with confidence.
5. Skipping Acidic Soil Prep

Camellias are particular about their soil, and they are not shy about showing their displeasure. These shrubs need a soil pH between 5.5 and 6.5 to absorb nutrients properly.
In North Carolina, many garden soils fall in the right range naturally, but soils near established trees can shift over time, especially if leaf litter from alkaline-tending species has been composting in place for years.
When soil pH climbs above 6.5, camellias struggle to pull iron and manganese from the ground even when those nutrients are technically present.
The result is interveinal chlorosis, a condition where leaf veins stay green while the tissue between them turns yellow. It looks alarming, and it is a clear signal that something is off at the root level. The fix is not more fertilizer. It is a pH correction.
A simple soil test from NC State’s soil testing lab costs just a few dollars and gives you exact numbers for pH and nutrient levels.
Based on those results, you can add granular sulfur, acidified fertilizer, or organic amendments like pine bark or cottonseed meal to bring the pH into the right range.
Always amend gradually, because swinging pH too far too fast stresses plants just as much as leaving it wrong.
Work amendments into the top six to eight inches of soil before planting, and retest every year or two to stay on track.
Good soil chemistry is the invisible foundation of every thriving North Carolina camellia. Getting it right from the start saves a lot of head-scratching later on.
6. Letting New Camellias Dry Out

A freshly planted camellia is in a tough spot from day one. Its root system is small, confined to the original root ball, and not yet connected to the surrounding soil.
Meanwhile, the tree overhead is pulling moisture out of the ground constantly, sometimes lifting hundreds of gallons of water per day through its roots and leaves. The camellia is competing for scraps at the buffet.
During the first two growing seasons, consistent soil moisture is the single most important factor in camellia establishment.
Skipping watering for even a week during a dry North Carolina summer can set back root development significantly.
Stress during establishment leads to weak root systems that stay shallow and vulnerable long after the plant looks healthy above ground.
The American Camellia Society recommends watering newly planted camellias deeply once or twice a week during dry periods, making sure water reaches the entire root ball rather than just the surface.
A slow trickle from a soaker hose for thirty to forty-five minutes is far more effective than a quick spray from a garden hose. Deep watering encourages roots to grow downward rather than staying near the surface.
A two to three inch layer of organic mulch around the plant, kept away from the stem, helps the soil hold moisture between watering sessions.
Check the soil at a depth of two to three inches before watering. If it feels dry, water thoroughly and do not wait for wilting to tell you it is time. This is the roots-before-shoots phase, and it is not the moment to skip the hose.
7. Piling Mulch Against The Crown

Mulch is one of the best tools in any gardener’s toolkit, but the way most people apply it around camellias quietly causes damage season after season.
The mulch volcano, that cone-shaped pile built up against the base of a shrub, traps moisture directly against the crown and stem.
Over time, that constant dampness creates conditions for fungal rot, bark decay, and harmful insect activity.
Camellias are especially vulnerable to crown rot because their stems are relatively smooth and do not have thick, protective bark like many trees.
When mulch stays packed against the crown for months at a time, the tissue underneath softens and breaks down.
By the time you notice the problem, the damage is often already deep. A shrub can look perfectly healthy from above while its base is quietly deteriorating at soil level.
NC State Extension and the American Camellia Society both recommend keeping mulch pulled back at least two to three inches from the crown and stem.
Apply a two to three inch layer across the rest of the planting area to retain moisture and moderate soil temperature, but leave a clear, dry ring around the base of the plant.
That small gap makes a surprisingly large difference in long-term crown health.
Pull the mulch back gently each spring to check for any signs of rot, discoloration, or pest activity at the crown.
Fresh mulch should be added on top of old mulch rather than raked away entirely, which can disturb shallow roots. Keep it flat, keep it pulled back, and your camellia’s crown will stay healthy for years to come.