Don’t Toss Your Mums When the Flowers Fade: 11 Steps Ohio Gardeners Use to Bring Them Back Bushier

Japan’s emperor sits on a throne named after a flower that brightens countless grocery store entrances every autumn. That same bloom has been grown in China for well over two thousand years, long before porch decorations existed.
Plenty of potted ones still land in the trash each November once their bright petals turn brown and crispy. Many of those plants are hardy perennials, and Ohio winters are often survivable with a little smart help.
I have to admit that I tossed a few myself before a friend showed me what I was missing.
You might notice tiny green shoots at the base of faded stems, and those shoots carry next year’s show.
Gardeners across Ohio quietly bring these plants back year after year, fuller and rounder than the store versions. That tired pot could be just a few easy steps away from stealing the show again next fall.
1. Leave Faded Mum Stems Standing Through Winter

Those crunchy brown stems look messy, but they work like a cozy winter coat for the plant’s crown. I used to grab the shears every November, and I honestly wish someone had stopped me sooner.
Extension experts note that mums left standing over winter usually survive better than mums cut back in fall. The old stems trap fallen leaves and snow, which adds a natural layer of insulation around the roots.
Cold air is only part of the problem for these shallow-rooted perennials during a long Ohio winter. Freezing and thawing can heave crowns out of the soil, and standing stems help soften those wild swings.
You can still tidy things up a little by snipping off the faded flower heads if they bother you. Just keep the main stems in place, because the plant needs that framework until the weather warms again.
Brown flowers can also hold moisture, so removing them may slightly reduce mold problems on very wet plants. Toss any spotted or moldy leaves into the trash rather than the compost pile to avoid spreading disease.
Neighbors might raise an eyebrow at your shaggy flower bed, but I think a little patience pays off. Add a pumpkin or a few corn stalks nearby, and the scraggly look suddenly feels like fall decor.
Come spring, those same stems will point you straight to the crown so you can find it quickly. That small bonus matters when tiny green shoots are hiding under a soggy blanket of leaves and mulch.
2. Plant Store-Bought Mums In The Ground Early

Garden centers sell mums in tight plastic pots packed with roots, and those roots desperately want more room. I like to free them from that cramped container as soon as I bring them home in early fall.
Planting in August or September gives roots several weeks to spread before the soil freezes hard in winter. Mums tucked into the ground in late October often struggle because they have so little time to settle.
Store-bought plants pour most of their energy into flowers, which leaves less energy for building strong roots. Snipping off some of the open blooms can help the plant redirect its strength down into the soil.
Gently loosen the root ball with your fingers before planting, especially if roots are circling the pot’s edge. Set the plant at the same depth it grew in the container, then firm the soil gently around it.
Space each plant about eighteen inches or more from its neighbors so air can move freely between them. Good airflow helps reduce powdery mildew and leaf spot, two common headaches for mums in humid weather.
Water right after planting, and keep checking the soil every few days until cooler weather finally settles in. Fall-planted mums usually do not need fertilizer until spring, so skip the plant food for now.
Personally, I treat late-season mums as a bonus rather than a sure thing, since some still fail anyway. Even so, an early start greatly improves your odds of seeing healthy green shoots after the snow melts.
3. Give Mums A Sunny Spot With Well-Drained Soil

Soggy winter soil causes plenty of mum losses, and many experts rank poor drainage among the biggest troublemakers. I learned this the hard way after planting a gorgeous bronze mum in a low corner that puddled.
Mums need at least six hours of direct sunlight each day to grow sturdy stems and plenty of buds. Shady spots tend to produce floppy, stretched plants that lean toward the light and bloom far less.
Heavy clay is common across much of Ohio, and it can hold water around roots for days. Mixing in compost or other organic matter loosens clay and helps excess water drain away more quickly.
Sandy soils have the opposite problem, since water rushes through them before roots can grab a decent drink. Compost helps here too, because it acts like a sponge that holds moisture without turning the bed swampy.
Mums generally prefer slightly acidic soil around a pH of 6.5, which matches many typical garden beds. A simple soil test from your county extension office can tell you whether any adjustments are needed.
Spots along a south-facing house wall can offer extra warmth and shelter from harsh winter winds. Raised beds are another smart choice, since they lift crowns above wet ground during rainy thaws in spring.
You might notice that mums in great locations come back stronger every year with far less fussing. Choosing the right spot takes a few minutes now, yet it shapes how the plant performs for seasons.
4. Water Mum Roots Deeply Before The Ground Freezes
Thirsty roots head into winter at a real disadvantage, even though the plant looks sleepy above ground. I keep a watering can by the back door in fall as a reminder that my mums still drink.
Mums have shallow root systems, so the top few inches of soil can dry out quickly on breezy days. Dry autumn stretches are common, and roots that go without moisture can weaken before the first hard freeze.
Aim to keep the soil evenly moist but not soggy, which feels a bit like a wrung-out sponge. Push a finger into the soil near the stems, and water when the top inch feels dry.
Deep watering at the base of the plant encourages roots to grow down instead of staying near the surface. Overhead sprinkling wets the leaves, and damp foliage invites fungal diseases like leaf spot and powdery mildew.
Morning is the best time to water, because any splashes on leaves can dry before cool evening temperatures. Evening watering often leaves foliage wet overnight, which gives fungus spores a comfortable place to settle and grow.
Once the ground freezes solid, you can put the hose away, since roots cannot absorb frozen water anyway. Rain and snow usually handle the job through winter for in-ground mums in most parts of the state.
What surprises me most is how a few deep drinks in October can affect plants months later. Healthy, hydrated crowns simply wake up faster and push out more shoots once spring sunshine returns.
5. Pile Straw Mulch Around Mum Crowns After Hard Frosts

Timing matters with mulch more than most gardeners expect, and piling it on too early can backfire. Mulch placed on warm soil may keep the ground soft, which can invite rodents to move in for winter.
Wait until several hard frosts have passed and the top layer of ground has frozen before adding mulch. In much of the state, that moment usually arrives sometime in late November or early December.
Spread three to four inches of loose straw or shredded leaves around and over each crown. Some growers in colder northern counties pile on even more, especially in exposed and windy spots.
The goal is to keep soil temperatures steady rather than to keep the plant warm like a blanket. Steady cold protects roots from the heaving that happens when soil freezes and thaws over and over.
Recycled holiday trees make great mulch, because their branches can be laid across beds after the holidays. I love how this trick gives the tree one more useful job before it heads to the curb.
Avoid heavy, matted materials like whole oak leaves that can pack down and trap water against stems. Fluffy mulch allows air to move, which helps prevent rot while still holding in some ground warmth.
Check the mulch occasionally after big storms, since strong winds can blow straw away from exposed beds. A quick top-up takes only a minute and keeps your mums tucked in until the weather softens.
6. Move Potted Mums Into A Cool Unheated Garage

Pots sit above ground, so their roots face far harsher cold than roots tucked safely into garden soil. I can’t imagine leaving a potted mum on an open porch through January and expecting it to return.
After the first frost, cut the stems back to about four to six inches above the soil line. Trimmed plants take up less space and are much easier to carry into an unheated garage or shed.
Aim for a spot that stays between about 32 and 50 degrees Fahrenheit throughout the winter months. Warmer rooms can trick the plant into growing weak shoots too early, long before it can go outside.
Water sparingly during dormancy, just enough to keep the soil from drying out to dust in the pot. Checking every four to six weeks usually works, though dry, breezy garages may need a little more attention.
Overwatering is the bigger risk, because cold, wet soil can quickly lead to root rot in sleeping plants. Make sure every container has drainage holes, and empty any saucers that collect standing water underneath.
No garage space can still work out, since pots can be sunk into the ground and heavily mulched. Grouping pots tightly against a house wall and burying them in leaves also offers decent protection for many plants.
In spring, after the last frost, move plants outside gradually over about a week to harden them off. Start with a few hours in shade, then slowly increase their time in full sun each day.
7. Cut Back Old Mum Stems When Spring Shoots Appear
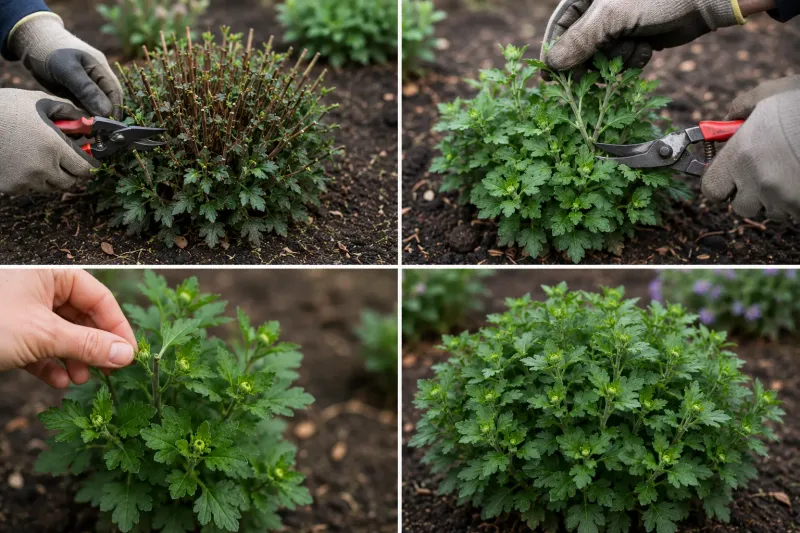
Spring cleanup feels wonderful after a long gray winter, and mums give you a good reason to start. Snipping away last year’s brittle stems reveals fresh green growth that looks almost like tiny rosettes at the base.
Wait until new shoots appear and the worst cold has passed before removing the old stems at ground level. In central parts of Ohio, that often lands sometime in April, though timing varies by year and location.
Pull back the winter mulch gradually over a week or two instead of raking it all off at once. Late frosts are common in spring, and a sudden exposure can shock tender shoots that were snugly covered.
Use clean, sharp pruners and cut the old stems close to the ground without nicking the new growth. Wiping your blades with a disinfectant wipe between plants helps limit disease spread from one clump to another.
Toss the old stems in yard waste rather than your compost, especially if leaves showed spots last fall. Diseased debris can carry fungus spores into the new season if it stays near the plant.
Personally, I find this step a little thrilling, because it is the first real proof that the plant survived. Green shoots poking through cold soil feel like a small reward for all that patience over the winter.
No green by late spring may mean the plant did not make it, so give it a few extra weeks. Some mums are slow starters, and a little patience can save you from digging up a perfectly healthy plant.
8. Divide Crowded Mum Clumps With A Sharp Spade

Mums are surprisingly generous plants, and one healthy clump can turn into several new plants in minutes. I think dividing is the most satisfying step, because you end up with free plants to share.
Clumps that go years without dividing often develop a woody, empty center with weak shoots around the edge. Dividing every two to three years in spring keeps plants vigorous and helps them grow fuller mounds.
Start when new shoots are a few inches tall, since you can easily see where healthy growth is. Dig around the whole clump with a sharp spade, then lift it gently from the soil with its roots.
Use a spade or sharp knife to split the clump into sections with several shoots and plenty of roots. Throw away the tired woody middle, because the young outer pieces will grow much stronger and bushier plants.
Replant the divisions at their original depth, spacing them about eighteen to thirty inches apart for airflow. Water them well afterward, and keep the soil moist for the next few weeks while roots settle in.
Moving divisions to a fresh spot every few years can also reduce disease and pest buildup in the soil. Leaf spot fungi can linger in old beds, so a new location gives plants a cleaner start.
Extra pieces make wonderful gifts for friends who admired your mums last fall but tossed their own plants. You might find that sharing divisions starts a fun neighborhood tradition that grows a little more each year.
9. Pinch Mum Shoot Tips Every Few Weeks

Pinching sounds a bit mean, but this simple trick is the real secret behind those perfect mounded mums. Commercial growers pinch their plants several times, which explains why garden center mums look so round and full.
Start when new shoots reach about four to six inches tall, usually sometime in late spring. Use your thumbnail and finger or small pruners to remove the top two or three inches of each stem.
Every pinched stem responds by sending out two or more side branches just below the cut. More branches mean more places for flower buds to form, so your plant grows fuller instead of taller.
Repeat the pinching every two to four weeks as new shoots stretch out and reach a similar height. Many gardeners find it easiest to pinch on a set schedule, like the first weekend of every month.
Skipping this step often leads to tall, leggy stems that flop open after a heavy summer rain. Floppy plants also tend to bloom with fewer flowers, which can feel disappointing after all that winter care.
Gardeners who missed early pinching can still cut leggy plants back by one third or half in June. That bigger trim acts like several small pinches at once and usually encourages a denser, sturdier plant.
I like how the pinched tips can be rooted as cuttings, giving you even more plants for free. Just tuck them into moist potting mix in a bright spot, and roots often form within a few weeks.
10. Feed Growing Mums A Balanced Fertilizer

Hungry mums grow pale leaves and thin stems, while well-fed plants push out lush, branching growth all summer. I noticed a huge difference the first year I fed my mums regularly instead of guessing every few months.
Fertilizing pays off most during spring and early summer, when plants are busy building leaves and stems. A balanced fertilizer such as 10-10-10 works well, applied at label rates every few weeks until August.
Mixing compost into the soil or spreading it around plants adds gentle nutrients and improves soil texture too. I like to work a few handfuls around each clump right after spring cleanup and dividing.
Container mums usually need feeding more often, since frequent watering washes nutrients out through the drainage holes. A diluted liquid fertilizer every couple of weeks keeps potted plants green and growing steadily through summer.
Once flower buds start forming in late summer, switch to a formula lower in nitrogen and higher in phosphorus. Too much nitrogen at that stage encourages leafy growth, and the plant may put less energy into blooms.
Stop feeding once flowers are fully open, because extra fertilizer can actually shorten how long blooms last. Late feeding can also push tender new growth that is more likely to suffer when frost arrives.
Follow package directions carefully, since overfeeding can burn roots and leave crusty white salt on the soil. More fertilizer rarely means more flowers, and a steady, moderate approach usually gives the healthiest plants.
11. Stop Pinching Mums By Mid-July For Fall Buds

Mums are short-day plants, which means shrinking daylight in late summer signals them to start forming buds. I find it fascinating that a flower can sense the calendar simply by measuring how long nights last.
Extension experts suggest stopping all pinching around mid-July in northern states, and Ohio fits that guideline nicely. Some sources mention July Fourth as an easy reminder, though anywhere from early to mid-July usually works.
Pinching later can remove developing buds, which delays flowering or reduces the number of blooms you get. Late-pinched plants sometimes flower so close to frost that the show ends before it truly begins.
After your final pinch, let the plant grow freely and watch it fill out over the next several weeks. Keep watering consistently through hot August days, since stress during bud formation can lead to smaller flowers.
Bright streetlights or porch lights shining on mums at night can confuse them and delay their buds. Placing plants away from strong artificial light helps them follow their natural schedule more closely each fall.
By September, tight buds should be covering the plant, ready to open as the nights grow cooler. You’re in for a big surprise when that first rounded mound bursts into color right on schedule.
Personally, I think a homegrown mum blooming for its second or third season beats any grocery store purchase. Once you see that bushy comeback, tossing faded mums will probably feel like a habit from long ago.