Here Is How New Jersey Gardeners Should Remove Faded Petunia Flowers For More Summer Color
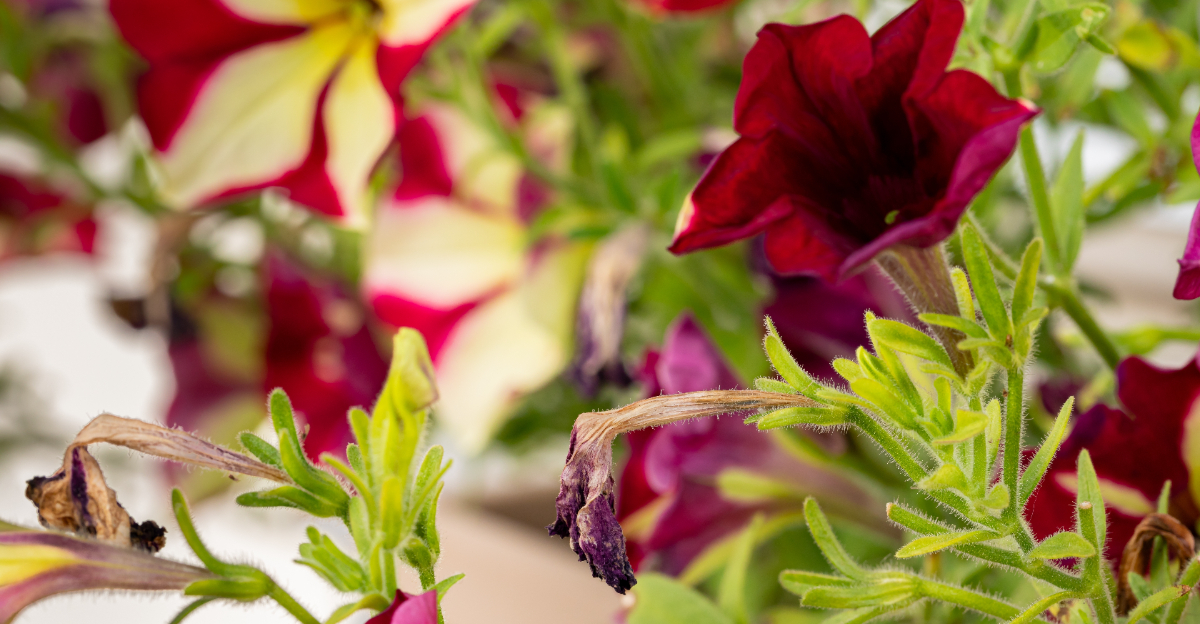
Petunias are not delicate. They are workhorses, and they can bloom from June well into September with the right care.
But most New Jersey gardeners are accidentally sabotaging their own plants without realizing it. That half-wilted bloom you left on the stem this morning? It is already signaling your petunia to stop making flowers and start making seeds instead.
Once that switch flips, the color fades fast. Window boxes go sparse. Hanging baskets turn leggy and brown at the edges. The whole display starts looking like it gave up.
The fix is removing faded flowers, and it takes about ten minutes twice a week.
Done right, it completely resets the plant and pushes out a fresh wave of blooms before you even notice the old ones are gone.
Here is exactly how New Jersey gardeners should be removing faded petunia flowers to keep the color coming all summer long.
1. Pinch Off Faded Blooms At The Base

Soft petals turning papery brown are your petunia’s way of sending a signal. When a bloom fades, the plant shifts all its energy toward making seeds. That means fewer new flowers and a display that looks tired by midsummer. No summer gardener wants to make that trade-off.
Pinching off faded blooms at the base is the fastest and most satisfying fix. You simply grab the wilted flower between your thumb and forefinger, right where it meets the stem, and give it a firm twist and pull.
The key is getting the whole bloom off cleanly without leaving a ragged stub. A clean removal tells the plant to push out fresh buds rather than linger on that spent spot.
Many gardeners make the mistake of only pulling the petals, leaving the green base behind. That green base is actually the start of a seed pod, and leaving it in place will slow down your bloom cycle considerably.
Go all the way to the base of the flower, just above the first set of healthy leaves. This small detail makes a measurable difference in how quickly new buds appear.
Removing faded petunia flowers at the base is the foundation of every other step in this list. Master this one move and your plants will reward you with waves of color that last well into September across your yard.
2. Remove The Whole Flower And Seed Pod

Here is something most beginner gardeners miss entirely: the green bump sitting right behind a faded bloom. That small, swollen bump is a seed pod, and it is quietly stealing energy from every new flower trying to form on your plant.
Removing the whole flower and seed pod together is a non-negotiable step if you want continuous summer color. Pulling just the petals and leaving that green pod behind is like clearing your dinner plate but leaving all the crumbs on the table.
Grip the spent bloom and slide your fingers down to where the pod meets the stem. You will feel a slight resistance, and that is exactly where you want to make your removal, twisting gently but firmly until it comes free.
Your New Jersey Garden Changes Every Week. Your Plan Should Too.
Gardening in New Jersey changes quickly throughout the season. Every Friday you’ll receive a simple weekly plan showing exactly what to plant, prune, fertilize, harvest, and protect so you never miss the right timing.
Seed pods left on the plant send a chemical message that flowering is no longer needed. The plant essentially thinks its job is done for the season, which causes blooming to slow dramatically.
Catching pods early makes removal much easier on your fingers. Look for them before they start to swell and harden.
Check your plants every couple of days during peak summer heat. Warm weather speeds up the seed development process noticeably.
Once you start removing the full flower and pod together, new buds will start popping up within days. That quick turnaround is one of the most encouraging sights in summer gardening.
3. Use Clean, Sharp Scissors For Tough Stems

Some petunia stems get woody and stubborn as summer rolls on. Fighting them bare-handed crushes the tissue, opens the door to disease, and slows regrowth.
Reaching for a pair of clean, sharp scissors is the smart move in those moments. A smooth cut through a tough stem causes far less trauma to the plant than tearing or twisting repeatedly until something finally gives way.
Sharp blades matter more than most people realize. Dull scissors crush stem cells instead of slicing through them cleanly, and that bruised tissue becomes a weak point where fungal issues can take hold during humid summer stretches.
Cleaning your scissors before each use is equally important. A quick wipe with a disinfecting pad takes about ten seconds and protects your plants from transferring anything harmful from one stem to another.
Bypass pruners also work beautifully for thicker stems that have turned almost woody by August. The curved blade design on bypass pruners creates a slicing motion that is gentler on plant tissue than a straight-blade cut.
Keep a small pair of garden scissors near your petunia containers so you are always ready. Convenience is one of the biggest factors in whether a gardening habit actually sticks through a long summer.
4. Check Every Stem, Not Just The Obvious Ones

It is easy to grab the brown blooms waving at you from the top of the plant and call it a day. But petunias are sneaky, and dozens of spent flowers can hide deep inside the foliage where they quietly set seed without anyone noticing.
Checking every stem, not just the obvious outer ones, is what separates a decent plant from one that explodes with color. Spend an extra two minutes parting the stems and peering into the center on each pass.
Hidden spent blooms are especially common in trailing and wave varieties, which layer over themselves as they cascade down a hanging basket. Those inner stems get shaded out and fade faster than the rest.
Run your fingers along each stem from the tip back toward the base, feeling for the papery texture of spent petals or the firm bump of a developing pod. Your hands can find what your eyes easily miss when a plant gets full and lush.
Making this a habit takes about three sessions before it becomes automatic. After that, your fingers instinctively search for problem spots the moment you touch the plant, turning a chore into something almost meditative.
A thorough stem check once or twice a week keeps hidden seed pods from undermining your efforts. Removing faded blooms from every corner, not just the surface, is the difference between good results and great ones.
5. Cut Stems Back To A Leaf Node

Cutting to a leaf node sounds technical, but it is actually one of the most intuitive things you can do. A leaf node is simply the small bump on a stem where a leaf grows out from the main branch.
When you cut just above a leaf node, you are giving the plant a clear instruction: branch out from here. The plant responds by sending new growth from that point, which means more stems and more flowers.
Cutting randomly between nodes leaves a bare stub the plant cannot use. That stub eventually browns off and does nothing productive.
It may also create a small entry point for fungal issues, especially during the humid summers that coastal and central parts of New Jersey are known for.
Look for a node that has at least one healthy set of leaves attached to it. Cutting about a quarter inch above that node gives you the best chance of a clean, vigorous regrowth response from the plant.
This technique works best when combined with regular removal of spent blooms. Together, they keep your plant compact and constantly pushing out new flowering stems.
Gardeners who add node-cutting to their routine often notice a dramatic bushing-out by late summer. That fuller shape means more blooms per square inch, and that is exactly the kind of payoff that makes the effort worth it.
6. Remove Faded Blooms At Least Twice A Week

Petunias are not a once-a-week kind of plant during a hot Garden State summer. They bloom fast, fade fast, and set seed fast.
Checking in only on weekends leaves a lot of lost blooming potential sitting on the stem. Twice a week is the rhythm that actually keeps up with them.
Removing faded blooms twice a week keeps the plant in a constant state of renewal. Let them pile up too long and catching up becomes a much bigger job than staying current.
Short, frequent attention beats one long, overwhelming session almost every time. Twice-weekly sessions also mean you spend less time per visit since fewer spent blooms accumulate between checks.
Early morning is the ideal time because cooler temperatures reduce stress on both you and the plant. The stems are more hydrated in the morning, which makes clean pinching and cutting noticeably easier on your hands.
Setting a simple reminder on your phone for Tuesday and Friday mornings can turn this into a low-effort habit within two weeks. Habits tied to a specific time and day stick far better than vague intentions.
By mid-August, when nearby gardens start looking ragged, yours will still be putting on a show. Consistent twice-weekly removing faded blooms is the single most impactful habit you can build for summer-long petunia color.
7. Pinch Back Leggy Stems At The Same Time

Long, bare stems with a single faded bloom flopping at the end are a telltale sign your petunia is losing its shape. These leggy stems are not just unsightly.
They are also producing far fewer flowers than a compact, well-pruned stem would. Pinching them back while you are already removing spent blooms is one of the most efficient habits you can build.
You are already holding the plant and looking for spent blooms. Addressing straggly growth at the same time costs almost no extra effort.
Find the leggy stem and trace it back to where a healthy set of leaves branches off. Pinch or cut just above that branch point, and the plant will redirect its resources into that more productive section of growth.
Some gardeners worry that cutting back too much will hurt their plants, but petunias are genuinely tough and bounce back fast. A stem cut back by a third will typically show new bud growth within five to seven days.
Milliflora and grandiflora varieties can get leggier faster than some wave types. Keep a closer eye on those specific plants as the season progresses.
Recognizing which varieties need more frequent attention helps you prioritize your garden time wisely. Tackling leggy stems and faded blooms in one pass keeps your plants looking intentional and full rather than wild and overgrown.
A tidy, well-shaped petunia is a genuinely happy one. That happiness shows up in every new cluster of blooms.
8. Dispose Of Removed Flowers Away From The Plant

Tossing pulled blooms back onto the soil might seem harmless, but that casual habit can quietly work against everything else you are doing. Spent flowers left near the base of the plant can harbor fungal spores and attract pests.
Those pests will happily move from the debris right back onto your healthy stems. Disposing of removed flowers away from the plant breaks that cycle before it starts.
Drop debris into a bucket as you work rather than leaving it on the soil. Botrytis, a gray fuzzy mold that loves humidity, is a real concern for petunia growers along the New Jersey coast and central valleys.
Removing spent organic material from the plant’s environment is one of the most effective low-effort ways to reduce the risk of an outbreak. Healthy removed material can go straight into your compost pile.
Composting your removed petals and stems is a great option, as long as the plant material shows no signs of disease or pest damage. Healthy organic matter breaks down beautifully and returns nutrients to your garden over time.
Keeping a small handled bucket near your petunia planters makes proper disposal automatic rather than something you have to think about. When the tool is already there, the right habit becomes the easy habit.
Disposing of removed blooms properly is the final piece of a truly effective petunia care routine. Clean plants, clean surroundings, and consistent attention are your best tools for color that lasts all season.