These Are The Signs Your Michigan Potato Plants Have Blight And What To Do To Save The Harvest
Potato blight moves through a Michigan garden with the kind of speed that makes early detection genuinely critical.
The same humid stretches that make summers productive for so many crops create near-ideal conditions for both early and late blight.
And the two behave differently enough that misidentifying which one you’re dealing with leads to the wrong response at the wrong time.
Michigan gardeners who’ve lost a potato harvest to blight often describe the same experience: something looked slightly off so they waited a few days to see how it developed.
By then the situation had moved well past the point where intervention could protect much of the crop.
The signs to watch for are specific, and catching them in the first few days of appearance makes a real difference in how much of the harvest can still be brought in before the season is lost.
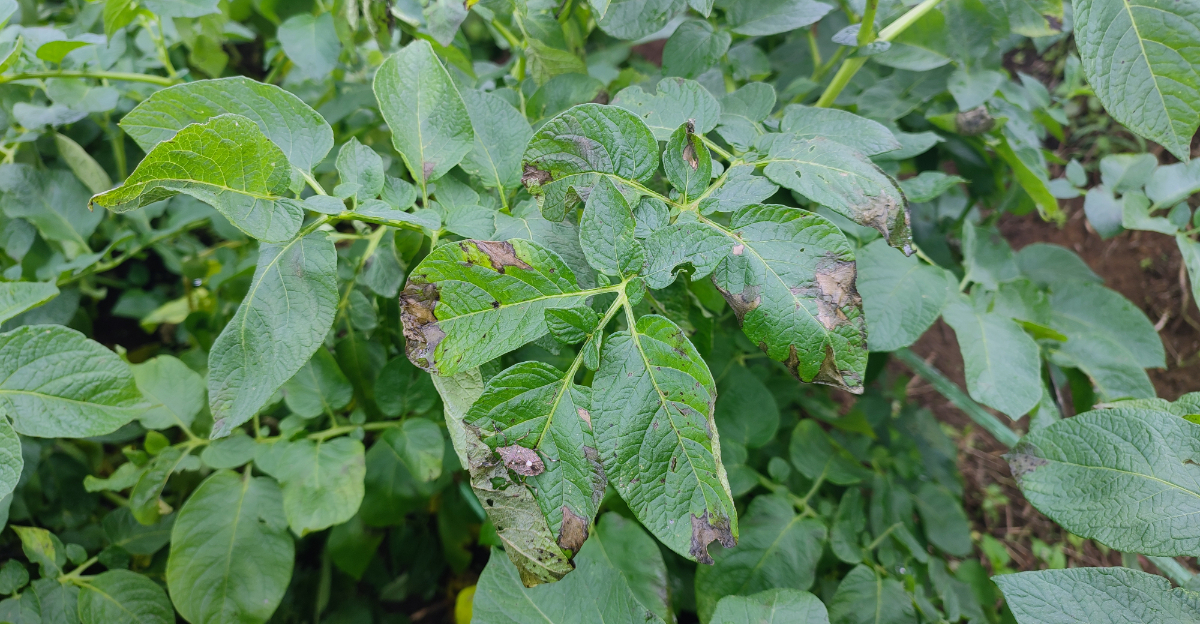
1. Yellowing Lower Leaves With Dark Spots

Something looks off at the bottom of your potato plant, and it starts with a few yellowing leaves that seem harmless at first.
Those yellow leaves, especially when they show dark brown or black spots with a ring-like pattern, are a classic early sign of early blight, caused by the fungus Alternaria solani.
Michigan gardeners often notice this showing up in June, right when summer humidity starts to build.
The spots typically appear on the oldest, lowest leaves first and then slowly work their way up the plant if left unchecked. Each spot often has a yellow halo around it, almost like a target, which is a reliable way to tell early blight apart from normal leaf aging.
Checking your plants every few days in early summer gives you the best chance to catch it before it spreads.
Walk your rows in the morning when the light is good and look closely at the undersides and tops of leaves near the soil. If you spot even two or three affected leaves on one plant, take action right away.
Removing those leaves and adjusting your care routine immediately can slow the fungus down significantly. Early detection in Michigan gardens truly is the most powerful tool you have for keeping your potato crop on track all season long.
2. Rapid Leaf Decline

One day the leaves look fine, and the next they are wilting, browning, and collapsing like they ran out of energy overnight.
Rapid leaf decline is one of the most alarming signs that blight has taken hold, and Michigan’s warm, humid summers create the perfect storm for this kind of fast spread.
When moisture sits on foliage for long periods, fungal spores travel quickly from leaf to leaf.
Removing affected leaves as soon as you spot them is one of the most effective things you can do right now. Every infected leaf is essentially a spore factory, releasing thousands of particles that can land on healthy foliage nearby.
Pulling those leaves off and sealing them in a bag before tossing them in the trash cuts that cycle short before more damage happens.
Your Michigan Garden Changes Every Week. Your Plan Should Too.
Gardening in Michigan changes quickly throughout the season. Every Friday you’ll receive a simple weekly plan showing exactly what to plant, prune, fertilize, harvest, and protect so you never miss the right timing.
Better airflow around your plants also slows this process down considerably. When leaves are crowded together, moisture lingers longer and gives the fungus more time to spread.
Thinning out dense growth and removing lower foliage that touches the soil reduces the humid microclimate that blight loves.
Michigan gardeners who stay on top of this step often find that their plants bounce back with much healthier upper growth, giving the tubers below enough time to develop fully before the end of the season arrives.
3. Brown Lesions On Stems

Most gardeners focus on leaves when scouting for blight, but the stems deserve just as much attention.
Brown streaks or sunken dark lesions running along the stem of a potato plant are a strong signal that the infection has moved beyond the foliage and is attacking the plant’s main support structure.
Once blight reaches the stem, nutrients and water have a harder time traveling to the rest of the plant.
Run your fingers lightly along the stems during your regular garden checks, especially after a stretch of rainy weather. You are looking for discolored patches that feel slightly soft or sunken compared to the healthy stem tissue around them.
These lesions can appear anywhere from the base of the plant up to where the branches fork, so a full inspection from bottom to top is worth the extra minute or two.
Catching stem lesions early also protects the tubers underground, because the infection can travel down through the stem and reach the developing potatoes before you ever see a problem at harvest.
If you find a badly infected stem, removing that entire branch and treating the area with a labeled fungicide gives the rest of the plant a better chance at survival.
Staying consistent with your stem checks throughout July and August in Michigan keeps you ahead of the disease curve when it matters most.
4. White Fuzzy Growth On Leaf Undersides

Flip a leaf over and you might find something that stops you in your tracks: a white or grayish fuzzy coating clinging to the underside of the leaf tissue.
That fuzzy growth is the signature sign of late blight, caused by Phytophthora infestans, the same pathogen responsible for the Irish Potato Famine in the 1800s.
In Michigan, late blight tends to appear during cool, wet stretches in mid to late summer when overnight temperatures stay between 50 and 60 degrees Fahrenheit.
The fuzzy growth is actually a mass of fungal spores ready to be carried by wind, rain, and even your hands to nearby plants. Checking the undersides of leaves, especially after several rainy days in a row, gives you the earliest possible warning.
You might also notice the tops of affected leaves turning dark brown or black, almost like they got burned, while the fuzzy white layer develops underneath.
Act fast if you find this growth, because late blight spreads far more aggressively than early blight and can wipe out an entire planting within days under the right conditions.
Michigan State University Extension recommends monitoring closely during high-risk weather windows and applying a labeled fungicide preventively if late blight has been reported nearby.
Timing your scouting around wet weather forecasts makes this kind of early catch much more likely throughout the growing season.
5. Dark, Sunken Spots On Tubers

Here is a sobering truth about potato blight: the damage underground can be well underway before you ever notice a single sick leaf above the soil.
Dark, sunken spots on the surface of developing tubers are a sign that the blight pathogen has traveled through the soil or down the stem and reached your actual harvest.
These lesions often look like firm, dark patches on the skin, and cutting into an affected tuber reveals brown or reddish discoloration beneath the surface. Checking tubers before full harvest is easier than most gardeners realize.
Gently dig around the base of a plant with your fingers or a small hand trowel about six to eight weeks after planting to expose one or two small tubers without disturbing the whole plant.
Inspecting those sample tubers gives you a realistic picture of what is happening underground while you still have time to respond.
If you find infected tubers, harvesting the entire crop early and sorting through potatoes carefully before storage can save a large portion of what remains healthy.
Infected tubers should never go into long-term storage because the disease spreads in the pile and ruins healthy potatoes quickly.
In Michigan, where the growing season runs from May through September, catching tuber infection by late July or August still leaves room to salvage a meaningful harvest if you respond without delay.
6. Improve Air Circulation

Good airflow through your potato patch is one of the simplest and most underrated tools in your fight against blight. Fungal diseases like early and late blight thrive in still, humid air where moisture clings to leaves for hours at a time.
Opening up the space around your plants changes that environment dramatically and makes it much harder for spores to settle and germinate.
Spacing potato plants at least 12 to 15 inches apart when you plant them gives each one room to breathe from the very start.
If your plants are already in the ground and crowded, carefully removing some lower leaves and any stems that are crossing into neighboring plants can make a real difference.
Even trimming away foliage that touches the soil surface removes a common entry point for soil-borne spores.
Better airflow also improves the effectiveness of any fungicide you apply, because the spray can reach more of the leaf surface when there is less dense, overlapping growth blocking the way.
Michigan gardens are especially prone to high humidity during July and August, so this step becomes even more valuable during those peak blight-risk weeks.
Think of improving air circulation as setting up your garden for success before problems even begin, rather than just reacting after symptoms appear. A little thoughtful pruning goes a long way toward protecting the whole crop.
7. Apply Fungicide Appropriately

Fungicide is not a cure, but used correctly and at the right time, it is one of the most effective tools for slowing blight in its tracks. The key word here is timing.
Applying fungicide after blight has already spread through most of your plants offers much less benefit than applying it at the very first sign of infection or even preventively during high-risk weather windows in Michigan.
For early blight, products containing chlorothalonil or copper-based fungicides are commonly labeled for home garden use and work well when applied every seven to ten days during active infection periods.
Late blight requires fungicides specifically labeled for Phytophthora infestans, so always read the product label carefully before purchasing.
Rotating between two different fungicide types throughout the season also helps prevent the fungus from developing resistance to any single product.
Safety matters just as much as effectiveness when applying fungicide in a home garden. Always wear gloves and avoid spraying on windy days to keep the product on the plant and off of you.
Apply in the early morning or late afternoon to reduce evaporation and give the product time to dry before evening dew sets in.
Michigan gardeners who follow label directions consistently and keep a simple spray log tend to see far better results than those who apply products randomly or too late in the disease cycle.
8. Remove And Destroy Infected Plant Material

Every blighted leaf you leave on the plant or drop on the ground is a source of thousands of new spores waiting for the next rain or breeze to carry them somewhere fresh.
Removing infected leaves and stems as soon as you spot them is one of the most hands-on and immediately effective ways to slow blight across your entire garden. Speed matters here more than almost anything else.
When you remove infected material, place it directly into a plastic bag rather than tossing it onto the soil or into a compost pile.
Standard home compost piles rarely get hot enough to break down Phytophthora infestans or Alternaria spores, which means composting blighted material can actually reintroduce the disease next season.
Bagging it and placing it in your household trash is the safest and most straightforward option for Michigan home gardeners.
If local rules allow it, burning small amounts of dry infected plant debris is another effective option that completely eliminates spores.
After handling any diseased plant material, washing your hands and cleaning your pruning tools with a diluted bleach solution or rubbing alcohol prevents you from accidentally spreading spores to healthy plants during the same garden session.
This simple hygiene step takes less than two minutes and can save a significant portion of your remaining crop from unnecessary exposure throughout the rest of the growing season.
9. Mulch Carefully To Reduce Soil Splash

Rain is great for your garden, but each raindrop that hits bare soil near your potato plants can splash blight spores from the soil surface directly onto lower leaves.
Mulching is a straightforward way to break that cycle, and it brings a handful of other benefits along with it.
A good layer of mulch acts like a shield between the soil and your plants, keeping spore-carrying soil particles right where they belong.
Straw is one of the most popular mulch choices for Michigan potato gardens because it is lightweight, easy to apply, and breaks down slowly over the season.
Apply a layer about two to three inches deep around the base of each plant, keeping it a couple of inches away from the main stem to avoid trapping excess moisture right against the stalk.
Pulling the mulch slightly away from the stem also reduces the risk of creating a damp spot where other soil-borne pathogens can take hold.
Mulch also helps the soil retain moisture more evenly, which reduces the stress on plants during dry spells and supports healthier, more disease-resistant growth overall.
In Michigan, where summer weather can swing between heavy rain and dry heat within the same week, that moisture balance is genuinely helpful.
Keeping your mulch layer refreshed throughout the season and checking underneath it occasionally for excessive wetness helps you stay on top of both disease control and overall plant health.