8 Ways To Collect Rainwater During Massachusetts’ Level 3 Drought
Massachusetts just handed down a Level 2 Significant Drought designation across large parts of the state, and your lawn is paying the price.
That crunch under your feet when you walk across the grass? Not a good sign. Meanwhile, every rainstorm rolls off your roof, gushes through your gutters, and disappears into the storm drain like it was never yours to begin with.
It was. You just let it go. Rainwater collection is not a fringe hobby or a niche gardening trick. It is a practical, low-cost way to fight back against a dry spell that shows no sign of backing down.
Massachusetts homeowners who harvest roof runoff are watering their gardens, topping off raised beds, and watching their water bills shrink while their neighbors argue with a hose.
Different budgets, different yard sizes, all of them smarter than watching rain vanish into the pavement.
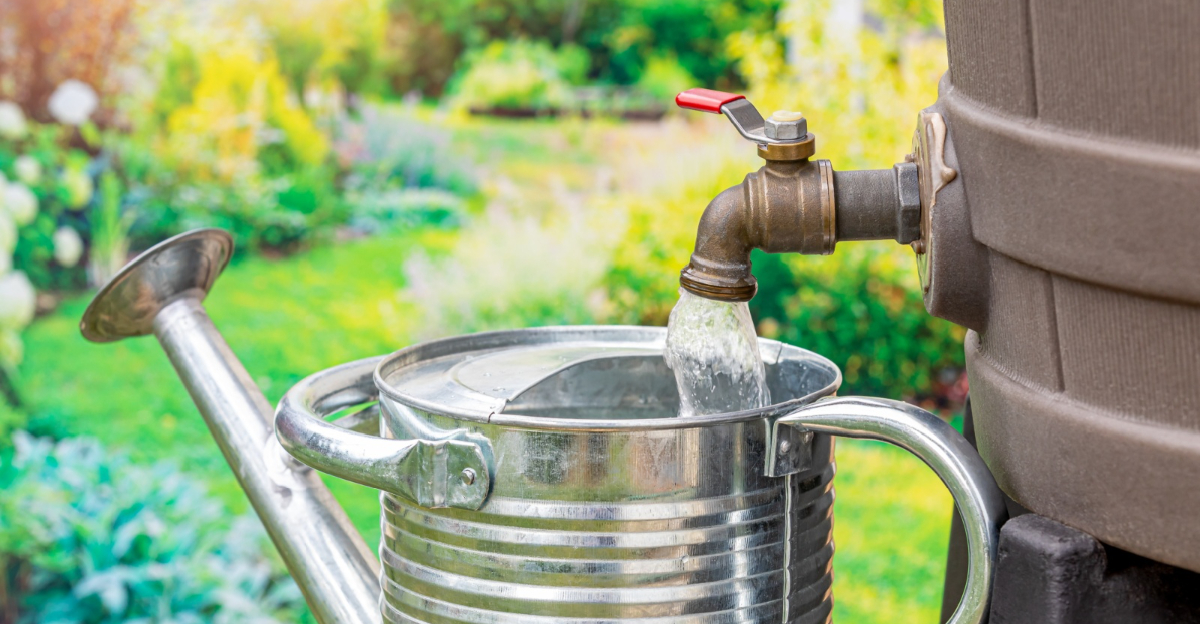
1. Connect Rain Barrels To Gutter Downspouts

Your roof is basically a giant funnel, and right now it is wasting every drop. Connecting a rain barrel to your gutter downspout is the fastest way to start collecting rainwater at home.
Most rain barrels hold between 50 and 80 gallons. That might not sound like much, but one inch of rain on a 1,000-square-foot roof produces over 600 gallons of runoff.
Pick a barrel with a tight-fitting lid to keep mosquitoes out. A screen mesh over the opening adds extra protection and filters out debris before the water enters.
Installation is surprisingly simple for most homeowners. You cut the downspout, attach a diverter kit, and connect the barrel with a short hose or elbow joint.
Place the barrel on a raised platform like cinder blocks. Elevation creates water pressure, so gravity does the work when you attach a hose to the spigot. Look for food-grade barrels or purpose-built rain barrels at local hardware stores.
Some Massachusetts towns have offered rebates for approved collection systems. Check with your local water authority for current availability.
Check your barrel after every storm and use the water quickly on garden beds. Keeping the barrel from overflowing prevents standing water issues around your foundation.
Once you see how fast one barrel fills up, you will want more. Luckily, the next step makes expanding your setup surprisingly easy.
2. Link Multiple Barrels To Increase Storage

One barrel fills up fast, especially during a heavy storm. Linking multiple barrels together turns a small setup into a serious rainwater collection system that can hold hundreds of gallons.
The process is called daisy-chaining, and it is easier than it sounds. You connect barrels side by side using PVC pipe or flexible tubing near the top of each container.
When the first barrel fills, water flows automatically into the second. Each additional barrel you add multiplies your total storage without requiring extra downspouts or complicated plumbing.
Keep all barrels on the same level surface so water distributes evenly. Uneven placement causes one barrel to overflow while another sits nearly empty.
Use bulkhead fittings to create watertight connections between barrels. These fittings are cheap, widely available, and require only a drill and a wrench to install.
Your Massachusetts Garden Changes Every Week. Your Plan Should Too.
Gardening in Massachusetts changes quickly throughout the season. Every Friday you’ll receive a simple weekly plan showing exactly what to plant, prune, fertilize, harvest, and protect so you never miss the right timing.
Label each barrel if you plan to use the water for different purposes. Some gardeners separate water for edible plants from water used on flower beds or lawns.
Three linked 55-gallon barrels give you 165 gallons of storage from a single downspout. During a prolonged drought like this one, that supply can keep a vegetable garden alive for weeks.
Adding overflow tubing at the end of your chain directs excess water away from your foundation. Smart overflow management means no wasted water and no soggy basement walls.
3. Dig Shallow Swales Along Garden Beds

Swales sound technical, but they are basically shallow ditches with a purpose. Digging them along your garden beds slows down rainwater and guides it exactly where your plants need it most.
A swale is typically six to twelve inches deep and follows the natural contour of your yard. Water flows into the channel, slows down, and soaks into the soil instead of racing away.
Start by observing where rain naturally flows across your yard during a storm. Those natural pathways tell you exactly where to position your swales for maximum effect.
Use a shovel or a mattock to carve out gentle, curved channels. The curve is important because straight ditches move water too quickly and reduce absorption time.
Lining the bottom of a swale with gravel improves drainage and prevents erosion. A layer of wood chips on top keeps the soil moist longer between rain events.
Swales work especially well on slightly sloped yards where runoff is a persistent problem. They act like a series of speed bumps, giving the ground time to drink deeply.
During a drought, even small amounts of rainfall become precious resources. A well-placed swale system can capture rain from a light drizzle that would otherwise evaporate before reaching plant roots.
Your garden will reward the effort quickly. Plants watered by swale-directed rain often look healthier than those watered by overhead sprinklers.
4. Position Large Containers Under Porch Overhangs

Your porch overhang is secretly one of the best water-catching structures on your property. Rain drips off the edge in a steady curtain during any storm, and most homeowners never think to catch it.
Large food-grade containers, galvanized tubs, or even clean plastic storage bins work perfectly here. Place them directly under the drip line where water falls most consistently.
Unlike barrel systems, this approach requires no installation at all. You simply carry a container outside, position it under the overhang, and let the rain do all the work.
A standard 30-gallon storage tote can fill completely during a moderate storm. Keep the lid nearby so you can cover the container quickly after rain stops to prevent evaporation.
Porch overhangs often concentrate water from a wide roof section into a narrow drip edge. That concentration means your containers fill faster than you might expect.
Use the collected water within 48 hours to avoid algae growth and mosquito breeding. Watering deeply at the base of plants early in the morning makes the best use of every gallon.
If your porch has multiple drip points, set up a container at each one. Covering several spots during a single storm event dramatically increases your total harvest.
This method shines brightest for renters or anyone who cannot modify gutters or install permanent systems. Simple, effective, and completely reversible when the drought finally breaks.
5. Terrace Sloped Yards To Slow Runoff

Sloped yards shed rain like a tin roof, sending precious water straight to the street. Terracing transforms that runaway slope into a series of flat platforms that hold water long enough for the soil to absorb it.
Think of terraces as giant steps carved into your hillside. Each flat level catches rainfall and gives it time to soak down toward plant roots instead of flowing away.
Building terraces does not require a landscaping crew or heavy equipment. A shovel, a level, and some basic retaining materials like timber, stone, or cinder blocks are enough to get started.
Start at the top of the slope and work downward, creating flat beds about two to four feet wide. Wider terraces hold more water and give you more planting space at the same time.
Retaining walls hold the terraced soil in place during heavy storms. Dry-stacked stone walls are popular in New England because they are sturdy, attractive, and blend naturally into the landscape.
Each terrace level acts as a small reservoir during rainfall. Planting drought-tolerant native species on each tier reduces future water needs once the drought eventually passes.
Terracing also prevents soil erosion, which becomes a serious problem on bare slopes during dry spells. Healthy soil structure improves water retention for years after the initial work is complete.
The upfront effort pays off every single time it rains. Your yard stops shedding water and starts holding onto it.
6. Mulch Heavily Around Plants

Mulch might be the most underrated tool in a drought management toolkit. A thick layer around your plants acts like a blanket, trapping soil moisture that would otherwise evaporate within hours of watering.
Aim for three to four inches of mulch spread evenly around each plant. Go right up to the base of stems and shrubs, but leave a small gap so bark does not rot against the plant.
Wood chips, straw, shredded leaves, and pine bark all work well. Wood chips from local tree services are often free and deliver excellent long-term moisture retention as they slowly break down.
During a drought, soil can dry out completely within a day or two of watering. Mulch slows that evaporation dramatically, sometimes stretching the time between waterings by three or four days.
Mulch also keeps soil temperatures cooler during hot spells. Cool soil holds moisture better and creates a healthier environment for roots struggling through dry conditions.
Applying mulch after a rain event locks in that moisture right away. Timing your application to follow a storm maximizes the benefit for your plants immediately.
Organic mulches improve soil structure as they decompose over time. Better soil structure means better water infiltration when the next rain finally arrives.
Pair heavy mulching with any rainwater collection method and you create an effective combination that works on two fronts.
Less evaporation plus more captured water equals a garden that survives even a stubborn drought.
7. Build Rain Gardens In Natural Low-Lying Spots

Every yard has that one soggy spot where puddles linger after every storm. Instead of fighting that low area, a rain garden turns it into a productive, beautiful water-collection feature.
A rain garden is a shallow depression planted with deep-rooted native species that love both wet and dry conditions. It captures runoff from driveways, rooftops, and lawns, then slowly filters it into the ground.
Choose a spot at least ten feet from your home’s foundation to prevent water from seeping into your basement. The depression should be six to eight inches deep at the center and slope gently upward at the edges.
Native plants are the star players in any rain garden. Species like swamp milkweed, native sedges, and blue flag iris thrive in New England and handle both flooding and drought without complaint.
Amend the soil with compost and coarse sand to improve drainage. Good drainage ensures the garden absorbs water within 24 to 48 hours after a storm, preventing standing water problems.
Direct a downspout or a swale toward your rain garden to feed it during storms. Combining this technique with other collection methods creates a layered system that captures water at multiple points.
Rain gardens also support pollinators, which are under pressure during drought conditions alongside your vegetable plants. A functional garden that feeds bees and butterflies while saving water is a genuine win.
Once established, rain gardens require almost no maintenance. They work quietly in the background, doing the job every single time clouds roll in.
8. Repurpose Food-Grade Drums As Storage Barrels

When a Level 2 drought hits, standard rain barrels can feel frustratingly small. Food-grade drums hold 55 gallons each, and repurposing several of them as storage barrels gives you serious long-term rainwater collection capacity.
These drums originally held food products like juice, vinegar, or cooking oil, and once properly cleaned, they are safe for storing water used on edible gardens.
Check local classified ads, restaurant suppliers, and food-processing facilities for affordable used drums.
Clean each drum thoroughly before use with a baking soda rinse followed by a plain water flush. Removing any residual food odors or oils ensures the stored water stays clean and usable.
Connect drums to your downspout system using standard diverter kits and flexible tubing. The same daisy-chaining technique used for smaller barrels works perfectly with these larger containers.
A single 55-gallon drum weighs over 450 pounds when full, so plan placement carefully before filling. Set drums on compacted gravel or a concrete pad to prevent sinking and tipping during a storm.
Add a spigot near the base of each drum for easy water access. A second port near the top creates an overflow connection to the next drum in your storage chain.
Painting drums a dark color or wrapping them in shade cloth slows algae growth. Keeping light out of the stored water is one of the simplest ways to maintain quality over time.
A bank of four linked drums holds 220 gallons of collected rainwater. That supply can sustain a thriving garden through weeks of dry Massachusetts weather.