What Oregon Gardeners Should Cut Back Now Before Plants Get Leggy
Plants can stretch fast once Oregon gardens hit their summer stride. A tidy clump in spring may turn floppy after a few warm weeks, especially if stems are reaching for light.
Cutting back at the right time can help keep growth fuller and more compact. It can also stop certain plants from spending energy in the wrong places.
The goal is not to shear everything down just because it looks tall. A smart trim depends on the plant, the bloom stage, and how much fresh growth is still coming.
Wait too long, and leggy stems can become harder to fix. Make the right cuts now, and your garden can look cleaner while plants head into summer with stronger shape.
1. Catmint Can Be Sheared Before It Flops Open

Few plants in the Pacific Northwest garden sprawl quite like catmint when left to its own devices.
It starts out looking neat and mounded, but by late spring it can flop outward in every direction, leaving a wide, tangled mess right in the middle of your border.
The good news is that catmint responds beautifully to a hard shear. Use a pair of hedge shears or sharp garden scissors and cut the whole plant back by about one-half to two-thirds.
Do this just as the first flush of blooms starts to fade, or even a little before if the stems are already starting to sprawl.
After the cut, give the plant a good drink of water and a light sprinkle of balanced fertilizer. Within a few weeks, fresh new growth will fill in from the base.
That new growth stays much more compact and upright than the original stems.
Catmint often sends up a second flush of those pretty lavender-blue flowers after being sheared. This second bloom can carry your garden color well into late summer or even early fall.
In many parts of Oregon, this timing lines up perfectly with when other late-season plants are just starting to open up.
Pollinators love catmint, so shearing it back actually helps bees and butterflies find fresh, accessible blooms again. It is one of the most rewarding quick cuts you can make all season.
2. Hardy Geraniums Bounce Back After A Fresh Cut

Hardy geraniums, also called cranesbills, are workhorses in the garden. They spread quickly, cover ground well, and bloom for weeks.
But after that first big bloom, the foliage often turns yellowish, the stems get floppy, and the whole plant starts to look worn out.
Cutting them back hard right after the main bloom is one of the best things you can do. Use sharp scissors or pruning shears and cut the entire plant down to just a few inches above the ground.
It might feel dramatic, but these plants are tough and recover fast.
Fresh new leaves will emerge within a week or two. The new foliage is a much brighter, cleaner green than what was there before.
Many varieties will also send up a light second flush of flowers, which is a nice bonus heading into late summer.
Your Oregon Garden Changes Every Week. Your Plan Should Too.
Gardening in Oregon changes quickly throughout the season. Every Friday you’ll receive a simple weekly plan showing exactly what to plant, prune, fertilize, harvest, and protect so you never miss the right timing.
In Oregon, where summers can swing from cool and cloudy to dry and warm, hardy geraniums can actually struggle with heat stress if their old foliage is left in place.
Cutting back helps the plant reset and puts its energy into new, healthy growth instead of maintaining tired stems.
Hardy geraniums work well as edging plants, groundcovers, and filler between larger perennials.
Keeping them trimmed means they stay neat and do not crowd out their neighbors. A fresh cut twice a season goes a long way toward keeping them looking their best.
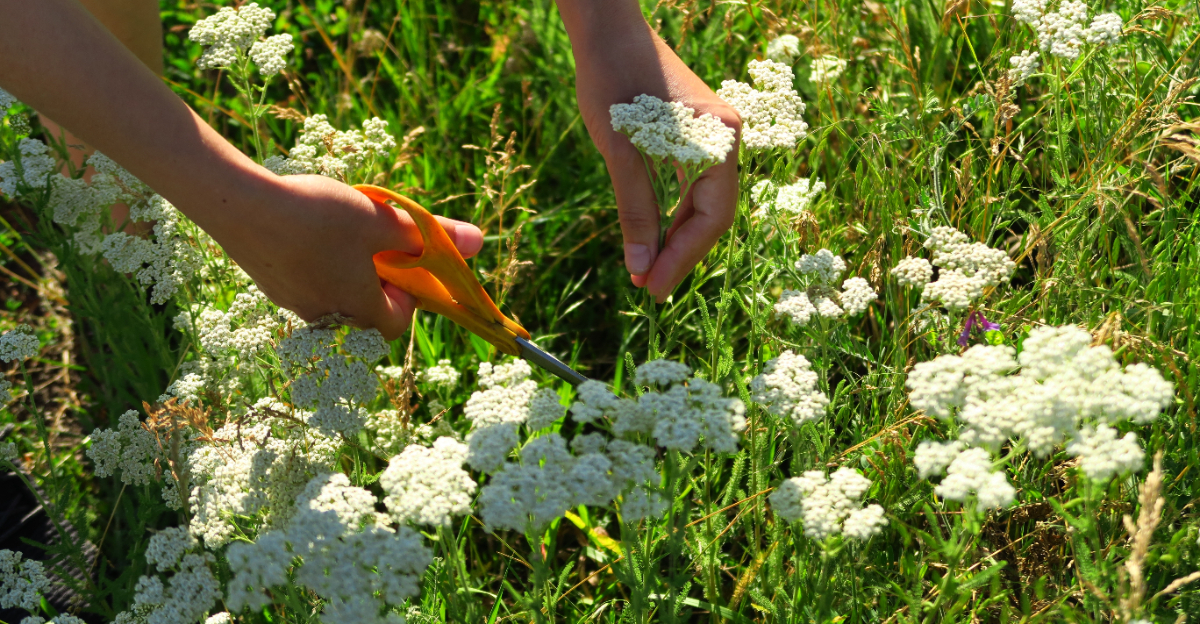
3. Yarrow Stays Fuller When It Is Cut Back Early

Yarrow is one of those plants that looks stunning in early summer but can become a floppy, weedy mess if you ignore it for too long.
The flower stems shoot up fast, especially during warm stretches, and without support or a timely trim, they tip over and take other plants with them.
Cutting yarrow back before the stems get too tall is the key to keeping it upright. When the plant is about twelve inches tall but before the flower buds fully open, cut it back by one-third.
This encourages the plant to branch out more at the base rather than sending up one tall, weak stem.
You can also deadhead spent blooms as they fade. Removing the old flower heads redirects the plant’s energy toward new growth and often triggers a second round of blooming.
Yarrow is a tough plant, and it responds well to this kind of attention.
Across Oregon, yarrow is often used in dry, sunny borders because it handles drought reasonably well once established.
Its feathery foliage and flat-topped flower clusters attract all kinds of beneficial insects, including ladybugs and parasitic wasps that help control garden pests.
Cutting yarrow back also helps prevent it from self-seeding too aggressively. Left unchecked, yarrow can spread widely and crowd out smaller plants.
A regular trim keeps it contained, attractive, and productive throughout the growing season without much extra effort on your part.
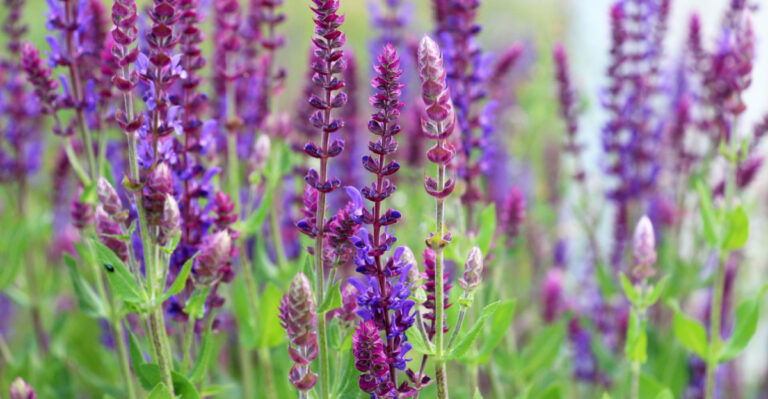
4. Perennial Salvia Rebloom Is Better After Spent Spikes Go

Perennial salvia puts on a spectacular early summer show. Those tall, spiky blooms in shades of blue, purple, and violet are hard to miss.
But once the flowers fade, the plant can look pretty sad if you leave the old spikes in place.
Deadheading or cutting back spent salvia spikes is one of the simplest ways to keep the plant looking good and encourage more flowers. Cut the old spikes back to just above the next set of leaves or side shoots.
This signals the plant to push out new growth and often leads to a second or even third flush of blooms.
For a more dramatic approach, you can shear the whole plant back by about half after the first bloom. This works especially well for varieties that tend to flop or sprawl.
The plant will come back fuller and more compact, with new flower spikes appearing in a few weeks.
Salvia is a great plant for Oregon because it handles both wet winters and dry summers fairly well. It also attracts hummingbirds and bees, which makes the garden feel alive and active all season.
Timing your cutback right after the peak bloom means you get the most out of the plant all season long.
Some gardeners in our region get three rounds of salvia blooms in a single season just by staying on top of deadheading and occasional shearing. That is a lot of color for very little effort.
5. Asters Can Be Pinched Before They Get Too Tall

Asters are fall bloomers, which means most gardeners do not think about them until late summer. But by then, the plants can be three or four feet tall, floppy, and all over the place.
The trick is to start pinching them back much earlier in the season.
Begin pinching asters when they reach about six inches tall in spring. Pinch off the top inch or two of each stem using your fingers or small scissors.
This encourages the plant to branch out instead of growing straight up, which leads to a much fuller, bushier shape by fall.
Continue pinching every few weeks until around the Fourth of July. After that, let the plant grow freely so it has time to set buds and bloom on schedule.
If you pinch too late in the season, you risk delaying or reducing the fall flower show.
In Oregon, where fall gardens can look spectacular with asters, sedums, and ornamental grasses all blooming together, keeping asters compact and sturdy makes a real difference in the overall look of the landscape.
Pinching also helps with airflow around the plant. Asters can be prone to powdery mildew, especially in our humid late-summer conditions.
Better airflow through a more open, branchy plant means less disease pressure and healthier foliage going into bloom season. It takes just a few minutes every few weeks but pays off in a big way come September and October.
6. Garden Mums Need Pinching Before Buds Set

Garden mums are synonymous with fall color, but getting them to look their best takes a little work during the summer months.
Left alone, mums grow tall and leggy with most of their flowers clustered at the top of long, bare stems. That is not a great look.
Pinching is the solution. Start when the plants are about four to six inches tall in spring.
Pinch off the top half inch of each stem to encourage branching. More branches mean more flower buds and a much fuller plant by the time fall arrives.
Keep pinching every two to three weeks until around mid-July. By then, the plant should be wide, bushy, and loaded with potential bloom sites.
Stop pinching after mid-July so the plant has enough time to develop its buds and open fully before the first frost arrives.
In northern and higher-elevation areas of our state, early frosts can cut the bloom season short if mums are not managed well. Pinching on schedule gives the plant the best chance of putting on a full show before cold weather sets in.
Mums also benefit from good soil and consistent moisture during their growing season. A layer of mulch around the base helps retain water and keep roots cool during warm summer spells.
Pairing regular pinching with good basic care gives you the kind of big, round, flower-covered mum plants you see at nurseries every fall. You can grow them that way yourself with a little patience.
7. Sedum Stems Stay Stronger With An Early Cutback

Tall sedum varieties, sometimes called stonecrop, are beloved for their late-season blooms and structural presence in the garden.
But those thick, fleshy stems can get surprisingly top-heavy as the season goes on, and they have a habit of flopping outward right when they are about to bloom.
Cutting tall sedums back in late spring or early summer is a simple trick that prevents the flop. When the stems reach about eight to ten inches tall, cut them back by about one-third.
This stimulates branching lower on the stem, which creates a stronger, more self-supporting plant overall.
You can also try a technique called the Chelsea chop, named after a famous British flower show. Around late May or early June, cut the outer stems of the clump back harder than the inner stems.
This creates a naturally mounded shape that holds up better when the heavy flower heads open in late summer and fall.
Sedum is incredibly tough and handles this kind of pruning without complaint. It rarely misses a beat and usually rebounds with dense, compact new growth within just a couple of weeks.
Their flat-topped flower clusters in shades of pink, red, and burgundy look stunning alongside ornamental grasses and late-blooming asters. An early cutback is a small investment for a big payoff come September.
8. Bee Balm Gets Bushier When Tall Growth Is Checked

Bee balm is a showstopper in the midsummer garden. Its shaggy, bright blooms in red, pink, purple, and white draw hummingbirds and bees from all over the neighborhood.
But without some management, it can grow very tall and leggy, with blooms only at the tips of long, bare stems.
Cutting bee balm back in late spring, when it is about a foot tall, encourages it to branch out closer to the ground. Use sharp shears and cut the stems back by about one-third.
This simple step creates a much bushier, more floriferous plant that holds its shape better through the bloom season.
After the first flush of flowers fades, cut the plant back again by about half. This often triggers a second wave of blooming and keeps the plant looking tidy during the late summer weeks when many gardens start to look tired.
Bee balm is also prone to powdery mildew, which is a common problem in our region due to our humid summers. Cutting back the plant and thinning out crowded stems improves airflow, which is one of the best natural defenses against mildew.
Dividing bee balm every two to three years also helps keep it vigorous. Over time, the center of the clump can become woody and less productive.
Dividing and replanting the outer sections gives you fresh, strong growth and more flowers. Combined with regular cutbacks, this keeps bee balm performing at its best year after year.
9. Phlox Can Be Cut Back For Sturdier Late Blooms

Garden phlox is one of the most fragrant and beautiful summer perennials you can grow in Oregon.
But it tends to grow tall and straight, which means the stems can bend or snap under the weight of the large flower heads, especially if a summer rainstorm rolls through.
Cutting phlox back early in the season is a reliable way to get stronger stems and more flowers.
When the plants are about a foot tall in late spring, cut the outer stems back by one-third while leaving the inner stems slightly taller.
This creates a layered, self-supporting structure that handles wind and rain much better.
Thinning is also important for phlox. Remove about one-third of the stems from each clump to improve airflow.
Phlox is very susceptible to powdery mildew, and thinning out crowded stems makes a big difference in keeping the foliage clean and healthy all season.
After the main bloom, cut the spent flower heads off just above a set of healthy leaves. Side shoots will often develop and produce smaller but still lovely secondary blooms in late summer or early fall.
Phlox loves consistent moisture and rich soil. In the drier eastern parts of Oregon, a layer of mulch and regular watering helps it thrive.
In wetter western areas, good drainage is key to keeping the roots healthy. With a little attention early in the season, phlox rewards you with weeks of stunning, fragrant blooms that make the whole garden smell amazing.