These Are The Simple Steps You Should Take The Moment Missouri Hydrangeas Sprout
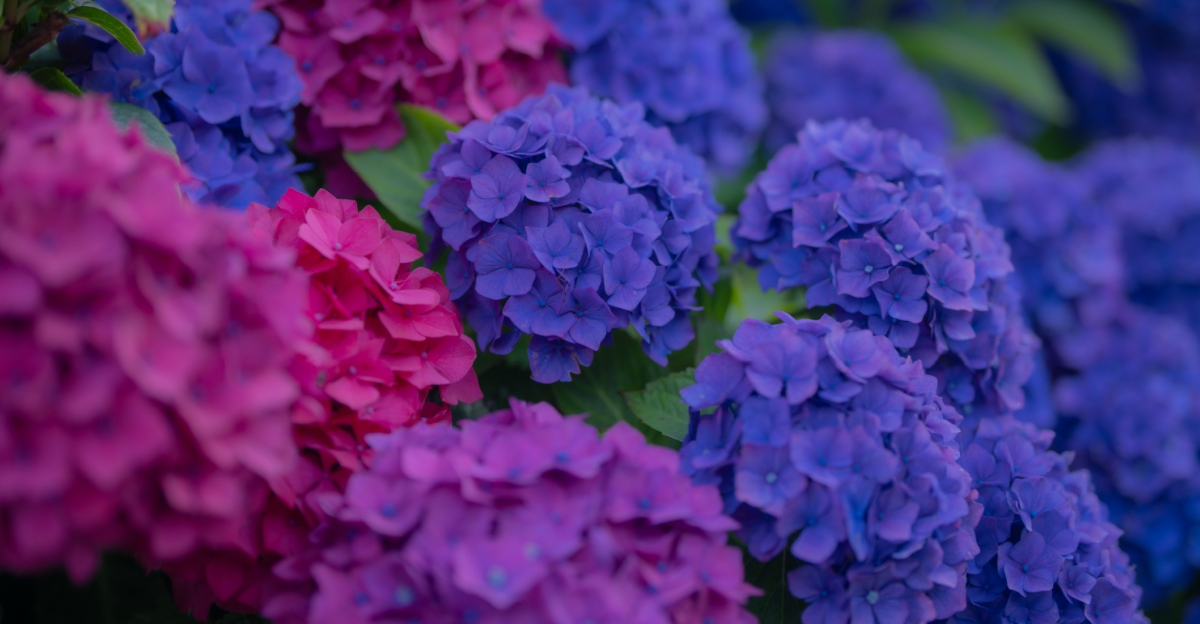
Missouri hydrangeas do not ease into spring. They surge.
One cold morning the canes look like kindling, and by the weekend, fat green buds are splitting through the bark with the kind of confidence that makes you reach for your pruners.
You have probably stood in your yard, stared at a shrub packed with leaves but not a single bloom, and wondered where the season went wrong.
That feeling sticks. So what separates a hydrangea that puts on a show from one that just takes up space in your yard? Timing. Pure and simple.
Missouri spring compresses fast, and that narrow window between first bud and missed opportunity closes quicker than you expect.
Move early, hit each step right, and your shrubs reward you with thick canes, wide blooms, and a yard that stops people mid-walk.
Hesitate, and the season slips through your fingers before it even starts. The buds are already pushing. Your move.
1. Walk The Plant And Inspect Every Stem

Your eyes are your best tool right now. Before you grab any shears or bags of fertilizer, walk slowly around each hydrangea and give it a good, honest look.
This first inspection sets the stage for every other step you take. Missouri hydrangeas can look deceiving in early spring.
Some stems appear completely bare on the outside but are quietly alive underneath the bark. Gently scratch a small section of bark with your thumbnail and look for a sliver of green tissue.
That green signal means life is still in there. Work your way from the base of the plant upward, checking each cane for swelling buds, soft new growth, or signs of winter damage.
Note which branches are already leafing out and which ones still look gray and brittle. This mental map will guide your pruning decisions in the very next step.
The lower third deserves a close look. On smooth hydrangeas like Annabelle and Incrediball, shoots pushing straight from the soil are your most productive growth.
Do not accidentally snap them off while moving around the shrub. Grab a pair of gloves, kneel down if you need to, and really get in close.
A thorough inspection takes less than ten minutes but can save you weeks of guesswork later. Knowing exactly what you are working with makes every step that follows feel purposeful and clear.
2. Cut Out Any Bare, Lifeless Wood

Old wood quietly drains space and airflow from the canes that actually matter. Removing it early gives healthy growth the room and resources it needs to thrive.
After your inspection, you should have a clear sense of which stems failed to survive winter. Those canes will feel hollow when you bend them slightly.
Healthy wood has give. If it snaps without bending, it is gone. Cut those canes back to the base or to the nearest green growth with sharp bypass pruners..
Dull blades crush the stem tissue instead of slicing cleanly, which can invite disease into an otherwise healthy plant.
Your Missouri Garden Changes Every Week. Your Plan Should Too.
Gardening in Missouri changes quickly throughout the season. Every Friday you’ll receive a simple weekly plan showing exactly what to plant, prune, fertilize, harvest, and protect so you never miss the right timing.
Wipe your blades with rubbing alcohol between cuts if you suspect any fungal issues on the removed wood. For smooth hydrangeas like Annabelle and Incrediball, confident cuts at the base are the right move.
If you grow bigleaf varieties, hold back. Those old canes carry this season’s blooms and should not be removed.
A clean cut flush with a healthy bud or the main stem is always the better choice. Once the unproductive wood is gone, stand back and take another look at the overall shape.
The plant will look more open than you expect. Good. That airflow and light is precisely what drives a strong bloom season.
3. Swap Winter Mulch For A Fresh 2 To 3 Inch Layer

Old mulch has done its job, and now it is working against you. Over winter, that protective layer you laid down in fall has broken down and compacted.
As temperatures rise, it can hold excess moisture against the crown and slow down new growth. Rake away the old material carefully, especially around any new sprouts pushing up from the soil.
Those tender green shoots can be surprisingly fragile. A careless rake stroke can set back growth by weeks.
Work slowly from the outer edge of the plant inward, pulling the old mulch into a pile for composting. Once the base is clear, apply a fresh 2 to 3 inch layer of shredded hardwood mulch, pine bark, or compost.
This fresh layer regulates soil temperature, holds in moisture during dry stretches, and slowly feeds the soil as it breaks down.
For Missouri hydrangeas, consistent soil moisture is one of the biggest factors in bloom size and overall plant health. Keep the mulch a few inches away from the main stems.
Piling it right against the wood creates a damp environment that encourages rot and gives slugs a cozy hiding spot. That small gap between mulch and stem makes a bigger difference than most people expect.
Think of this fresh layer as a reset button for your garden bed. Your hydrangeas will respond with stronger roots and steadier growth through the unpredictable Missouri spring weather ahead.
4. Begin Deep Watering At 1 Inch Per Week

Hydrangeas are dramatic about thirst. They will droop in the afternoon sun and recover quickly after a drink.
Repeated drought stress early in the season, though, can set back bloom development for good.
Getting your watering rhythm right from the very first sprout matters more than most people realize. Aim for 1 inch of water per week, delivered slowly and deeply rather than in quick, shallow sprinkles.
Slow, deep watering encourages roots to grow downward into the soil where moisture stays more consistent.
Surface watering keeps roots shallow and leaves your plant dependent on you every time the sun gets intense. A simple rain gauge placed near your shrubs takes the guesswork out of the equation.
If Missouri spring rains are doing the heavy lifting that week, you may not need to add much at all. But during dry stretches, grab your hose and water at the base of the plant rather than overhead.
This keeps the foliage dry and reduces fungal risk. Water in the early morning. It gives leaf moisture time to evaporate before nightfall and keeps powdery mildew at bay.
Morning watering also means roots get hydrated before the heat of the day kicks in. Consistency is the real goal here.
Your Missouri hydrangeas want steady, predictable moisture, and once you establish that rhythm, you will notice stronger stems and larger flower heads forming almost immediately.
5. Feed With A Balanced 10-10-10 Slow-Release Fertilizer

Hungry plants bloom smaller. Once those first sprouts appear, your hydrangea is signaling that it is ready to grow, and that growth requires fuel.
A balanced 10-10-10 slow-release granular fertilizer is one of the most reliable ways to give your plant what it needs without overdoing it.
Those three equal numbers cover nitrogen for foliage, phosphorus for roots and blooms, and potassium for water management and stress resistance.
For early-season feeding, that balanced ratio gives your hydrangea a well-rounded nutritional boost right when it needs it most. Scatter the granules evenly around the drip line of the plant.
That is the outer edge of where the branches spread. Avoid piling fertilizer directly against the stems, since concentrated nutrients near the crown can cause burning.
Lightly scratch the granules into the top inch of soil and water them in to begin the slow-release process. One application in early spring is a strong starting point for most home gardens.
Some gardeners follow up with a light second feed in midsummer if growth slows noticeably. Too much nitrogen later in the season pushes out leaves at the expense of flowers.
Feed wisely, and let the slow-release formula do its job over the following weeks. Feed right and your Missouri hydrangeas will answer back with strong stems and blooms worth the wait.
6. Cut Out The Oldest Woody Interior Canes At The Base

Old canes are taking up prime real estate. Those thick central stems shade out the younger, more productive growth trying to push through.
Removing them sounds counterintuitive, but it is one of the most effective ways to boost bloom output. For smooth hydrangeas, target canes thicker than your thumb growing through the center.
Cutting them at ground level opens the shrub and lets light and air reach younger growth. Skip this step entirely on bigleaf varieties.
Removing their old canes takes next season’s flower buds with them. Use loppers for thick canes rather than hand pruners.
Forcing a small blade through tough old wood can damage both your tool and the plant. Make cuts as close to the soil line as possible without disturbing the surrounding root system.
Clean cuts heal faster and are less likely to become entry points for insects or disease. A good rule of thumb is to remove no more than one-third of the total canes in any single season.
Taking out too much at once can redirect energy away from flowering. Spread heavier rejuvenation pruning over two or three seasons if the plant is very overgrown.
Once those old canes are gone, you will be amazed at how much younger growth is waiting underneath. Those fresh shoots are the future of your hydrangea, and now they finally have room to rise.
7. Cover Buds With Frost Cloth On Cold Nights

Missouri spring weather plays tricks. A warm week in March can lull you into thinking winter is fully behind you.
Then a cold snap rolls in overnight and catches every tender bud you have been watching with so much excitement. Frost cloth is cheap insurance against that heartbreak.
Hydrangea buds are especially sensitive to freezing temperatures once they have started to swell and open.
A single night below 28 degrees Fahrenheit can turn tender buds brown and soft, seriously reducing your blooms for the season depending on how far along the growth is.
That is not a risk worth taking when a few yards of lightweight frost cloth can prevent it entirely. Keep a folded piece of frost cloth near your garden shed from the moment sprouts appear through at least mid-April.
When overnight lows are forecast below 32 degrees, drape the cloth loosely over the shrub before sunset and secure the edges with rocks or garden staples.
Remove it in the morning once temperatures climb back above freezing so the plant can breathe and photosynthesize normally.
Do not substitute plastic sheeting for frost cloth. Plastic traps heat and moisture in a way that can scorch leaves and buds on a sunny morning.
Frost cloth is breathable by design, which makes it far safer for tender plant tissue. Think of frost cloth as a small but mighty ally during those unpredictable early-spring nights.
Protecting those buds now means you get to enjoy full, lush Missouri hydrangea blooms when summer finally arrives for good.
8. Check Around The Base And Treat For Slugs

Slugs love exactly what your hydrangeas love. Moist soil, fresh mulch, and tender new growth are a standing invitation for these garden pests to move in and start feeding.
Catching them early keeps the damage minimal and your new foliage intact. Check around the base of your plants in the early morning or after a rain, when slugs are most active and easiest to spot.
Look for irregular holes chewed through young leaves, a silvery slime trail on the soil or mulch, and small clusters of clear eggs tucked under the mulch layer.
Finding even one slug early is a sign that more are nearby. Sprinkling food-grade diatomaceous earth around the base of the plant creates a gritty barrier that slugs strongly dislike crossing.
Use food-grade diatomaceous earth only according to label directions, avoid inhaling dust, and avoid applying it where pollinators or beneficial insects are active.
Iron phosphate slug bait is another highly effective option that breaks down naturally in the soil without harming birds or other wildlife.
Scatter the small pellets around the base of the plant according to package directions. Avoid older metaldehyde-based baits, which can be harmful to pets and local wildlife.
Missouri hydrangeas put so much energy into producing those first soft, new leaves. A quick check every few days through early spring keeps these pests from quietly undoing the work you have already put in.