Why Ohio Tomato Leaves Turn Yellow From The Bottom Up And What To Do
Few garden moments sting quite like a walk past your tomato plants and a flash of yellow near the bottom leaves. After a long Ohio spring, all that care, watering, staking, and weather-watching can make those faded leaves feel personal.
The plant may still have flowers, green fruit, and plenty of life at the top, which only makes the lower yellow growth more confusing. Is it stress?
Disease? A normal part of the season?
Tomatoes often send their first warnings from the bottom, especially during Ohio’s humid summer stretch, and the pattern can reveal more than the color alone. Before you cut off half the plant or reach for fertilizer, pause for a closer look.
The right fix depends on what those lower leaves are really saying.
1. Check Whether The Oldest Tomato Leaves Are Yellowing First

A few yellow leaves near the soil line can look alarming, especially when the top of the plant still looks strong and green. Before you assume the worst, take a close look at which leaves are yellowing.
Older, lower leaves are the first to go as a tomato plant matures and directs energy upward toward fruit and new growth.
This is a normal part of the plant’s life cycle. As stems grow taller and the canopy fills in, the lowest leaves receive less sunlight and less airflow.
The plant naturally reduces resources to those leaves over time. If the yellowing is limited to the oldest, lowest leaves and the rest of the plant looks vigorous, natural aging may be the entire explanation.
However, the pattern still matters. Check whether yellowing is spreading quickly upward, affecting newer leaves, or showing up on one side of the plant only.
A slow, steady yellowing of the oldest leaves is far less concerning than a rapid climb up the stem. Compare several leaves, look at overall plant vigor, and note how many leaves are affected.
Staying calm and observant at this stage will help you make better decisions about what, if anything, needs to happen next.
2. Look For Spots Before Blaming A Nutrient Problem

A spotted leaflet tells a different story than a plain yellow one. Before reaching for fertilizer, spend a minute examining the affected leaves closely.
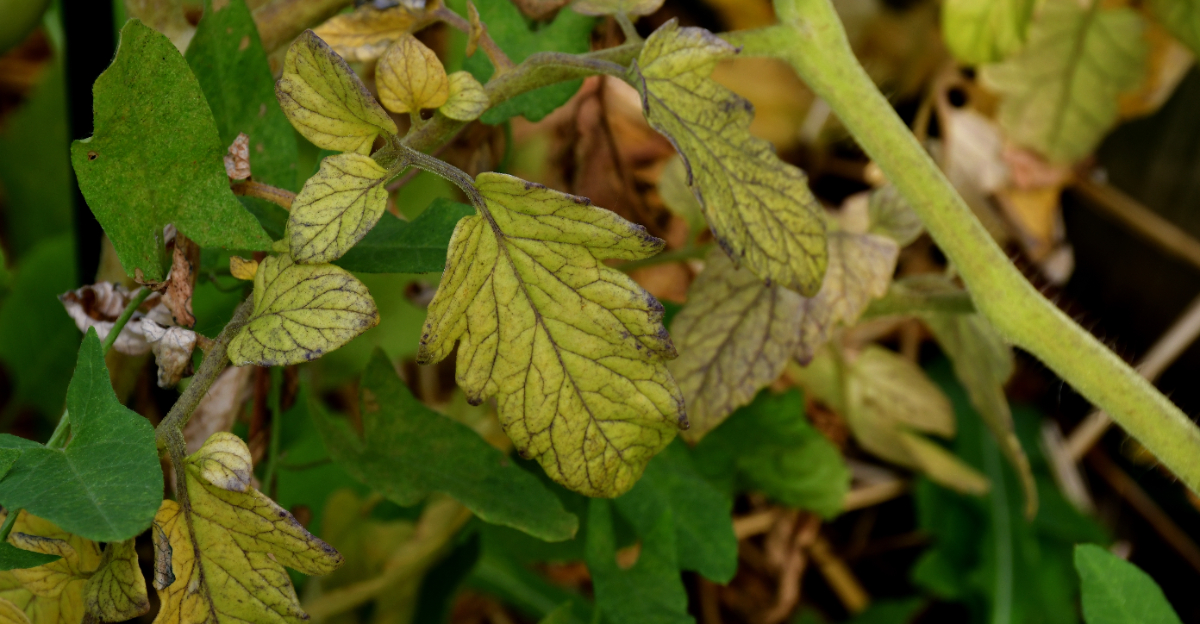
Spots, halos, dark lesions, or tiny speckling are signs that a disease issue may be involved, not a nutrient shortage.
Early blight, caused by the fungus Alternaria solani, typically shows up as dark brown spots with yellow halos and a target-ring pattern. It usually starts on the oldest lower leaves first.
Septoria leaf spot appears as small, round spots with dark edges and lighter centers, often with tiny dark specks inside. Both diseases spread upward through the canopy and are common in vegetable gardens during warm, humid summers.
Even yellowing across a leaf without spots may suggest water stress, root crowding, or a nutrient imbalance, but spots change the diagnosis completely. Ohio State University Extension recommends accurate identification before treatment.
Fungicide options exist for both diseases, but labels must be followed carefully and timing matters. Removing affected lower leaves, improving airflow, and reducing soil splash are often the first practical steps regardless of which disease is present.
Your Ohio Garden Changes Every Week. Your Plan Should Too.
Gardening in Ohio changes quickly throughout the season. Every Friday you’ll receive a simple weekly plan showing exactly what to plant, prune, fertilize, harvest, and protect so you never miss the right timing.
Getting the diagnosis right saves time, money, and unnecessary stress on the plant.
3. Remove Lower Leaves That Touch The Soil

Rain-splashed soil carries fungal spores, and leaves that rest directly on the ground are the easiest entry point for those spores. Removing the lowest leaves that actually touch the soil is one of the most practical steps a gardener can take early in the season.
The goal is not to strip the plant bare. Removing too many leaves at once stresses the plant and reduces the foliage it needs for photosynthesis.
Focus on leaves that are already yellowing, spotted, or physically resting against the soil. A clean pair of scissors or pruners works well.
Wipe the blades with rubbing alcohol between cuts if disease is suspected, to avoid spreading spores to healthy tissue.
Aim to keep the lowest leaves at least two to three inches above the soil line as the season progresses. This small gap reduces the chance of splash contact during rain or watering.
Some gardeners remove a few leaves at a time over several weeks rather than all at once. That gradual approach gives the plant time to adjust.
Dispose of removed leaves in the trash rather than the compost pile if disease is present. Keeping the lower stem area open and clean makes a real difference over the course of a long growing season.
4. Mulch Under Plants To Stop Soil Splash

Straw spread under a tomato plant does more than hold moisture. It acts as a physical barrier between the soil and the lower leaves, reducing the upward splash of fungal spores every time rain falls or a hose runs.
Soil splash is one of the primary ways early blight and Septoria leaf spot move from the ground onto foliage. Spores from infected plant material can survive in garden soil and wait for the right wet conditions to travel upward.
A two to three inch layer of clean straw, untreated wood chip mulch, or similar organic material absorbs the impact of water droplets before they carry soil onto leaves.
Apply mulch after the soil has warmed in late spring or early summer. Keep the mulch a few inches away from the main stem to allow airflow and avoid trapping moisture against the base.
Avoid piling mulch too thick or too close, as dense, damp material near the stem can create its own moisture problems. Straw is a common and practical choice for tomato rows and raised beds in this region.
Refresh the mulch layer if it thins out mid-season. This one step, done early, can noticeably slow the climb of lower-leaf yellowing and spotting through the summer months.
5. Water At The Base To Keep Leaves Drier

Wet foliage is an open invitation for fungal disease. Overhead watering, whether from a sprinkler or a hose held above the plant, coats leaves in moisture and keeps them wet longer than base watering does.
That extra wetness gives spores the conditions they need to germinate and spread.
Watering at the base, directly onto the soil around the root zone, keeps leaves significantly drier. Soaker hoses and drip irrigation systems do this automatically and efficiently.
A watering can or hose directed low at the soil works just as well in smaller gardens. The goal is to deliver water to the roots without soaking the foliage above.
Timing matters too. Morning watering gives any accidental leaf splash a chance to dry before evening.
Evening watering leaves moisture on leaves overnight, which increases disease pressure. Deep, infrequent watering encourages roots to grow down and find moisture on their own.
Shallow daily watering does the opposite and can stress the plant over time. Most established tomato plants in raised beds or garden rows do well with a thorough watering every few days, depending on rainfall, temperature, and soil type.
Checking the top inch or two of soil before watering helps you avoid both overwatering and underwatering throughout the season.
6. Avoid Overfeeding Before You Know The Cause

Reaching for a fertilizer bag is a natural first reaction when tomato leaves start turning yellow. However, feeding a plant before understanding the cause can make things worse, not better.
Yellowing does not automatically signal a nutrient deficiency.
Too much nitrogen, in particular, can push the plant toward leafy growth at the expense of fruit. It can also contribute to soft, lush foliage that is more vulnerable to disease.
If the soil already has adequate nutrients, adding more will not fix a disease problem, a watering issue, or a root stress situation. It will simply add more of something the plant does not need.
A soil test is the most reliable way to know what your garden actually lacks. Ohio State University Extension and local cooperative extension offices can provide guidance on soil testing.
Tests are relatively inexpensive and give you real data to work with. If testing is not possible right away, observe the plant carefully.
Uniform yellowing of older lower leaves with no spots may suggest a mild nutrient issue over time, but spots, lesions, or rapid spread upward point elsewhere. Feed based on evidence, not on guesswork.
A balanced approach to fertilizing, guided by what the soil and plant actually need, will serve your tomatoes far better than a reactive one.
7. Improve Airflow Around Crowded Tomato Plants

A crowded cage full of overlapping tomato branches creates exactly the kind of environment fungal disease loves. Humidity builds up inside dense foliage, leaves stay wet longer after rain, and spores have less wind to carry them away.
Opening up that space makes a meaningful difference.
Start by tying up any stems that have sagged or fallen outside the cage or stake. Upright growth dries faster and catches more light.
Next, look at the lower canopy. If branches are crossing, touching each other, or pressing against neighboring plants, selectively removing a few of the lower, less productive ones can help.
Avoid extreme pruning during hot weather, as removing too much foliage too quickly can stress the plant and expose fruit to sunburn.
Spacing matters from the start of the season. Most determinate and indeterminate tomato varieties do best with at least two feet of space between plants, and some larger varieties benefit from even more room.
If plants are already crowded, focus on what you can do now: tie, trim selectively, and remove the lowest problem growth. Raised beds and container gardens in this region often pack plants closer than ideal.
Targeted pruning and careful staking become even more important when space is limited. Better airflow helps the whole plant stay healthier through summer.
8. Keep Picking Fruit While You Manage The Problem

A bowl of ripe tomatoes is a good reminder that lower-leaf problems do not have to mean the season is over.
Many tomato plants with some yellow or spotted lower leaves continue producing fruit successfully, as long as the upper canopy stays green, vigorous, and well-supported.
Keep harvesting regularly. Fruit left on the vine too long adds weight and stress to the plant.
Picking at peak ripeness encourages the plant to keep setting new fruit and directs energy where it is most useful. Monitor the plant every few days rather than waiting for a problem to get worse before acting.
Watch the upper leaves closely as you manage lower-leaf issues. If yellowing or spotting begins climbing quickly toward the top third of the plant, pay closer attention.
New growth that looks stunted or distorted is another sign that the situation may need more care. Ohio extension resources and local master gardener programs can help with identification if you are unsure.
For most home gardens, practical care gives the plant a real chance to finish the season well. That includes removing problem leaves, mulching, base watering, and improving airflow.
Stay observant, stay consistent, and keep picking. A plant that is being actively cared for has a much better chance of making it to a full and satisfying harvest.