Why Tomato Leaves Turn Yellow In California And How To Fix It Fast
Yellow tomato leaves can make a healthy-looking plant feel like a mystery overnight. One day the vine is pushing new growth, and the next the lower leaves start fading.
For California gardeners, the cause can be as simple as uneven watering or as sneaky as a nutrient problem hiding in the soil.
Heat can make the clues harder to read because stressed plants often show several symptoms at once.
The important thing is to notice where the yellowing starts. Lower leaves tell a different story than pale new growth near the top.
A fast fix begins with reading those signs before guessing. Check the soil, look at the pattern, and avoid making too many changes at once.
Once you know what the plant is asking for, your tomato can get back to growing strong.
1. Uneven Watering Turns Tomato Leaves Yellow Fast

Watering tomatoes the wrong way is one of the fastest routes to yellow leaves, and it happens more often than most gardeners realize.
When plants get too little water one day and too much the next, the roots struggle to absorb nutrients properly.
That stress shows up quickly in the leaves, turning them yellow and droopy.
Temperatures in California can swing dramatically between morning and afternoon, making consistent watering even more important. Sandy soils drain fast and dry out quickly, while clay soils hold moisture too long.
Both extremes mess with how roots function and how nutrients reach the leaves.
The fix is easier than you might think. Water deeply and consistently, aiming for about one to two inches per week.
Use a drip irrigation system or soaker hose to deliver water directly to the root zone. Check soil moisture with your finger before watering. If the top inch feels dry, it’s time to water.
Mulching around the base of your plants with straw or wood chips helps hold moisture in the soil longer. A two- to three-inch layer of mulch can make a huge difference during hot, dry stretches.
Once you establish a steady watering routine, yellow leaves from uneven watering usually stop appearing within a week or two.
2. Overwatering Can Suffocate Tomato Roots

Too much of a good thing can be just as harmful as not enough, and water is no exception. Overwatered tomato plants develop yellow leaves because their roots are sitting in soggy soil with no oxygen reaching them.
Roots need air just as much as they need water to absorb nutrients properly.
Heavy clay soils common in many parts of California make overwatering even more likely. Water pools at the root zone instead of draining away, and the roots start to rot.
Once root rot sets in, the plant cannot pull up the nutrients it needs, and yellow leaves appear fast.
Spotting overwatering is usually straightforward. The soil feels wet and heavy even a few inches down.
Leaves may look yellow but also feel soft or slightly wilted. You might even notice a faint sour smell near the soil, which is a sign that roots are breaking down.
Your California Garden Changes Every Week. Your Plan Should Too.
Gardening in California changes quickly throughout the season. Every Friday you’ll receive a simple weekly plan showing exactly what to plant, prune, fertilize, harvest, and protect so you never miss the right timing.
Fix the problem by letting the soil dry out before watering again. If your soil drains poorly, work in compost or perlite to improve its structure.
Raised beds are a great option because they drain much better than in-ground beds. Make sure your containers or garden beds have proper drainage holes.
Once roots get air again, most plants bounce back within a week or so.
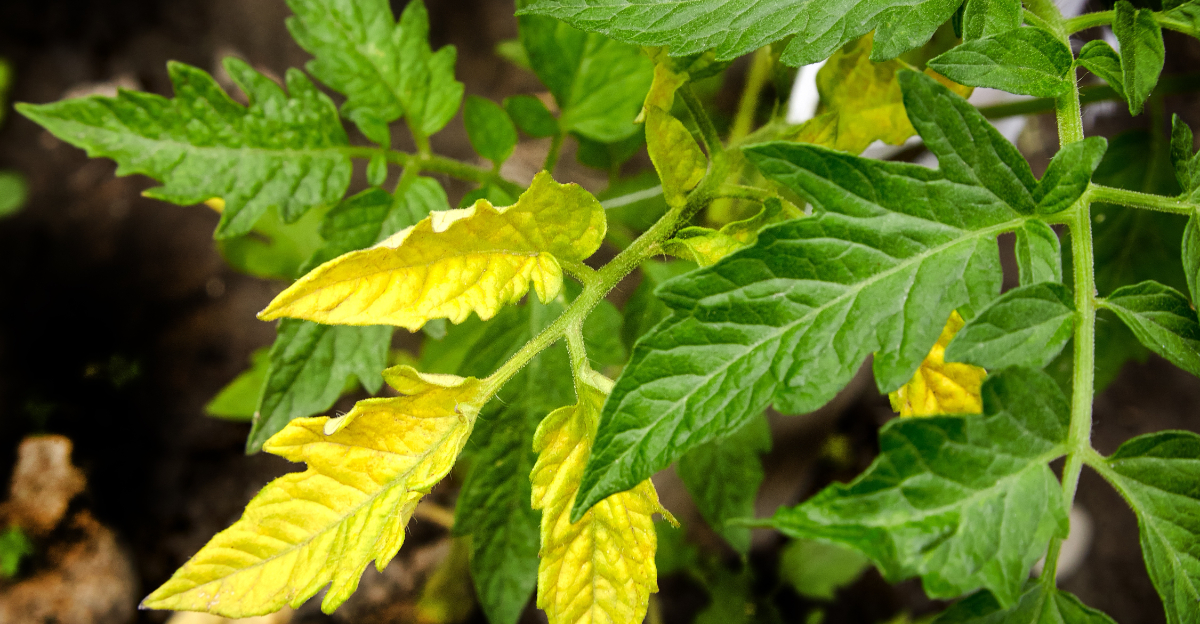
3. Nitrogen Deficiency Often Starts On Older Leaves

Nitrogen is the nutrient that keeps tomato plants green and growing strong. When the plant runs low on it, the oldest leaves at the bottom of the plant turn yellow first.
That’s because the plant pulls nitrogen from older leaves and sends it to newer growth at the top.
In California, nitrogen can wash out of sandy soils quickly, especially after heavy watering or rain. Fast-draining soils just don’t hold nutrients the way rich loam does.
If you haven’t fertilized in a while, nitrogen deficiency is likely the culprit behind your yellowing lower leaves.
The pattern is a key clue here. Yellowing that starts at the bottom and slowly moves upward almost always points to nitrogen.
The upper leaves usually stay green and healthy-looking while the lower ones fade to a pale, uniform yellow.
Fixing a nitrogen deficiency is quick and satisfying. Apply a balanced vegetable fertilizer or one with a higher first number, like a 10-5-5.
Fish emulsion and blood meal are great organic options that work fast. Always follow label directions to avoid over-fertilizing, which can scorch roots.
Side-dress the soil around your plants with compost to add slow-release nitrogen over time. Within a week of feeding, you should see new growth looking greener and healthier.
Keep a regular fertilizing schedule throughout the season to prevent the problem from coming back.
4. Potassium Problems Can Yellow And Burn Leaf Edges

When the edges of tomato leaves start turning yellow and then brown, potassium deficiency is often to blame.
Unlike nitrogen issues that start at the leaf center, potassium problems show up at the margins first.
The leaf edges look scorched, almost like they got too close to a flame.
Potassium plays a huge role in how tomato plants manage water, fight off stress, and move sugars through their stems.
Without enough of it, the whole plant becomes weaker and more vulnerable to heat and disease. In California’s hot growing season, that weakness shows up fast.
Soils that are very sandy or that have been heavily watered can lose potassium quickly. High-pH soils, which are common in many parts of California, can also lock up potassium so roots can’t absorb it even when it’s present in the soil.
A soil test is the smartest first step. It tells you exactly how much potassium your soil has and whether pH is blocking uptake.
You can buy simple soil test kits at most garden centers. If potassium is low, apply a fertilizer with a high third number, like a 5-5-10, or use greensand and kelp meal for an organic approach.
Keeping soil pH between 6.0 and 6.8 helps ensure nutrients stay available to roots. Fixing potassium issues usually takes a couple of weeks, but you’ll see new leaves come in healthy and strong.
5. Magnesium Deficiency Creates Yellowing Between The Veins

Here’s a pattern that really stands out once you know what to look for: the veins stay green while the tissue between them turns bright yellow.
That’s called interveinal chlorosis, and it’s the signature sign of magnesium deficiency. It usually appears on middle-aged leaves first, not the newest or oldest ones.
Magnesium is a central part of chlorophyll, the green pigment that lets plants turn sunlight into energy. Without enough of it, leaves lose their color in a very specific and recognizable way.
Magnesium can get pushed out of the soil by too much calcium or potassium, especially in heavily fertilized gardens.
Acidic soils and sandy soils also tend to run low on magnesium. If you’ve been adding a lot of lime or calcium-heavy fertilizers, that can make the problem worse by competing with magnesium uptake at the root level.
The fastest fix is a foliar spray made from Epsom salt, which is pure magnesium sulfate. Mix one tablespoon of Epsom salt in one gallon of water and spray it directly on the leaves.
Plants absorb it quickly through the leaf surface, and you can often see improvement within a few days.
For a longer-term solution, work Epsom salt into the soil around your plants at planting time. About one tablespoon per foot of plant height is a common recommendation.
A soil test can confirm magnesium levels and guide your next steps.
6. Spider Mites Leave Yellow Stippling On Hot Summer Leaves

Tiny, nearly invisible, and incredibly destructive, spider mites are one of the most frustrating pests tomato gardeners deal with during hot weather.
These microscopic insects feed on plant cells by piercing the leaf surface and sucking out the contents.
The result is a pattern of tiny yellow dots called stippling that covers the leaf like a fine spray of pale paint.
California’s hot, dry summers are perfect conditions for spider mite populations to explode. They reproduce incredibly fast in high temperatures and low humidity.
A small infestation can get out of control within just a week or two if you don’t catch it early.
Flip your tomato leaves over and look closely at the underside. Spider mites are so small you might need a magnifying glass.
Look for fine webbing stretched between the leaf veins, which is a clear sign the infestation is already serious.
Blast the leaves with a strong stream of water from your garden hose to knock mites off. Do this in the morning so leaves dry before evening.
Neem oil spray is very effective and safe for edible plants. Mix it according to label instructions and spray the entire plant, especially the undersides of leaves.
Repeat treatments every five to seven days until the mites are gone. Keeping plants well-watered and avoiding dusty conditions around the garden also helps prevent spider mite outbreaks during summer.
7. Whiteflies Can Spread Tomato Yellow Leaf Curl Virus

Few garden problems are as alarming as watching an entire tomato plant curl up and turn yellow almost overnight.
Tomato Yellow Leaf Curl Virus does exactly that, and it spreads through a tiny flying pest called the silverleaf whitefly.
These small white insects look harmless but carry one of the most damaging plant viruses around.
Whiteflies are especially common in California’s warmer growing regions, where mild winters allow populations to survive year-round. They gather on the underside of leaves and feed on plant sap.
As they move from plant to plant, they carry the virus with them and spread it quickly through a garden.
Infected plants show very specific symptoms. Leaves curl upward and inward, turn yellow around the edges, and the whole plant looks stunted and weak.
Fruit production slows or stops completely. Once a plant is infected with the virus, there is no cure for that individual plant.
The focus has to be on prevention and control. Use yellow sticky traps near your plants to catch whiteflies early before populations build up.
Reflective mulch on the soil surface confuses and deters them. Insecticidal soap spray applied to the undersides of leaves can knock back whitefly numbers quickly.
Planting virus-resistant tomato varieties is the most reliable long-term solution. Look for varieties labeled TYLCV-resistant at your local nursery.
Remove and bag any heavily infected plants to stop the virus from spreading further.
8. Early Blight Causes Yellow Leaves With Dark Spots

Not every yellow leaf problem is about nutrients or bugs. Early blight is a fungal disease that creates a very distinctive pattern: dark brown or black spots with yellow rings around them, almost like a target or bullseye.
It starts on the oldest, lowest leaves and works its way up the plant over time.
The fungus that causes early blight, called Alternaria solani, loves warm days and cool, moist nights. Coastal areas and valleys where morning fog is common are particularly prone to it.
Spores splash up from the soil onto lower leaves during watering or rain, and the infection spreads from there.
Crowded plants with poor airflow make things worse. When leaves stay wet for long periods, the fungus spreads faster.
Stressed or under-fertilized plants are also more vulnerable because they can’t fight off infection as well as healthy, well-fed ones.
Remove infected leaves as soon as you spot them and put them in the trash, not the compost pile. Compost doesn’t always get hot enough to break down fungal spores.
Apply a copper-based fungicide spray to slow the spread and protect healthy leaves above the infected zone.
Water at the base of the plant and avoid wetting the foliage. Stake your plants and prune lower leaves to improve airflow.
Rotating your tomato crops to a different garden bed each year also helps reduce the buildup of fungal spores in the soil over time.