7 Steps To Revive Heat-Damaged Tomatoes In Florida
Florida tomatoes and summer heat have a complicated relationship. The same state that grows tomatoes commercially at a massive scale can humble a backyard gardener fast once temperatures push past what the plant is built to handle.
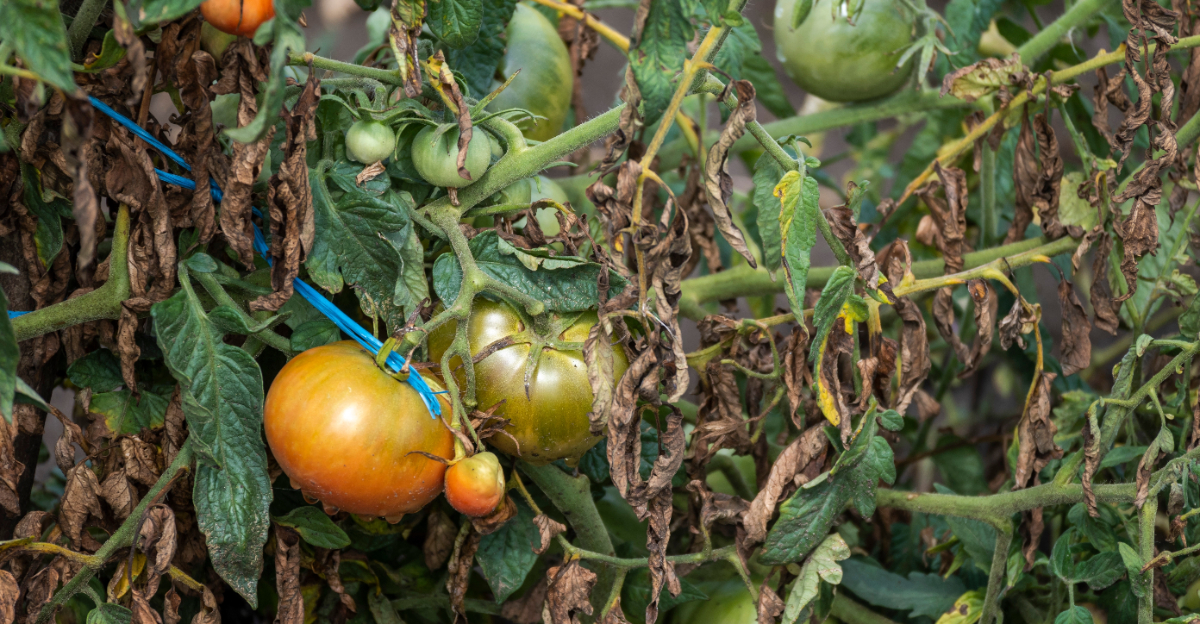
Blossom drop, scalded leaves, fruit that stops setting, a plant that looks alive but has essentially checked out until conditions improve. Heat damage on tomatoes is not always a death sentence.
Caught at the right stage, with the right approach, a plant that looks finished can come back and produce again before the season closes out.
Most gardeners either give up too early or throw water and fertilizer at a stressed plant and wonder why nothing improves.
Heat damaged tomatoes need something more specific than that, a step by step approach that addresses what the plant actually lost and gives it a real path back. Seven steps make that recovery process systematic and genuinely achievable.
1. Check Whether The Tomato Plant Can Still Recover

Before reaching for the hose or the pruning shears, take a slow look at what you are actually dealing with. A wilted tomato at midday does not always signal disaster.
Many plants perk back up once temperatures drop in the evening. That is a sign the roots are still working and the plant is managing stress rather than collapsing under it.
Start by checking the stems. Gently bend a few near the top.
Flexible, green stems suggest living tissue, even if the leaves look rough. Crispy older leaves near the bottom, blossom drop, and midday wilting are common heat responses, not automatic signs that recovery is impossible.
Look for any new growth at the tips, which is one of the clearest signs a plant is still pushing forward.
Check root-zone moisture next. Push your finger two to three inches into the soil.
Surface wetness can be misleading, especially in sandy soil or containers that dry out fast. Also look for pest damage or disease symptoms such as yellowing, spots, or fungal growth on leaves and stems.
Be honest with yourself here. A plant with collapsed stems, rotted roots, widespread disease, or severe pest damage may not be worth the effort to revive.
UF/IFAS Extension notes that tomatoes in this state often struggle once prolonged heat sets in, particularly past their productive window. Removing a failing plant and replanting in a better season can be the smarter, more productive choice.
2. Move Containers Out Of Brutal Afternoon Sun

A hot patio pot can become a real problem fast. Containers sitting on concrete driveways, pool decks, and sun-baked balconies absorb heat from multiple directions at once.
The pot heats from above through direct sun and from below through reflected heat off hard surfaces. Root-zone temperatures in small, dark containers can climb well above what even a summer-hardened tomato can handle.
Moving a container to a spot with morning sun and afternoon shade can reduce heat stress noticeably. Morning sun gives the plant the light it needs for growth while shading it during the hottest part of the day.
Your Florida Garden Changes Every Week. Your Plan Should Too.
Gardening in Florida changes quickly throughout the season. Every Friday you’ll receive a simple weekly plan showing exactly what to plant, prune, fertilize, harvest, and protect so you never miss the right timing.
Afternoon shade from a fence, wall, or tree can drop the temperature around the plant by a meaningful amount without cutting off enough light to stall photosynthesis.
Shade cloth rated at 30 to 40 percent can also help where moving the container is not practical. UF/IFAS Gardening Solutions notes that partial shade during peak afternoon hours can reduce heat stress on tomatoes in warm-season conditions.
Avoid deep shade, which weakens the plant further and reduces fruit production.
Pot color and size matter too. Dark containers absorb more heat than lighter ones.
Small pots dry out faster and heat up faster. If you are replanting after a failed heat season, choosing a larger, light-colored container can make a real difference.
For now, getting that hot pot out of the worst afternoon sun is one of the fastest ways to reduce stress on a struggling plant.
3. Water Deeply Before You Reach For Fertilizer

A dry root ball is one of the fastest ways to push a heat-stressed tomato over the edge. Sandy soil, which is common across much of this state, drains quickly and can feel moist at the surface while being completely dry a few inches down.
Raised beds and containers dry out even faster, especially during hot stretches with low humidity or strong afternoon winds.
Before adding any fertilizer, check whether the root zone actually has enough moisture. Press your finger two to three inches into the soil near the base of the plant.
If it feels dry at that depth, the plant needs water first, not nutrients. Fertilizer applied to a water-stressed plant with a struggling root system can make things worse by increasing salt concentration in the soil around the roots.
Water slowly and deeply when you do water. A slow, steady soak gives water time to move down through sandy soil and reach the root zone rather than running off the surface.
Drip irrigation or a slow-running hose at the base of the plant works better than overhead watering, which can promote fungal issues in this state’s humid conditions.
Avoid keeping the soil constantly soggy, which can lead to root rot, especially in containers with poor drainage. Follow local watering restrictions if they apply in your area.
Once the plant has adequate moisture and shows signs of stabilizing, you can revisit fertilizer decisions. Fixing water stress first gives every other recovery step a much better foundation to build on.
4. Mulch The Soil Before Roots Heat Up Again

Root protection often gets overlooked when Florida gardeners focus on what is happening above the soil. Bare soil in a summer garden can reach surface temperatures that would surprise most people.
In this state’s heat, exposed soil around tomato plants can get hot enough to stress shallow roots and speed up evaporation. That can make recovery harder even after watering and shading have been addressed.
Organic mulch, such as straw, pine needles, or wood chips, can help moderate soil temperature. Spread it two to three inches deep around the base of the plant to slow moisture loss.
UF/IFAS recommends mulching vegetable beds as part of a Florida-Friendly approach to managing heat and water efficiency. A consistent layer of mulch can make a measurable difference in how quickly the root zone dries out between waterings.
Keep mulch a few inches away from the main stem to allow airflow and reduce the risk of stem rot. Avoid piling mulch up against the base of the plant, especially in humid conditions where fungal issues are more likely.
Thick, wet mulch pressed against the stem can do more harm than help.
For container tomatoes, a thin layer of mulch on the soil surface can also help slow evaporation and moderate temperature swings inside the pot. Refresh mulch that has thinned out or decomposed.
Mulch alone will not revive a heat-damaged plant. But as part of a broader recovery plan that includes water management and shade, it gives the root zone a better environment to stabilize and recover.
5. Remove Crispy Leaves Without Stripping The Plant

Crispy lower leaves are one of the most visible signs of heat stress on a tomato plant, and the instinct to clean them off makes sense. Removing fully brown, withered, or diseased leaves can improve airflow around the plant and reduce the chance of fungal spread in humid conditions.
It also makes it easier to spot new growth, which is the clearest sign a plant is starting to recover.
Use clean, sharp pruning shears or scissors. Dirty tools can transfer disease between plants, which is a real concern when a plant is already stressed.
Wipe blades with rubbing alcohol or a diluted bleach solution between cuts, especially if you notice any signs of disease on the leaves you are removing.
Remove only what is clearly withered or fully damaged. Some leaves may look rough, with browning edges or a wilted appearance, but still provide shade to the fruit and stem below.
Stripping too much foliage at once can expose tomatoes to direct sun and cause sunscald, which shows up as pale, papery patches on the fruit surface.
UF/IFAS notes that fruit exposed to direct sun after sudden defoliation is more vulnerable to sunscald in warm-season conditions.
Avoid heavy pruning during the hottest part of the day or during a heat wave. Light, careful removal of clearly deceased material is the goal here, not a full reshape of the plant.
Let the plant keep as much working foliage as possible while you address the other recovery steps. Patience at this stage protects the plant from added stress.
6. Pause Heavy Feeding Until New Growth Returns

Reaching for fertilizer when a Florida tomato plant looks terrible is a natural reaction. More nutrients should mean a faster recovery, right?
Not always. A plant under serious heat and water stress often has a root system that is not functioning well enough to absorb or use fertilizer effectively.
Pushing nutrients onto a struggling plant at the wrong time can create more problems than it solves.
Heavy feeding during active stress can increase salt levels in the soil, which pulls moisture away from already dry roots. It can also stimulate weak, soft growth that wilts quickly and becomes more attractive to pests.
UF/IFAS Extension guidance on tomato production in this state emphasizes that fertilizer timing and soil moisture management work together. It also notes that applications during stress periods can be counterproductive.
Wait for clear signs of recovery before resuming regular feeding. New growth at the stem tips, firmer stems, and leaves that hold their position in the evening rather than wilting are good indicators that the root system is stabilizing.
At that point, a balanced fertilizer applied according to label directions can support continued recovery without overwhelming a plant that is still fragile.
Soil testing through your local Extension office can take the guesswork out of what your tomatoes actually need. Avoid applying fertilizer to dry soil.
Water first, then feed after the root zone has adequate moisture. Skipping a week or two of feeding while you focus on water, shade, and mulch is not going to set the plant back further.
Patience here is a practical strategy, not a passive one.
7. Watch For Pests That Exploit Heat-Stressed Tomatoes

A plant under heat stress is a plant with its defenses down. Whiteflies, aphids, spider mites, stink bugs, and hornworms are among the pests that show up regularly on tomatoes in this state.
A stressed plant is less able to tolerate their feeding. Some pest damage can also look a lot like heat stress, with yellowing, wilting, stippled leaves, and distorted new growth that can be easy to misread.
Check the undersides of leaves carefully. Spider mites leave fine webbing and a dusty, stippled appearance on leaf surfaces.
Whiteflies cluster on leaf undersides and fly up in a small cloud when disturbed. Aphids gather in groups on new growth and leave behind a sticky residue that can lead to sooty mold.
Stink bugs and their feeding damage often show up on fruit as cloudy spots or hard, pithy areas beneath the skin.
Start with the least disruptive approach. Removing pests by hand works for hornworms, which are large and easy to spot.
A firm spray of water directed at the undersides of leaves can knock back aphid and whitefly populations without chemicals. UF/IFAS Extension offers pest management resources specific to tomatoes in this state, including guidance on when and how to use targeted controls responsibly.
Broad pesticide sprays applied without identifying the actual pest can harm beneficial insects that help control pest populations naturally. Reducing heat and water stress first makes the plant more resilient and less appealing to opportunistic pests.
Monitor consistently, act specifically, and avoid making pest management more complicated than the situation requires.