How Ohio Gardeners Grow Garlic That Stores Well Past Harvest
A single garlic clove goes into the ground in October, disappears under a blanket of straw, and spends the entire winter doing something remarkable underground before you ever see a green shoot.
By July, you are pulling up bulbs that smell sharper, taste bolder, and outlast anything sitting on a grocery store shelf.
Many people assume that kind of garlic comes from a specialty farm or a farmers market with a very long story attached to it.
It does not.
It comes from backyards across Ohio where gardeners figured out a handful of things that make all the difference between garlic that lasts two weeks and garlic that lasts until the following spring.
The variety matters. The planting depth matters. The curing process matters more than almost anything else.
None of it is complicated, but most of it is counterintuitive enough that skipping even one step tends to show up months later when you reach for a bulb and find something soft where something firm should be.
The good news is that once you get this right, you get it right every year.
1. Choose Hardneck Garlic For Ohio Winters

Not all garlic is built for a cold Ohio winter, and choosing the wrong type is one of the most common mistakes new growers make.
Hardneck varieties are the clear winner for Ohio conditions, and consistent guidance for Midwest gardeners supports this without much debate.
Rocambole, Purple Stripe, and Porcelain types all thrive where temperatures dip hard and stay low for months.
Hardneck garlic grows a central woody stalk, which gives it extra cold tolerance compared to softneck types.
Softneck garlic is better suited to milder climates like California. In Ohio, softneck bulbs can struggle to develop properly and may fail to size up before harvest.
Beyond cold hardiness, hardneck varieties offer a flavor payoff that is worth every bit of extra attention.
Rocambole types are famously rich and complex, almost nutty with a gentle heat that lingers. Purple Stripe varieties hold their flavor longer in storage, making them a smart pick for bulbs you want lasting deep into winter.
Local seed garlic from Ohio farms or regional suppliers gives you an extra edge.
Seed garlic already adapted to your climate tends to perform better than bulbs shipped from far away. Check with a nearby farmers market or native plant sale to find trusted sources.
Starting with the right variety sets the entire season up for success, and it is the one decision that influences every step that follows from planting to pantry.
2. Plant Cloves Before The Ground Freezes

Timing is everything with garlic, and Ohio gives you a narrow but reliable window each fall.
The goal is to get cloves into the ground after the heat of summer has fully passed but well before the soil locks up with frost.
Late October through mid-November hits that sweet spot for most of Ohio, though southern counties can sometimes stretch planting into late November.
Planting too early is a real risk.
Your Ohio Garden Changes Every Week. Your Plan Should Too.
Gardening in Ohio changes quickly throughout the season. Every Friday you’ll receive a simple weekly plan showing exactly what to plant, prune, fertilize, harvest, and protect so you never miss the right timing.
Warm soil encourages too much top growth before winter, which can weaken the plant when cold finally arrives. You want roots to establish and just a tiny bit of green to push up, not a lush leafy shoot that gets hammered by a freeze.
Planting too late carries its own problems.
Cloves that go into near-frozen ground never get the root development they need to survive and size up properly in spring.
A clove with no roots heading into winter is gambling against Ohio weather, and Ohio weather rarely loses that bet.
Watch your local forecast and soil temperature rather than the calendar alone.
A soil thermometer is a cheap and genuinely useful tool. When ground temperatures drop into the 50s Fahrenheit and are trending lower, you are right in the planting zone.
Most Ohio gardeners find that timing their planting around the first expected frost works well as a practical rule of thumb.
Mark your calendar, prep your bed, and get those cloves in the ground before the season slips away.
3. Set Each Clove The Right Way

Orientation matters more than many people expect.
Every garlic clove has a flat bottom called the basal plate, where the roots will emerge, and a pointed tip at the top, where the shoot pushes up toward sunlight.
Plant them upside down and the bulb wastes precious energy trying to correct itself underground. Some cloves never fully recover from a bad start.
Press each clove into the soil with the basal plate down and the pointed tip aiming straight up.
Aim for a planting depth of about two inches from the top of the clove to the soil surface. Deeper planting, around three inches, works well in areas with harsh freeze-thaw cycles, which Ohio certainly delivers in abundance.
Spacing deserves just as much attention as depth.
Cloves planted too close together compete for nutrients and moisture, and the bulbs end up small and disappointing at harvest. Give each clove six inches of space within the row, and set rows about twelve inches apart.
That spacing allows enough airflow as the plants mature, which helps reduce fungal problems that Ohio’s humid summers can encourage.
Use only the largest, firmest cloves from your seed garlic for planting.
Smaller cloves produce smaller bulbs, almost without exception. Save the smaller ones for cooking and put your best cloves back into the ground.
Breaking apart the bulb should happen as close to planting day as possible, because exposed cloves dry out faster than you might expect.
4. Mulch Beds Before Winter Settles In

After the cloves are in the ground, mulch is your most important tool until spring.
A good layer of mulch acts like a blanket for the soil, smoothing out the wild temperature swings that Ohio winters love to throw at gardens. Freeze-thaw cycles are brutal on newly planted cloves, and mulch keeps that chaos to a minimum.
Straw is the go-to choice for most Ohio garlic growers, and for good reason.
It insulates well, allows moisture to move through rather than pooling, and breaks down slowly enough to protect the bed all winter long.
Shredded leaves work well too and are often free if you have trees in your yard. Avoid thick matted leaf piles that pack down tight and hold too much water against the soil surface.
Apply three to four inches of mulch after planting.
You want enough depth to buffer temperature swings without smothering the emerging shoots entirely. In very cold northern Ohio counties, some gardeners push that layer closer to six inches for extra protection.
A little garlic green poking through the mulch in early spring is one of the most satisfying sights in the garden calendar.
Mulch also helps conserve soil moisture during dry spells in late winter and early spring, when garlic roots are actively growing even though the surface looks quiet.
Removing mulch in spring should happen gradually as temperatures rise, not all at once. Pull it back a bit at a time so the soil warms steadily and the plants transition smoothly into their active growing season.
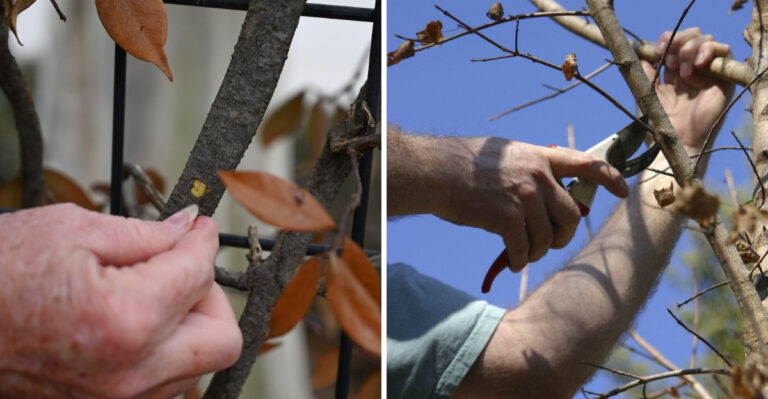
5. Cut Scapes For Bigger Bulbs

Around late May or early June, hardneck garlic sends up a curling green stalk called a scape.
It is the plant’s way of trying to flower and set seed, but letting it go unchecked comes at a cost. Energy that should be building the underground bulb gets redirected upward into that flower stalk instead.
Cutting scapes at the right moment is one of the simplest things you can do to boost bulb size.
Snap or snip them off when the scape has made one full curl but before it straightens back out. At that stage the cut is clean, the plant redirects its energy fast, and bulb development gets a noticeable boost heading into the final weeks of the season.
Do not toss those scapes in the compost bin without tasting them first.
Garlic scapes are genuinely delicious, with a milder flavor than the bulb and a satisfying crunch when fresh. Chop them into stir-fries, blend them into pesto, or grill them whole with a drizzle of olive oil.
They are a short-season treat that garlic growers get to enjoy while everyone else is still waiting for bulbs.
Missing the scape window is easy to do if you are not checking the garden regularly in late spring.
Set a reminder on your phone if needed, because scapes that flower and go to seed can noticeably reduce bulb size.
One quick cut at the right moment is worth far more effort than it takes.
6. Harvest When Lower Leaves Brown

Reading your garlic plants correctly at harvest time is a skill that pays off directly in storage quality. Each leaf on a garlic plant corresponds to a wrapper layer around the bulb underground.
When leaves brown from the bottom up, those outer wrappers are maturing and tightening around the bulb, creating the protective skin that helps garlic last in storage.
Harvest when the lower three or four leaves have browned while the upper leaves are still green.
That balance means the bulb is fully sized but still wrapped in enough intact layers to protect it through curing and storage.
Wait too long and the wrappers deteriorate in the soil, leaving bulbs vulnerable to mold and rot.
Early July is typically harvest time for most Ohio garlic, though the exact date shifts with the weather each season.
A dry spring can push harvest earlier. A cool wet spring might delay it.
Rather than chasing a date on the calendar, watch the plants themselves and let their foliage be your guide.
Loosen the soil with a fork or spade before pulling, rather than yanking plants straight up.
Pulling too hard can snap the neck of the bulb right where it connects to the stalk, which shortens storage life significantly.
Ease each plant out gently, shake off loose soil, and set the bulbs aside carefully. Rough handling at harvest creates small wounds that invite problems during curing, and curing is where the real work of long storage begins.
7. Cure Bulbs In A Dry Airy Spot

Curing is where long storage life is actually earned.
Freshly pulled garlic still carries moisture inside the neck and outer wrappers, and that moisture needs to escape slowly before the bulbs go into storage.
Rush this step and you are setting yourself up for soft, moldy bulbs within weeks of harvest.
Hang garlic in bundles of eight to ten plants or lay them in single layers on wire racks.
The key requirements are shade, warmth, and steady airflow. Direct sunlight can bleach the wrappers and heat the bulbs unevenly, so a covered porch, a well-ventilated garage, or a shaded barn works perfectly.
Avoid anywhere that traps humidity, because moisture is the enemy of a long cure.
Plan on three to six weeks of curing time.
Hardneck varieties generally cure faster than softneck types, but do not rush the clock. The neck of the plant should feel completely dry and papery before you consider the cure finished.
Squeeze the neck gently near the bulb top. If there is any softness or give, it needs more time. A properly cured neck snaps rather than bends.
Good airflow matters more than most gardeners initially realize.
Stagnant air around damp bulbs is a recipe for mold to take hold quickly. A small fan on a low setting can help tremendously in humid Ohio summers when natural airflow is not enough.
Check your bulbs every few days during curing and remove any that show signs of softness before they affect the ones stored nearby.
8. Store Only Firm Clean Bulbs

Once curing wraps up, the sorting process begins, and being selective here protects everything you worked so hard to grow.
Not every bulb that comes out of the ground will make it to long-term storage, and that is perfectly normal.
Soft spots, cracked wrappers, or any sign of mold means a bulb goes straight to the kitchen rather than the storage shelf.
Trim the roots close to the base of each bulb using clean scissors or pruners.
Cut the stalk down to about an inch above the bulb for hardneck types.
Brush off any remaining loose dirt gently with your hands or a soft brush. Do not wash bulbs before storage, because moisture on the skin invites exactly the kind of breakdown you are trying to prevent.
Cool, dark, and dry describes the ideal storage environment.
A basement corner, an unheated closet, or a root cellar all work well if humidity stays low. Mesh bags, paper bags, or open wooden crates allow air to circulate around the bulbs.
Plastic bags trap moisture and speed up spoilage faster than almost anything else, so keep garlic far away from sealed plastic.
Hardneck varieties stored properly typically last four to seven months past harvest, which carries most Ohio households well into late winter or early spring.
Check your stored bulbs every couple of weeks and pull any that are softening before they spread problems to neighbors.
One rule worth remembering: if the neck is dry, the bulb is ready to store and ready to last.